For oil filters, always turn clockwise to tighten and counter-clockwise to loosen. This universal “righty tighty, lefty loosey” rule applies to nearly all threaded components, preventing incorrect installation and potential leaks. Following this simple principle, along with proper torque, ensures a secure and leak-free fit every time.
Ever found yourself under your car, oil pan draining, new filter in hand, and suddenly paused? You’re staring at that old, crusty oil filter, and a little voice in your head asks, “Wait, which way do I turn oil filter to get it off?” Or, worse, “Which way do I turn oil filter to put the new one on without stripping it or making a huge mess?” If you’ve been there, you’re definitely not alone. It’s a common moment of doubt for many DIY mechanics, myself included!
Good news! The general rule for most oil filters, both for removal and installation, is simpler than you might think. Think ‘righty-tighty, lefty-loosey.’ Yes, that classic phrase you learned for screws and bolts usually applies here too. Let’s dig deeper and banish that oil filter confusion for good!
So, Which Way Do You *Really* Turn an Oil Filter, and How Can You Be Sure Every Time?
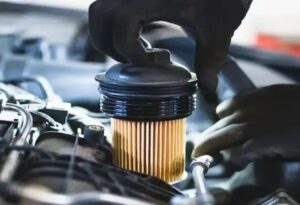
The simplest answer, and one that applies to the vast majority of oil filters you’ll encounter, is the familiar adage: righty-tighty, lefty-loosey. This means to remove your old oil filter, you’ll turn it counter-clockwise, or lefty-loosey. I remember my first time changing an oil filter; it was stuck! I was yanking and pulling, unsure if I was even turning it the right way. That’s when I learned the magic of a good oil filter wrench. Sometimes, they’re on there pretty tight, especially if the previous person overtightened it or didn’t lube the gasket, making it tricky to know which way to turn oil filter without the right tool.
For installing your new oil filter, it’s the opposite: righty-tighty. But here’s where expertise comes in. You don’t just crank it on! Over-tightening is a common mistake that can make the next change a nightmare, or even damage the filter housing. I once over-tightened an oil filter so much that I thought I’d never get it off the next time. Lesson learned! The key is to hand-tighten the new filter until the rubber gasket makes contact with the engine block. You’ll feel it snug up. Then, give it an additional three-quarters to one full turn with your filter wrench. This usually provides enough sealing pressure without going overboard. Always check your car’s service manual or the instructions on the new filter box; they often have specific torque specs or turn recommendations, which really helps when you’re uncertain which way to turn oil filter.
Before you screw on the new one, put a thin film of clean engine oil on the rubber gasket of the new oil filter. This helps it seal properly and makes it easier to remove next time. Also, make sure the old gasket didn’t stick to the engine block – that’s another common source of leaks I’ve personally run into! Always wipe the mating surface clean. Knowing these little tricks makes all the difference when tackling an oil change, especially understanding which way to turn oil filter correctly.
This ‘righty-tighty, lefty-loosey’ rule applies to most common spin-on oil filters. If your car uses a cartridge-style filter (where you replace just the filter element inside a housing), you’ll typically unscrew a cap. That cap almost always follows the same left-to-loosen, right-to-tighten rule. Look for arrows on the housing itself, just in case, but they usually spin off counter-clockwise.
So there you have it! No more head-scratching moments under the hood when you’re wondering which way to turn oil filter. With a little knowledge, the right tools, and careful attention, you’ll be changing your oil filter like a pro. Keep those oil changes regular, and your engine will thank you!