Correctly tightening your oil filter is critical to prevent leaks and safeguard your engine’s performance. Always hand-tighten until snug, then apply the manufacturer-specified additional turn (typically 1/2 to 3/4) to achieve a secure, leak-free seal, avoiding costly damage from overtightening or looseness.
How to Tighten Oil Filter Correctly and Prevent Leaks
Ever changed your oil filter yourself and then wondered, “Did I tighten this thing enough?” Or worse, “Did I tighten it *too much*?” It’s a super common concern, and believe me, I’ve been there! The good news is, learning how to tighten an oil filter correctly isn’t rocket science, but it does require a specific touch. The key is to get it snug enough to prevent leaks without making it a nightmare to remove next time or, even worse, damaging your engine’s oil system. Most of the time, it’s about getting it hand-tight and then giving it just a little extra twist – no superhero strength needed!
The Core Question: How Do I Correctly Tighten My Oil Filter Without Causing Leaks or Damage?
Okay, let’s dive into the nitty-gritty of how to tighten your oil filter like a pro. This isn’t just about preventing a messy driveway; it’s about protecting your engine. An improperly tightened filter can lead to oil leaks, which can damage your engine over time, or even cause a dangerous situation if oil splashes onto hot components.
Here’s the deal: most oil filter manufacturers recommend tightening the filter by hand until the gasket makes contact, and then giving it an additional 1/4 to 1/2 turn. Forget that wrench for tightening, usually! Your hands are the best torque wrench here.
Let me walk you through the process, based on years of turning wrenches in my garage:
Step-by-Step for a Perfect Seal:
- Clean the Surface: Before anything else, make sure the engine’s mounting surface where the oil filter screws on is spotlessly clean. No old gasket bits, no dirt, no crud. I once skipped this, and guess what? A tiny leak! Lesson learned.
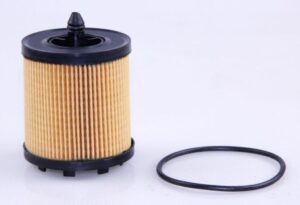
- Lubricate the Gasket: This is a crucial step often overlooked. Take a tiny bit of fresh engine oil on your finger and lightly coat the rubber gasket (O-ring) on your new oil filter. This lubrication helps the gasket compress and seal properly without tearing or sticking. It also makes it easier to remove next time.
- Thread it On By Hand: Carefully screw the new oil filter onto the engine by hand. Make sure it threads on smoothly. If you feel any resistance or it seems to bind, stop! You might be cross-threading it. Unscrew, realign, and try again. This should feel easy, like screwing a lightbulb into a socket.
- Hand-Tight Until Contact: Continue turning the oil filter by hand until the rubber gasket makes firm contact with the engine’s mounting surface. You’ll feel a definite resistance as the gasket starts to compress. This is what we call “hand-tight.”
- The “Extra Snug” Turn: Now, for the critical part. From that point of firm contact (hand-tight), give the filter an additional 1/4 to 1/2 turn. Do not overdo this. This is where people often go wrong. It’s a gentle snug, not a death grip. Many filters even have markings on them that you can use to visually gauge this 1/4 or 1/2 turn from the initial contact point. I often make a mark with a marker on the filter lining up with a point on the engine block, then turn it to see the rotation.
- Resist the Wrench for Tightening: Unless your manufacturer specifically states otherwise (which is rare), you generally *don’t* need an oil filter wrench for tightening. Those wrenches are mostly for helping you *remove* a stubborn, old filter. Using one to tighten can easily lead to over-tightening. My mechanic friend used to tell me, “Your hands are calibrated for this, not that wrench!”
Common Mistakes to Avoid:
- Over-tightening: This is the most common issue when learning how to tighten an oil filter. It can damage the filter, crush the gasket, strip the threads on your engine block, or make the filter nearly impossible to remove next time, often requiring special (and sometimes destructive) tools.
- Under-tightening: The opposite problem! If it’s too loose, oil will seep out, creating a mess and potentially a dangerous situation. Always check for leaks immediately after.
- Forgetting to Lubricate the Gasket: A dry gasket can tear, leading to leaks, or stick to the engine, making removal a pain.
- Leaving the Old Gasket On: Seriously, double-check! Sometimes the old gasket gets stuck to the engine block. If you screw on a new filter with a new gasket on top of the old one, you’ll have a massive leak. Always confirm the old one came off with the old filter.
The Final Check:
Once your new oil filter is on and tightened correctly, refill your engine oil. Start the engine and let it run for a couple of minutes while watching for any drips or leaks around the filter. Turn the engine off, wait a few minutes for the oil to settle, and then check your oil level again. Sometimes, I’ll even slide a piece of clean cardboard under the car for a few hours just for extra peace of mind, especially after I’ve figured out how to tighten an oil filter correctly for the first time on a new car.
Tightening an oil filter isn’t a race; it’s a careful process. Trust your hands, follow these steps, and you’ll get that perfect, leak-free seal every time. You’ve got this!