Easily troubleshoot engine misfires and poor performance by learning how to quickly check your spark plug wires. Simple visual inspections for damage, resistance tests with a multimeter, and even basic engine running tests can pinpoint faulty wires. This straightforward diagnostic process is crucial for maintaining optimal engine health and restoring smooth vehicle operation.
Hey there, fellow car enthusiast! Ever been driving along, minding your own business, when suddenly your car starts acting up? Maybe it’s sputtering, struggling to accelerate, or just feeling a bit “off”? It’s a frustrating experience, I know. That dreaded engine misfire can really throw a wrench in your day, making you wonder if you’re facing an expensive trip to the mechanic.
Before you panic, let’s talk about one common culprit that’s often overlooked: your spark plug wires. These unsung heroes are crucial for your engine’s smooth operation, delivering the vital spark that ignites the fuel-air mixture. When they start to go bad, your car will definitely let you know. The good news is that learning how to check spark plug wires is a straightforward process that many DIYers can tackle at home, potentially saving you a chunk of change.
This guide is designed to walk you through everything you need to know, just like I’d explain it to a friend. We’ll cover the symptoms, the tools, and the step-by-step methods to inspect and test these wires. By the end, you’ll feel confident in your ability to diagnose potential issues and perform some basic maintenance on your car. So, let’s roll up our sleeves and dive into how to check spark plug wires with ease!
Key Takeaways
- Prioritize Safety: Disconnect the battery before any inspection.
- Perform Visual Check: Look for cracks, burns, or frayed insulation.
- Conduct Wiggle Test: Gently move wires to detect loose connections.
- Listen for Arcing: Dark conditions reveal sparks from faulty wires.
- Use Resistance Test: A multimeter confirms wire integrity easily.
- Check Each Wire: Isolate issues by testing them individually.
- Recognize Symptoms: Misfires or rough idle often indicate bad wires.
📑 Table of Contents
Understanding Spark Plug Wires: The Lifeline of Your Ignition
Before we jump into the “how-to,” it’s helpful to understand what these wires actually do and why they’re so important. Think of them as tiny, insulated electrical highways.
What Do Spark Plug Wires Do?
Spark plug wires, often called ignition wires, have one primary job: to transmit high-voltage electricity from the ignition coil (or distributor, in older cars) to the spark plugs. This electricity creates the spark needed to ignite the fuel in your engine’s cylinders. If this connection is weak or broken, the spark plug won’t fire correctly, leading to big problems.
Common Symptoms of Bad Spark Plug Wires
Your car is pretty good at telling you when something’s wrong. Here are some tell-tale signs that it might be time to learn how to check spark plug wires:
- Engine Misfires or Rough Idle: This is the most common symptom. Your engine might shake or “stumble” at idle or under acceleration.
- Reduced Fuel Economy: A misfiring engine isn’t burning fuel efficiently, meaning you’ll be visiting the gas station more often.
- Check Engine Light: A flashing or solid check engine light often accompanies a misfire, and diagnostic codes (like P0301-P0308) will point to specific cylinder misfires.
- Hesitation or Lack of Power: Your car might feel sluggish when you press the accelerator.
- Starting Difficulties: While not as common, extremely bad wires can make your car hard to start.
- Visible Arcing (at night): In very dark conditions, you might actually see small blue sparks jumping from damaged wires to ground. This is a clear sign to immediately check spark plug wires.
Why Do Spark Plug Wires Go Bad?
Spark plug wires are tough, but not invincible. They’re constantly subjected to extreme heat from the engine, vibrations, and general wear and tear over time. The insulation can crack or become brittle, the conductor inside can degrade, or the terminals can corrode. Sometimes, even curious critters like rodents might chew on them. Understanding these failure modes helps you know what to look for when you check spark plug wires.
Safety First: Preparing for Your Inspection
Before you even think about touching anything under the hood, safety must be your absolute top priority. We’re dealing with electricity and moving parts, so let’s be smart about it.
Essential Safety Precautions
- Engine Off and Cool: Never work on a hot engine. Let your car sit for at least an hour or two after driving to ensure everything is cool to the touch. Hot components can cause severe burns.
- Disconnect the Battery: To prevent any accidental shocks or short circuits, always disconnect the negative terminal of your car’s battery. A wrench is usually all you need.
- Wear Protective Gear: Safety glasses will protect your eyes from debris, and work gloves can protect your hands from scrapes and heat.
- No Jewelry: Remove rings, watches, and bracelets. They can get caught in moving parts or conduct electricity.
- Proper Ventilation: If you’re working in a garage, make sure there’s good airflow.
Tools You’ll Need
Having the right tools makes any job easier. Here’s what you’ll want on hand to effectively check spark plug wires:
- Multimeter: An essential tool for electrical testing. Make sure it has an Ohm (Ω) setting.
- Spark Plug Wire Puller: This specialized tool helps you grip the spark plug boots and prevent damage when removing them. You can sometimes get by without one, but it’s highly recommended.
- Dielectric Grease: Useful for lubricating new wires during installation and protecting connections.
- Rags or Shop Towels: For cleaning and wiping.
- Flashlight or Headlamp: Engine bays can be dark, and you’ll need to see clearly.
- Clean Cloth or Brush: To clean around the spark plug area before removal.
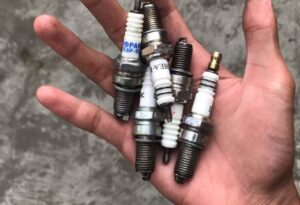
Visual Inspection: The First Line of Defense
Often, the simplest checks can reveal the biggest problems. A thorough visual inspection is your first step when you’re trying to figure out how to check spark plug wires.
Starting with the Basics
Pop the hood and locate your spark plug wires. They’re usually thick, insulated cables leading from the coil pack (or distributor) to each spark plug on the engine. On some modern vehicles, the coil packs sit directly on top of the spark plugs, and you’ll only see short boots, not long wires. This guide primarily focuses on vehicles with traditional spark plug wires.
What to Look For
Carefully examine each wire from end to end. Be systematic and thorough.
- Cracks, Fraying, or Abrasions: Look for any signs of physical damage to the outer insulation. Cracks can allow electricity to escape (arc) before reaching the spark plug.
- Burn Marks or Melting: Wires routed too close to hot exhaust manifolds or other engine components can melt or burn.
- Corrosion at Terminals: Check the metal terminals inside the boots (both at the spark plug end and the coil/distributor end) for any green or white corrosion. This can impede electrical flow.
- Rodent Damage: Small chew marks are a clear indicator of uninvited guests.
- Secure Connections: Ensure the boots are firmly seated on both the spark plugs and the coil pack/distributor. A loose connection can cause a misfire.
The “Wiggle Test”
Gently try to twist and wiggle each wire at both ends. They should feel snug and not easily pull off. If a wire feels loose or comes off with minimal effort, it’s a red flag. Be careful not to pull hard on the wire itself; always grip the boot. This simple test is a quick way to check spark plug wires for basic connection issues.
Don’t Forget the Coil Pack/Distributor Cap
While you’re inspecting the wires, also take a moment to look at the points where they connect to the ignition coil or distributor cap. Check for cracks on the coil pack or distributor cap itself, and ensure the wire terminals are clean and securely seated. Sometimes, the problem isn’t the wire, but where it connects.
Electrical Testing: How to Check Spark Plug Wires with a Multimeter
A visual inspection is great, but sometimes wires look perfectly fine on the outside while being faulty on the inside. That’s where your multimeter comes in. This is the definitive method for how to check spark plug wires for internal resistance.
Understanding Resistance
Spark plug wires are designed to have a specific amount of electrical resistance. This resistance helps suppress radio frequency interference and ensures a clean spark. However, if the resistance is too high, it chokes the flow of electricity, leading to a weak spark or no spark at all. If the resistance is zero or extremely low, it means the wire is likely shorted internally. Both extremes are bad.
Setting Up Your Multimeter
Set your multimeter to the Ohm (Ω) setting. If your multimeter is manual ranging, start with a high range (e.g., 20k or 20,000 ohms) and adjust down if needed. Auto-ranging multimeters will handle this for you.
Step-by-Step Testing Process
You’ll test one wire at a time. This is critical to avoid mixing up the firing order, which can cause severe engine damage.
- Remove One Wire: Start with cylinder #1. Using your spark plug wire puller (or a gentle, firm grip on the boot), carefully remove the wire from the spark plug and then from the coil pack/distributor. Remember which end goes where!
- Clean Terminals: Briefly inspect and clean any visible corrosion from the metal terminals on both ends of the wire.
- Connect Multimeter Probes: Insert one multimeter probe into one end of the spark plug wire boot and the other probe into the opposite end’s boot. Ensure good metal-to-metal contact with the internal terminals.
- Read the Display: Observe the reading on your multimeter. This is the electrical resistance of the wire in Ohms.
- Repeat for All Wires: Reinstall the first wire securely before moving on to the next one. Test each wire individually. This is a crucial part of knowing how to check spark plug wires properly.
Interpreting the Results
What’s a “good” reading? It varies by manufacturer, but generally, spark plug wires have resistance in the thousands of Ohms (kΩ). A common guideline is that resistance should be between 3,000 and 15,000 Ohms per foot of wire. Longer wires will have higher resistance. Consult your vehicle’s service manual for exact specifications, but here’s a general guide:
| Wire Length (Inches) | Typical Resistance Range (Ohms) |
|---|---|
| 12 – 18 | 5,000 – 10,000 |
| 18 – 24 | 8,000 – 15,000 |
| 24 – 36 | 10,000 – 20,000 |
| 36+ | 15,000 – 25,000+ |
- Good Reading: The resistance is within the manufacturer’s specifications or the general range for its length. Also, all wires in the set should have relatively similar readings, proportionate to their length.
- Bad Reading (Too High): If a wire shows significantly higher resistance than others of similar length, or if it reads “OL” (Over Limit) or “infinity” (meaning an open circuit), that wire is faulty and needs replacement. This indicates a break in the internal conductor.
- Bad Reading (Too Low or Zero): A reading of zero or very low resistance might indicate an internal short. This is also a faulty wire.
Comparing readings between wires of similar length is often more helpful than relying on absolute numbers alone. A wire that sticks out from the rest is likely the culprit when you check spark plug wires.
What to Do After Checking: Next Steps and Maintenance
Once you’ve completed your inspections and electrical tests, you’ll have a clear picture of the health of your spark plug wires. Now, what’s next?
When to Replace Spark Plug Wires
You should replace any spark plug wire that:
- Shows visible signs of damage (cracks, burns, fraying).
- Has significantly higher or lower electrical resistance compared to other wires of similar length.
- Causes a misfire that disappears when you swap it with another wire.
It’s often recommended to replace spark plug wires as a complete set, even if only one or two appear faulty. This is because they wear out at similar rates, and if one has failed, others are likely not far behind. Plus, replacing the set ensures consistent performance across all cylinders. This is a common practice when you effectively check spark plug wires and find a problem.
Tips for Proper Replacement
- Replace One at a Time: To avoid mixing up the firing order, remove and replace wires one by one.
- Apply Dielectric Grease: A small amount of dielectric grease inside the boots (both ends) will help seal out moisture, prevent corrosion, and make future removal easier.
- Proper Routing: Make sure the new wires are routed exactly as the old ones were, keeping them away from hot components and moving parts.
- Ensure Secure Connections: Push the boots firmly onto the spark plugs and coil pack/distributor until you feel or hear a “click” indicating they’re fully seated.
Preventative Maintenance
Regular inspection is key. Every time you change your spark plugs (typically every 30,000-100,000 miles, depending on your vehicle), take a few extra minutes to visually check spark plug wires. Keep your engine bay clean to reduce the risk of rodent damage or debris buildup. This proactive approach will help you catch problems early and keep your engine running smoothly for years to come.
Conclusion
See? Learning how to check spark plug wires isn’t nearly as intimidating as it might seem. With a little patience, a few basic tools, and a commitment to safety, you can confidently diagnose a common cause of engine performance issues. By understanding the symptoms, performing visual inspections, and conducting electrical tests with a multimeter, you’ve gained valuable knowledge that empowers you to keep your vehicle running its best.
The satisfaction of troubleshooting and fixing a problem yourself is truly rewarding. So, the next time your engine starts acting peculiar, remember these steps. You’re now equipped with the know-how to tackle those spark plug wire woes head-on. Happy wrenching, and here’s to many more miles of smooth driving!
Frequently Asked Questions
Why do I need to check my spark plug wires?
Checking your spark plug wires is crucial because they deliver the high voltage necessary for the spark plugs to ignite the fuel-air mixture. Faulty wires can lead to engine misfires, rough idling, reduced fuel economy, and overall poor engine performance. Regular inspection helps maintain your engine’s efficiency and prevent more significant issues.
What are the common signs of bad spark plug wires?
You might notice symptoms like a rough-running engine, misfires (especially under acceleration), a significant drop in fuel efficiency, or the “Check Engine” light illuminating. Other signs include difficulty starting the engine, power loss, or a distinct gasoline smell due to unburnt fuel.
What tools do I need to check spark plug wires?
For a basic visual inspection, you typically only need a flashlight and possibly a clean rag. For more thorough electrical testing of spark plug wires, you will need a multimeter capable of measuring resistance (ohms). Insulated pliers can also be helpful for safely disconnecting wires.
How do I visually inspect spark plug wires for damage?
Carefully examine each spark plug wire from end to end for any visible signs of wear, such as cracks, fraying, cuts, blisters, or burn marks on the insulation. Also, check the boots where they connect to the spark plugs and the ignition coil/distributor for corrosion or damage.
How can I test spark plug wires with a multimeter?
To test spark plug wires, first safely disconnect one wire at a time. Set your multimeter to the ohms (Ω) setting, then touch the probes to each end of the wire’s metal terminals. Consult your vehicle’s service manual for the acceptable resistance range, but generally, wires should have low and consistent resistance without open circuits.
How often should I check or replace my spark plug wires?
While there’s no fixed schedule for checking, it’s a good practice to inspect your spark plug wires during routine maintenance, such as when you change spark plugs or perform a tune-up, typically every 30,000 to 50,000 miles. Replacement is usually recommended between 50,000 to 100,000 miles, or sooner if visual inspection or multimeter tests reveal issues.