Mastering spark plug and wire testing is paramount for ensuring optimal engine performance and fuel efficiency. This guide empowers you to diagnose ignition system issues like a pro, utilizing essential techniques for visual inspection, resistance checks, and proper tool usage. By accurately identifying and addressing failing components, you’ll maintain peak vehicle health and prevent costly repairs.
How to Your Guide How to Test Spark Plugs and Wires Like a Pro
Hey there, fellow car enthusiast! Ever had your car sputter, shake, or just feel… off? Like it’s trying to tell you something, but you can’t quite understand? Chances are, your spark plugs and wires might be whispering (or shouting!) for attention. Don’t worry, you don’t need to be a seasoned mechanic to figure this out. I’ve been there, staring at a grumpy engine, wondering if it’s a huge problem or something simple.
In this guide, I’m going to share my personal experience and show you how to test spark plugs and wires like a pro. We’ll break it down, step by step, so you can diagnose issues with confidence. It’s a super satisfying feeling to pinpoint a problem yourself and fix it, trust me!
Why This Matters / Understanding the Problem
Spark plugs are tiny, but mighty. They ignite the air-fuel mixture in your engine. This creates the combustion that powers your car. Think of them as the tiny lightning bolts making everything go. The spark plug wires carry the high voltage from your ignition coil to the plugs. If either of these components isn’t working right, your engine will definitely let you know.
Common signs? A rough idle, misfires, poor acceleration, or even a noticeable drop in fuel economy. When your car struggles, it often points to a problem with the ignition system. Learning to test spark plugs and wires is a fantastic skill. It helps you save money on diagnostics and avoid unnecessary repairs. It’s truly empowering to know what’s going on under the hood.
What You Need
Before we dive in, let’s gather our tools. Don’t worry, you likely have some of these already. None of them are super specialized. You’ll be ready to test spark plugs and wires in no time.
- Socket Wrench Set: Specifically a spark plug socket (usually 5/8″ or 13/16″).
- Spark Plug Gap Tool: A small, inexpensive disc or coin-style tool.
- Wire Brush: To clean threads, if needed.
- Dielectric Grease: Helps seal and protect electrical connections.
- Anti-Seize Compound: For spark plug threads.
- Spark Plug Tester (Inline Spark Tester): A simple tool that shows if a spark is present.
- Multimeter (Digital is best): To measure electrical resistance in the wires.
- Gloves: Safety first, folks!
- Safety Glasses: Always protect your eyes.
- Shop Towels or Rags: For cleaning and wiping.
- Flashlight or Headlamp: Engines can be dark places.
Step-by-Step Guide to Your Guide How to Test Spark Plugs and Wires Like a Pro
Alright, let’s roll up our sleeves. Remember, safety is our number one priority. Take your time with each step. This approach helps you effectively test spark plugs and wires.
Step 1: Safety First – Disconnect the Battery
Always, always start here. You’ll be working with electrical components. Disconnecting the negative (-) terminal of your car battery prevents accidental sparks or shocks. Use your wrench to loosen the nut on the negative battery post. Then, move the cable away so it can’t accidentally touch the terminal.
Step 2: Locate Spark Plugs and Wires
Open your hood. Look for thick, rubbery cables coming from a coil pack or distributor. These lead to the spark plugs, which are usually screwed into the top or side of your engine. Note the order of the wires. Taking a quick photo with your phone can be a huge help here. This ensures you reinstall them correctly.
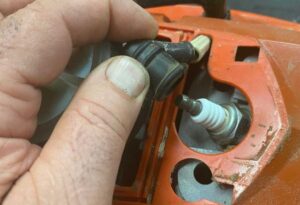
Step 3: Visually Inspect Spark Plug Wires
Gently pull one spark plug wire off its plug. Be sure to pull the boot, not the wire itself, to avoid damage. Look for any cracks, fraying, burns, or melted spots on the wire and boot. Any visible damage means that wire is likely failing. Do this for each wire. If a wire looks bad, it’s a strong sign you need to replace it. A healthy wire is key when you test spark plugs and wires.
Step 4: Test Spark Plug Wires for Resistance (Using a Multimeter)
Now, let’s get technical! This step really helps you test spark plugs and wires effectively. Set your multimeter to measure ohms (Ω) at a range like 20k or 200k. Place one probe of the multimeter into the metal terminal at one end of the spark plug wire. Place the other probe into the terminal at the other end. You should get a reading, typically between 3,000 and 10,000 ohms per foot. Your car’s service manual will have the exact specifications. If a wire reads infinite resistance (open circuit) or very high resistance compared to others, it’s bad. Replace that wire.
Pro Tip: Wiggle the wire gently while testing. Sometimes, an internal break only shows up under slight movement.
Step 5: Remove Spark Plugs
Carefully twist and pull the spark plug wire boots off the plugs. Make sure you’re pulling from the boot. Use your spark plug socket and wrench to loosen each plug. Turn counter-clockwise. Be gentle! The plug threads can strip easily. Remove each plug and set them aside carefully, noting which cylinder they came from. This is vital for accurate diagnosis. This is a crucial step to truly test spark plugs and wires.
Warning: Never force a spark plug. If it feels stuck, stop and apply a penetrating oil, letting it soak. Stripping threads is a costly mistake.
Step 6: Visually Inspect Spark Plugs
This is where you become a detective! Each spark plug tells a story about its cylinder.
- Brownish-tan or grayish-white deposit: This is ideal! It means good combustion.
- Black, sooty deposits: Could indicate a rich fuel mixture or a weak spark.
- Oily deposits: Often points to oil leaking past piston rings or valve guides.
- White, chalky deposits: Can mean the plug is too hot, or there’s a lean fuel mixture.
- Melted or damaged electrodes: A serious issue, possibly detonation or pre-ignition.
Comparing them side-by-side helps identify single-cylinder issues. This visual check is powerful when you test spark plugs and wires.
Step 7: Test Spark Plugs (Using a Spark Tester)
This is a more dynamic way to test spark plugs and wires. Attach your inline spark tester between the spark plug wire and the removed spark plug. The tester will have a gap. Have a helper crank the engine (briefly!). Look for a bright, blue spark jumping across the tester’s gap. A weak, orange, or no spark means a problem. This could be the plug itself, the wire, or even the ignition coil for that cylinder. Repeat for each cylinder.
Safety Note: Keep hands clear of moving engine parts. Do not touch the spark tester or wires while the engine is cranking.
Step 8: Check Spark Plug Gap
The gap is the distance between the center electrode and the ground electrode. Use your gap tool to measure it. Your car’s manual will specify the correct gap. If the gap is off, gently bend the ground electrode to adjust it. A proper gap ensures a strong spark. An incorrect gap can lead to misfires. This small step makes a big difference in performance.
Step 9: Reinstall Spark Plugs and Wires
Apply a small amount of anti-seize to the threads of new or cleaned spark plugs. This prevents them from seizing. Hand-tighten the plugs first. Then, use your torque wrench to tighten them to the manufacturer’s specifications. Don’t overtighten! Apply dielectric grease inside the spark plug wire boots. This helps protect against moisture and ensures a good connection. Push the wires firmly onto the plugs until they click. Reconnect your battery’s negative terminal.
Pro Tips & Common Mistakes to Avoid
- Label Everything: I once forgot which wire went where. Trust me, it’s a headache. Label cylinders or take photos before removal.
- Don’t Overtighten: Spark plugs go into aluminum cylinder heads. They strip easily. Use a torque wrench.
- Use Quality Parts: Cheap spark plugs or wires can cause more problems. Stick to OEM equivalents or reputable brands.
- Change Them All: If one spark plug or wire is bad, others might be close behind. It’s often best to replace them as a set. This saves you future hassle.
- Clean the Area: Before removing plugs, blow away any dirt or debris around them. This stops junk from falling into your engine cylinders.
From my experience, one of the biggest “gotchas” is assuming a misfire means a bad plug when it’s actually a wire, or vice-versa. Always test both! That’s why this guide covers both aspects to truly help you test spark plugs and wires effectively.
FAQs About Your Guide How to Test Spark Plugs and Wires Like a Pro
Q1: How often should I test spark plugs and wires?
It’s good practice to inspect them during routine maintenance, like every 30,000 miles. Testing is usually done when you suspect a problem, not as a preventative measure. However, regular visual checks are always smart.
Q2: Can I just replace the faulty spark plug or wire?
You can, but it’s often better to replace them all. If one has failed, the others might be nearing the end of their lifespan. Replacing the full set ensures consistent performance across all cylinders.
Q3: What if my car still has problems after I replace them?
If you’ve followed this guide to test spark plugs and wires and replaced them, but the issue persists, the problem lies elsewhere. It could be fuel injectors, an ignition coil, oxygen sensors, or other engine components. Further diagnostics would be needed.
Q4: Do I need a special spark plug socket?
Yes, absolutely! Regular sockets can crack the ceramic insulator. A spark plug socket has a rubber insert inside. This protects the plug and holds it securely as you remove or install it.
Q5: Is it safe to do this if I’m not very mechanical?
Definitely! This is a great entry-level DIY project. Just take your time, follow the safety steps, and don’t hesitate to consult your car’s service manual. The biggest hurdles are usually just reaching the plugs!
Q6: Why is the proper spark plug gap so important?
The gap controls the strength and consistency of the spark. A gap that’s too wide makes the spark weak or non-existent. Too narrow, and the spark might not ignite the fuel-air mixture efficiently. It’s a fine-tuning step for optimal combustion.
Final Thoughts
See? You just learned how to test spark plugs and wires like a pro! Taking the time to understand and perform this diagnostic task yourself is incredibly rewarding. It saves money and gives you a deeper connection with your vehicle. Don’t be intimidated by what’s under the hood. Most car issues can be tackled with a little patience and the right guidance.
So, the next time your car feels a bit sluggish, remember these steps. You now have the knowledge to check those tiny but vital components. Go forth and keep those engines purring smoothly!
“`