To tint car windows yourself, you need automotive window tint film, a spray bottle with approved application solution, a squeegee, a hard card, a precision cutting knife, a low-lint cloth, and suitable glass-cleaning tools. A heat gun and specialized shaping tools may also be necessary for curved windows, particularly when installing film on a rear windshield.
The quality of the installation depends on more than having the correct film. Glass preparation, accurate measurements, dust control, and careful trimming determine whether the tint sits smoothly against the window or develops bubbles, contamination, and lifting edges.
Choosing the right tint is equally important. Dyed, carbon, and ceramic films offer different levels of heat rejection, appearance, and cost. The selected shade must also comply with applicable state window tint laws.
For beginners, ordinary side windows are generally easier to tint than large curved rear glass. A pre-cut film kit can simplify the process and reduce cutting errors.
In this article, I cover the complete DIY window tinting tool checklist, how to choose and measure automotive film, prepare the windows, apply tint correctly, avoid installation mistakes, and decide when professional installation makes more sense.
What Do You Need to Tint a Car Windows? Essential Tool Checklist
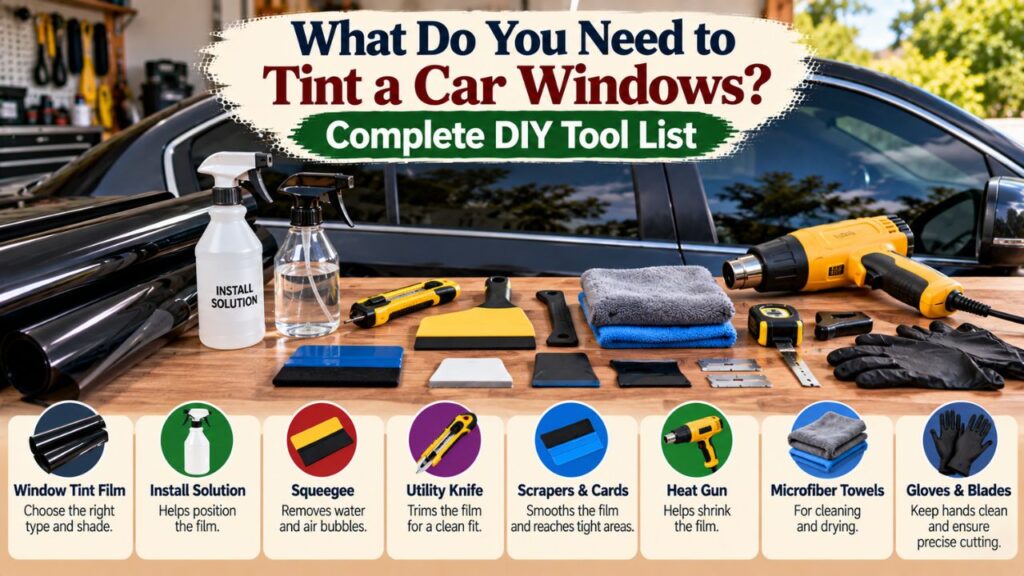
A basic automotive window tint installation requires a combination of cleaning, cutting, positioning, and smoothing tools.
Not every project requires professional equipment. However, a few specialized tools can make a significant difference in the finished appearance.
| Tool or material | Main purpose | Requirement |
| Automotive window tint film | Provides the selected darkness and solar protection | Essential |
| Application solution | Lubricates the glass and adhesive during positioning | Essential for wet-applied film |
| Spray bottle | Distributes application solution evenly | Essential |
| Squeegee | Removes water and air from beneath the film | Essential |
| Hard card | Smooths edges and tighter areas | Essential |
| Low-lint microfiber cloth | Cleans glass and absorbs excess liquid | Essential |
| Precision utility knife | Cuts and trims the film | Essential for uncut rolls |
| Measuring tape | Measures window dimensions | Essential for cutting film |
| Glass scraper | Removes suitable surface contamination | Conditional |
| Heat gun | Heat-shrinks film to match curved glass | Conditional |
| Edge-tucking tool | Helps position film beneath weatherstripping | Helpful |
| Pre-cut tint kit | Reduces the need for manual pattern cutting | Optional |
| VLT meter | Measures the finished window’s light transmission | Helpful |
1. Automotive Window Tint Film
The film itself is the main material.
Choose a product specifically manufactured for automotive glass rather than residential window film.
Automotive tint is designed for vehicle windows that may be curved, exposed to vibration, and repeatedly raised or lowered.
Common types include:
- Dyed film: Often the most affordable choice, primarily used for privacy and glare reduction.
- Carbon film: Commonly offers good color stability and solar control without relying on a metallic layer.
- Ceramic film: Can provide strong heat rejection and low reflectivity in higher-performance products.
- Metallized or hybrid film: Uses metallic technology for solar control but may create signal-related considerations in some vehicles.
For a basic DIY installation, choose a reputable automotive film with clear installation instructions.
Avoid films with unknown specifications or adhesives.
2. Window Tint Application Solution
Application solution, sometimes called slip solution, allows adhesive-backed tint film to move across wet glass before it bonds firmly.
Without appropriate lubrication, the adhesive may grab the glass before the film is correctly positioned.
This can cause wrinkles, creases, and trapped contamination.
Use a ready-made automotive tint solution or a mixture specifically approved by the film manufacturer.
Some installation systems permit carefully measured surfactant solutions, while others require proprietary products.
Avoid adding random amounts of household detergent.
Excessive soap or incompatible ingredients may interfere with adhesive performance.
According to Gila’s official automotive tint application kit guidance, its installation kit includes ready-to-use application solution, a squeegee, a low-lint cloth, and a utility knife for trimming film.
The manufacturer identifies these tools as suitable for preparing the glass and installing its automotive film products.
3. Spray Bottle
A spray bottle distributes application solution across the glass and adhesive.
Choose a bottle that produces a consistent spray.
The glass must remain adequately wet during positioning so the film can be adjusted without pulling against the adhesive.
A bottle with an adjustable nozzle can be convenient for applying solution over large windows or smaller sections.
Keep the spray bottle clean and clearly labeled.
Avoid reusing containers that previously held chemicals or cleaners that could contaminate the solution.
4. Squeegee and Hard Card
A squeegee removes application liquid and trapped air from beneath the film.
Different tools are useful for different parts of the installation.
Soft or rubber-edged squeegee: Useful for cleaning wet glass and making initial passes over the tint.
Hard card: Helps apply more controlled pressure around edges, corners, and tighter areas.
Some installers use a hard card wrapped in a clean, low-lint cloth to absorb liquid near the film edges.
Avoid scraping the film with an unprotected sharp or damaged tool.
A scratched hard card can leave visible marks.
5. Precision Utility Knife
A sharp utility knife is needed when cutting tint film from a roll or making final edge adjustments.
A precision cutting tool helps produce clean, controlled cuts.
Use new, sharp blades rather than forcing a dull blade through the material.
Dull blades can tear or stretch the film.
The cutting tool must be handled carefully around painted trim, weatherstripping, and glass.
Avoid making deep cuts against the vehicle’s glass or seals.
Pre-cut tint kits can reduce the amount of knife work required.
6. Low-Lint Microfiber Cloth
A clean, low-lint cloth is used to prepare glass and remove excess application solution.
Lint contamination is a common cause of small bumps beneath finished window film.
Use dedicated cloths that have not collected dust, fabric softener residue, grease, or polishing products.
Keep separate cloths for dirty cleaning tasks and final film installation.
A cloth used to clean door trim shouldn’t be reused on the adhesive side of the tint.
7. Glass Scraper
A suitable glass scraper can help remove stubborn contamination from compatible glass surfaces.
Examples include adhesive residue, stuck-on dirt, and other deposits that ordinary wiping cannot remove.
However, sharp scrapers can damage certain glass surfaces, coatings, printed elements, and defroster lines.
Never use a metal razor blade on rear-window defroster lines, printed antenna elements, or other vulnerable glass features.
Use the glass and film manufacturers’ approved cleaning method.
If the surface is coated or its construction is uncertain, avoid scraping until compatibility is confirmed.
8. Heat Gun
A heat gun is used for heat shrinking, a technique that helps automotive film conform to curved glass.
It is particularly useful for large curved rear windows.
However, it isn’t required for every side-window installation.
Excessive heat can distort film, damage rubber seals, or affect surrounding vehicle components.
Use an adjustable heat gun only when the film manufacturer supports the technique and you understand the recommended process.
For complicated rear windows, professional installation may be safer than attempting heat shrinking without experience.
Additional Supplies That Make DIY Window Tinting Easier
Several accessories aren’t strictly necessary for every installation, but they can reduce avoidable problems.
Edge-Tucking Tools
Edge-tucking tools help position the film around weatherstripping and tight window borders.
They are useful for roll-down side windows where the film may need to extend slightly beneath the lower window seal.
Choose tools designed for automotive tint applications.
Avoid using sharp screwdrivers or other improvised metal tools that can damage the film or door components.
Masking Tape and Protective Towels
Water-based application solution can run into door trim, switches, and electrical components.
Clean, absorbent towels help control liquid near the door panel.
Appropriate masking materials may also protect trim and interior surfaces during installation.
Avoid spraying large quantities of liquid directly into electrical openings.
Bright Work Light
Good lighting makes contamination, wrinkles, and trapped air easier to identify.
A portable LED work light can help illuminate the glass during preparation and final inspection.
Position the light so it doesn’t create excessive glare.
Keep electrical equipment away from application liquids.
Pre-Cut Window Tint Patterns
Pre-cut kits contain film pieces shaped for specific vehicle windows.
A properly manufactured kit may reduce the need for manual trimming.
However, compatibility matters.
Confirm the vehicle’s:
- Make and model.
- Model year.
- Body style.
- Number of doors.
- Window configuration.
A kit intended for a four-door sedan may not fit a two-door coupe of the same model.
Pre-cut film also doesn’t eliminate the need for cleaning, wet application, smoothing, or shaping where required.
Which Window Tint Film Should You Choose?
Before tinting a car, decide whether your main goal is privacy, glare reduction, heat control, or UV protection.
Different films provide different performance levels.
| Film type | Main advantage | Main limitation |
| Dyed | Usually affordable | Heat rejection varies and may be limited |
| Carbon | Good color stability in quality products | Performance depends on formulation |
| Ceramic | Strong heat rejection options | Often more expensive |
| Metallized | Can reflect substantial solar energy | May affect some electronic signals |
| Hybrid | Balances properties of multiple technologies | Composition varies by product |
Dyed Tint for Basic Privacy
Dyed window tint is commonly used for an affordable, darker appearance.
It reduces visible light entering the cabin.
However, darkness alone doesn’t guarantee strong heat rejection.
A dark dyed film may allow more solar energy into the vehicle than a lighter, high-performance ceramic film.
Carbon Tint for Balanced Performance
Carbon films can provide a neutral appearance and useful solar-control performance.
Many nonmetallic carbon products avoid the signal-interference concerns associated with some metallized films.
Check the exact film specifications rather than assuming all carbon films perform alike.
Ceramic Tint for Better Heat Control
Quality ceramic film can reject substantial solar heat without requiring an extremely dark shade.
This can be useful for drivers in hot climates.
However, ceramic films vary in quality.
Compare Total Solar Energy Rejection (TSER), visible light transmission, warranty coverage, and manufacturer specifications.
Do not rely solely on a claimed infrared rejection percentage.
How Much Window Tint Film Do You Need for a Car?
The required film quantity depends on the vehicle’s window dimensions and the number of windows being tinted.
A compact two-door vehicle generally requires less material than a large SUV with multiple side windows.
However, curved rear glass and oversized windows may require wider film rolls.
Measure Each Window Before Buying Film
Measure the approximate width and height of every window to be tinted.
For a side window:
- Measure the widest part of the usable glass area.
- Measure the vertical height.
- Account for the portion of the window extending below the rubber seal.
- Allow extra material for trimming.
- Check whether the film roll is wide enough for the window.
Don’t calculate film requirements using only the visible glass area.
Roll-down windows may require additional film below the visible lower edge.
Film Width Matters More Than Total Area Alone
Suppose a rear window requires a film piece approximately 48 inches wide and 30 inches tall.
A roll only 24 inches wide cannot cover that window with one continuous piece in the required orientation.
Even if the roll contains enough total square footage, its width may be unsuitable.
Choose a film roll wide enough for the largest piece.
Some products are designed to be installed in sections, but the film manufacturer’s instructions should determine whether that approach is appropriate.
Allow for Cutting Errors
Beginners may need replacement pieces if film becomes creased, contaminated, or incorrectly trimmed.
Purchase a little extra material when working from a roll.
A vehicle-specific pre-cut kit may be more economical when only a few windows need tinting.
If using an expensive ceramic film, inaccurate cutting can quickly increase the project cost.
How to Prepare Car Windows Before Tinting
Glass preparation is one of the most important parts of the process.
Even small dust particles can become visible beneath the finished film.
Choose a Clean Work Area
Install film in a shaded, clean, well-lit environment.
Avoid working outdoors during strong wind, blowing dust, or heavy pollen.
Direct sunlight can cause the application solution to evaporate quickly and make positioning more difficult.
Extremely cold or hot temperatures can also affect installation.
Follow the film manufacturer’s recommended application-temperature range.
A clean garage is often a practical location.
Clean Both Sides of the Glass
Cleaning the outside glass helps when using it as a temporary surface for measuring or shaping the film.
Cleaning the inside glass is essential because adhesive-backed automotive window film is normally installed on the interior surface.
Remove fingerprints, dirt, grease, and other residue.
Use compatible cleaning products and clean cloths.
Avoid leaving cleaner residue on the glass.
Clean Around Window Seals
Door-window weatherstripping can collect dust, sand, and debris.
When the glass moves, that material can contaminate the installation.
Clean around the seals using suitable soft tools.
Pay attention to the lower edge of roll-down windows.
Don’t damage weatherstripping or force tools into electrical or mechanical components.
Remove Existing Tint if Necessary
Old tint shouldn’t automatically be covered with another film.
Existing film can have worn adhesive, scratches, bubbles, or discoloration.
If replacement is needed, remove the original material using a method appropriate for the glass and film.
Rear-window defroster lines require particular care.
Improper scraping or pulling can damage the heating elements.
For heavily deteriorated film, professional removal may be preferable.
How to Tint Car Side Windows Step by Step
The following process describes the general installation of adhesive-backed automotive tint on a roll-down side window.
Specific film products may require different trimming, heating, or positioning techniques.
Follow the selected manufacturer’s instructions when they differ from these general steps.
The International Window Film Association’s automotive installation overview describes the standard process of cleaning and measuring the glass, cutting the film, applying a wet installation solution, positioning the film on the interior surface, removing trapped liquid, and allowing the adhesive to cure.
Step 1: Measure and Prepare the Film
Start with a clean side window.
Measure the glass and determine the required film dimensions.
For film supplied on a roll, the exterior glass can be used as a temporary shaping surface when the manufacturer’s instructions permit.
Keep the protective release liner attached while preparing the film.
Position the film in the correct orientation.
Leave sufficient trimming allowance without wasting excessive material.
If using a pre-cut kit, verify that the piece matches the correct window.
Step 2: Trim the Film to Fit
Carefully trim the material according to the film manufacturer’s procedure.
Avoid cutting against unprotected paint or rubber seals.
Use a sharp blade and make controlled cuts.
For roll-down windows, account for the upper edge and the section that will extend beneath the lower weatherstrip.
An incorrectly cut piece may expose gaps when the window moves.
Don’t use the glass as a cutting surface unless the specified method allows it and the surface is suitable.
Step 3: Wet the Interior Glass
Spray the inside glass with the approved application solution.
The surface should be adequately wet so the adhesive-backed film can be repositioned.
Keep nearby trim and electrical components protected from unnecessary liquid.
Work in a controlled manner rather than spraying blindly toward door switches or electrical openings.
Step 4: Remove the Protective Film Liner
Adhesive-backed window tint has a protective liner covering the adhesive.
Carefully separate the liner using the manufacturer’s recommended method.
Some installers use small pieces of transparent tape at opposite sides of a corner to help separate the layers.
As the liner comes away, spray the exposed adhesive with the approved solution.
Keep the adhesive from touching dirty clothing, tools, or interior surfaces.
Avoid allowing the adhesive side to fold against itself.
A severe crease or contaminated adhesive can make the film unusable.
Step 5: Position the Tint on the Inside Glass
Place the wet adhesive side against the wet interior glass.
Slide the film into its intended position.
Align the upper edge carefully.
For roll-down windows, maintain the edge clearance specified by the film manufacturer.
Make sure the film doesn’t extend into areas where it will interfere with moving seals or window operation.
Avoid stretching the film to correct an incorrect fit.
If the piece is too small or badly positioned, replacing it may produce a better result than forcing it into place.
Step 6: Remove Water and Air With a Squeegee
Once the film is aligned, use a suitable squeegee to begin removing liquid.
Work systematically according to the film manufacturer’s pattern.
Many installations begin near the center and move toward the edges.
Use overlapping passes so water isn’t left trapped beneath the film.
Maintain enough solution on the exposed film surface to keep the squeegee from scratching it.
Use a suitable hard card or edge tool for tighter areas.
Don’t apply excessive force that could crease or move the film.
Step 7: Finish the Lower Edge
For roll-down windows, the lower section of film may need to be positioned beneath the window gasket.
Follow the film manufacturer’s installation sequence.
Avoid forcing the film under a seal with a sharp tool.
Make sure the lower edge is properly seated and free from debris.
Use a low-lint cloth to absorb remaining moisture near the edges.
Check that the film hasn’t lifted or folded during the final smoothing process.
Step 8: Inspect and Allow the Film to Cure
Inspect the finished window under suitable lighting.
Look for large trapped air pockets, visible dirt, wrinkles, and lifting edges.
Some small moisture patterns can remain during curing and may disappear as the installation dries.
However, trapped contamination and permanent creases generally won’t disappear on their own.
Follow the film manufacturer’s curing instructions before lowering the windows or cleaning the film.
Curing time depends on the film, temperature, humidity, and installation conditions.
Do You Need a Heat Gun to Tint Car Windows?
A heat gun isn’t necessary for every automotive tint installation, but it is commonly used to shape film for curved glass.
The need depends on the vehicle and film.
When a Heat Gun Is Useful
Curved rear windows can require heat shrinking to help flat film conform to the glass.
Professional installers often perform shaping work on the exterior surface before transferring the film to the interior for application.
The film remains protected by its liner during the appropriate shaping process.
This requires careful heat control and suitable techniques for the particular film.
Can You Use a Hair Dryer Instead?
A hair dryer produces warm airflow but typically offers less heating capability than a dedicated heat gun.
It may be insufficient for some film-shrinking applications.
However, replacing it with an excessively powerful heat gun doesn’t automatically improve results.
The tool must match the technique and film.
For a large curved rear window, professional installation is often preferable to improvising with unsuitable heating equipment.
Can Heat Damage Window Tint?
Yes. Excessive heat can cause film distortion, adhesive problems, wrinkles, or other defects.
It can also damage rubber seals and surrounding trim.
Don’t aim a concentrated heat source at one small area for an extended period.
Follow the manufacturer’s heat-forming instructions.
A heat gun should not be used indiscriminately on already installed film in an attempt to remove every visible bubble.
What Window Tint Percentage Should You Choose?
The selected shade determines how much visible light passes through the window.
This is measured using Visible Light Transmission (VLT).
A higher percentage means a lighter window.
| Film VLT | General appearance | Main consideration |
| 70% | Very light | Preserves more visible light |
| 50% | Light to moderate | Balance of appearance and visibility |
| 35% | Moderately dark | More noticeable privacy and light reduction |
| 20% | Dark | Greater nighttime visibility limitations |
| 5% | Extremely dark | Severe outward visibility restrictions |
These are nominal film values.
The finished glass-and-film combination may transmit less visible light than the film’s advertised rating.
For example, adding a 35% VLT film to glass that transmits 70% of visible light produces an approximate combined VLT of 24.5%.
Actual results depend on the glass, film, and measurement conditions.
Check State Tint Laws Before Installation
Window tint laws differ across the United States.
Restrictions may depend on:
- Front side windows.
- Rear side windows.
- Rear windshield.
- Windshield tint strips.
- Vehicle classification.
- Reflectivity.
- Medical exemptions.
Check current official state requirements rather than relying on a general online tint chart alone.
The IWFA’s installation guidance linked earlier also recommends checking the applicable state tint regulations before selecting the film.
Don’t assume a film is legal simply because a retailer sells it.
Choose Visibility Before Maximum Darkness
Extremely dark tint can reduce the ability to recognize pedestrians, cyclists, and obstacles through side windows at night.
A lighter film may be more appropriate for vehicles used frequently after dark.
High-performance ceramic films can provide meaningful solar control without requiring extremely low VLT.
Evaluate heat rejection and visibility separately rather than assuming darker film is always better.
How Much Does It Cost to Buy DIY Window Tinting Supplies?
The total cost depends on the film type, vehicle size, and whether you already own cleaning and cutting tools.
A simple dyed-film project generally requires a smaller materials budget than a premium ceramic installation.
The main expenses are usually:
- Window film or a vehicle-specific pre-cut kit.
- Installation solution.
- Squeegee and hard card.
- Cutting tools and replacement blades.
- Cleaning materials.
- Optional heat gun and specialty tools.
Retail prices vary, so compare the complete project cost rather than buying the cheapest film without checking its specifications.
A basic application kit may be convenient because it combines several smaller tools.
However, if the project requires expensive equipment for a single rear window, professional installation may be more economical than purchasing all the tools and risking wasted film.
Is a Pre-Cut Tint Kit Worth Buying?
For beginners, a correctly sized pre-cut kit can reduce cutting mistakes.
It also eliminates much of the measuring and manual pattern-making work.
However, the film still needs proper preparation and application.
Pre-cut kits don’t automatically solve curved-glass heat shrinking or contamination problems.
Choose a kit from a reputable supplier and verify vehicle compatibility.
Common Mistakes When Tinting Car Windows
A number of common problems are caused by poor preparation rather than defective film.
Applying Film to Dirty Glass
Dust, lint, and adhesive residue can become trapped beneath the tint.
Clean the glass and weatherstripping thoroughly before beginning.
Don’t touch the exposed adhesive with dry or dirty fingers.
Using Too Little Application Solution
Insufficient lubrication can cause the film to grab the glass prematurely.
This makes alignment difficult and increases the risk of creases.
Use the amount and type of solution specified by the film manufacturer.
Cutting Film Too Small
A film piece that doesn’t cover the intended area may leave visible gaps.
Measure carefully before trimming.
If you’re learning, a compatible pre-cut kit can reduce this problem.
Using Excessive Heat
Too much heat can permanently distort the film.
Use controlled heat-forming techniques only when required and supported by the manufacturer.
Curved rear windows can be challenging for beginners.
Working in a Dusty Area
Wind, loose dust, and airborne particles can contaminate the adhesive.
Choose a clean, sheltered workspace.
Keep tools and cloths free of debris throughout the installation.
Scraping Rear Defroster Lines
Sharp blades can damage heating elements on the inside of rear glass.
Use appropriate cleaning and removal methods for defroster-equipped windows.
If the old film is strongly bonded to the defroster, professional removal may be advisable.
Rolling Windows Down Too Early
New tint adhesive needs time to cure.
Lowering a roll-down window before the recommended period has passed may lift the film edges or interfere with bonding.
Follow the specific curing instructions.
DIY vs. Professional Car Window Tinting
DIY tinting can save labor costs, but it requires patience, a clean workspace, and careful tool handling.
Professional installation offers advantages for complicated glass and expensive films.
When DIY Tinting Makes Sense
DIY installation may be reasonable when:
- You are working on relatively flat side windows.
- The film manufacturer supplies clear instructions.
- A suitable pre-cut kit is available.
- You have a clean, sheltered work area.
- The vehicle’s glass and trim are in good condition.
- You are comfortable measuring, cleaning, and handling delicate film.
Start with a simpler window rather than immediately attempting a large curved rear windshield.
When Professional Installation Is Better
Consider a professional installer when:
- The rear glass has substantial curvature.
- The vehicle has delicate defroster or antenna components.
- Expensive ceramic film is being installed.
- Old tint is heavily deteriorated.
- The windows have unusual shapes.
- You need help verifying final VLT compliance.
- You want manufacturer-backed installation and warranty support.
Professional installers use specialized tools and techniques to control contamination and shape film correctly.
Even with experience, installation quality can vary.
Choose a reputable shop that identifies the film manufacturer, product line, and warranty terms.
How to Maintain Window Tint After Installation
Once tint is installed, proper care helps protect the adhesive and film surface.
Allow the Recommended Curing Period
Avoid lowering the windows or cleaning the film until permitted by the manufacturer.
Temporary haze or small moisture patterns may be normal during the curing process.
However, large air pockets, folds, or dirt contamination may require correction.
Use Suitable Glass Cleaners
Use cleaning products approved for the installed film.
A soft microfiber cloth is generally preferable to abrasive pads.
Some films have specific restrictions on cleaners and chemicals.
Follow the manufacturer’s instructions rather than assuming all automotive glass cleaners are appropriate.
Avoid Scraping the Film Surface
Do not use razor blades or abrasive tools on installed window tint.
The film is generally applied to the inside surface of the glass and can be scratched or damaged by sharp objects.
Take particular care when cleaning windows with rear defroster elements.
Inspect for Peeling or Bubbling
Check the edges periodically.
Signs of deterioration may include:
- Lifting corners.
- Persistent large bubbles.
- Peeling adhesive.
- Discoloration.
- Scratches.
- Optical distortion.
If the film has a warranty, contact the installer or manufacturer before attempting repairs.
Conclusion
Knowing what do you need to tint a car windows starts with assembling the right materials and preparing the glass properly.
For a basic DIY installation, the essential supplies are suitable automotive window film, approved application solution, a spray bottle, a squeegee, a hard card, clean low-lint cloths, measuring tools, and precision cutting equipment.
A heat gun and specialized shaping tools may be needed for curved windows, but many straightforward side-window installations can be completed without advanced equipment.
The most important factors are clean glass, compatible film, careful measurements, correct application technique, and sufficient curing time.
For beginners, I recommend starting with a vehicle-specific pre-cut film kit and a reputable application kit rather than purchasing numerous specialized tools immediately.
Always verify the final tint darkness against the applicable state laws and prioritize clear outward visibility.
For complex rear glass or expensive ceramic film, professional installation may provide better value and more dependable results.
FAQs About What Do You Need to Tint a Car Windows
Can You Tint Car Windows Without a Heat Gun?
Yes. Some relatively flat side windows can be tinted without using a heat gun.
Curved glass may require heat shrinking to shape the film properly. Follow the film manufacturer’s instructions and avoid using excessive heat.
Can You Tint Car Windows With Just Water and Soap?
Some automotive window films can be installed using a manufacturer-approved water and surfactant solution.
However, the correct mixture depends on the product. A dedicated application solution is generally easier for beginners and reduces uncertainty about compatibility.
Do You Need to Remove Car Windows to Tint Them?
No. Most automotive tint installations are performed with the glass installed in the vehicle.
Certain complex projects may involve removing trim or other components, but complete glass removal isn’t normally required for basic side-window tinting.
Can You Install Window Tint Over Factory-Tinted Glass?
Yes, aftermarket film can often be applied over factory-tinted glass when the product and glass are compatible.
However, the combined VLT will be lower than the film’s advertised percentage. Measure the existing glass and verify legal compliance before installing additional tint.
How Long Should You Wait Before Rolling Down Tinted Windows?
The waiting period depends on the film manufacturer, installation conditions, and curing process.
Follow the specific product instructions. Rolling windows down too early can lift the film edges or interfere with adhesive bonding.
Is It Hard to Tint Car Windows Yourself?
Basic side-window tinting is manageable for some beginners, but producing a clean, professional-looking result requires practice.
The most common difficulties involve dust contamination, trimming accuracy, trapped bubbles, and film alignment. Curved rear windows are generally more challenging.
Do You Need Special Tools for Ceramic Window Tint?
Ceramic film typically requires the same basic installation tools as other adhesive-backed automotive films.
However, heat-forming behavior and handling instructions can differ by product. Follow the specific manufacturer’s procedure rather than assuming every ceramic film installs identically.