Modern engine systems rely heavily on accurate airflow measurement to maintain the correct air-fuel ratio. The MAF (Mass Air Flow) sensor is responsible for measuring the amount of air entering the engine and sending that data to the ECU in real time. Based on this information, the ECU adjusts fuel delivery for optimal performance, fuel economy, and emissions control.
When the MAF sensor starts to fail or deliver incorrect readings, it can create a wide range of drivability issues such as rough idle, hesitation during acceleration, poor fuel efficiency, and even engine stalling. The challenge is that these symptoms often overlap with other problems like vacuum leaks or fuel system faults, making diagnosis difficult without proper tools.
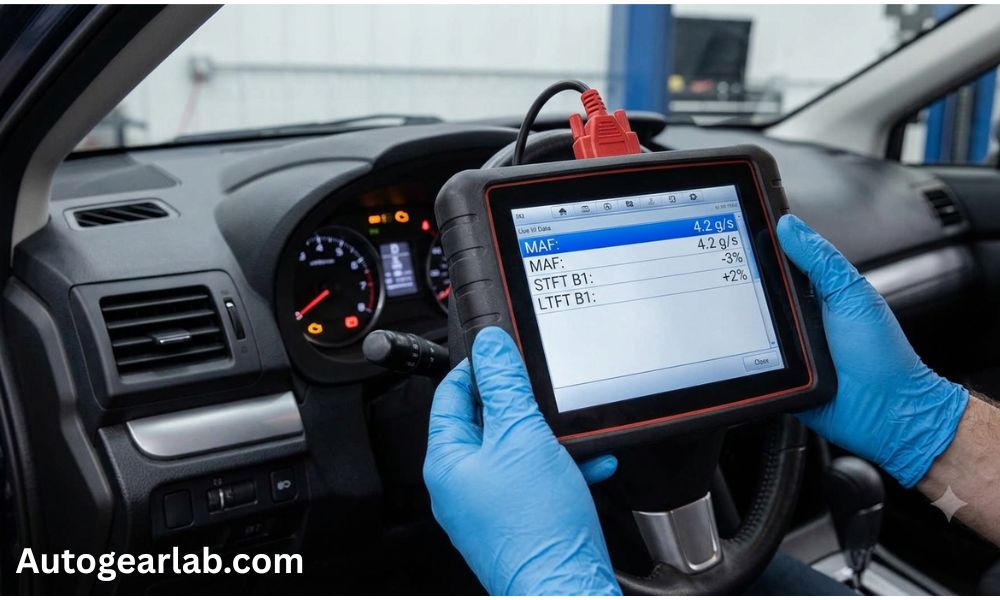
This is where an OBD2 scanner becomes extremely useful. Instead of guessing, you can access live engine data and directly observe how the MAF sensor is performing under different conditions. By analyzing airflow readings (measured in grams per second) along with fuel trim data, it becomes possible to determine whether the sensor is working correctly or sending inaccurate signals to the ECU.
Read More: How to Test a MAF Sensor: 7 Easy Methods Explained
In this guide, you will learn how to test a MAF sensor with an OBD2 scanner using live data analysis, RPM response checks, and fuel trim interpretation. These methods provide a more accurate and real-world diagnosis compared to basic visual inspection or unplug tests, helping you make a confident repair decision.
What You Need Before Testing
Before starting the diagnosis, it’s important to have the right tools and a clear understanding of how the system communicates. OBD2 testing is simple, but accuracy depends on proper setup and correct data interpretation.
1. OBD2 Scanner (Basic or Advanced)
You will need an OBD2 scanner that supports live data reading. Even a basic scanner can display MAF readings and fuel trims, but advanced tools provide more detailed graphs and real-time updates, making diagnosis easier.
2. Access to the OBD2 Port
The OBD2 port is usually located under the dashboard near the steering wheel. In some vehicles, it may be slightly hidden behind a cover panel. Ensure the connector is accessible before starting the test.
3. Fully Warmed Engine
For accurate readings, the engine should be at normal operating temperature. Cold engine data can be misleading because fuel delivery and airflow behavior are temporarily adjusted during warm-up.
4. Basic Understanding of Live Data Parameters
You don’t need advanced technical knowledge, but you should understand the key values you will be monitoring:
- MAF (g/s): Measures air entering the engine
- STFT (Short-Term Fuel Trim): Immediate fuel adjustments
- LTFT (Long-Term Fuel Trim): Long-term engine corrections
These values work together to show how efficiently the engine is managing the air-fuel mixture.
5. Stable Electrical Conditions
Make sure the battery is healthy and all electrical connections are stable. Low voltage can sometimes affect sensor readings and lead to incorrect diagnosis.
Once these basic requirements are in place, you are ready to move into live data testing and begin evaluating the MAF sensor performance step by step.
Understanding MAF Sensor Data on OBD2
Before testing, it’s important to understand what the scanner is actually showing. The MAF sensor does not just give a simple “pass or fail” result—instead, it continuously reports airflow data that the ECU uses to calculate fuel delivery.
What “Grams Per Second (g/s)” Means
On most OBD2 scanners, MAF readings are displayed in grams per second (g/s). This value represents how much air is entering the engine at any given moment.
- Low g/s = low airflow (idle or low RPM)
- High g/s = high airflow (acceleration or load)
The ECU relies on this measurement to maintain the correct air-fuel ratio. If the reading is incorrect, engine performance will immediately be affected.
How the ECU Uses MAF Data
The ECU constantly adjusts fuel injection based on MAF input. When airflow increases, more fuel is added. When airflow decreases, fuel delivery is reduced.
If the MAF sensor is inaccurate:
- The engine may run too rich (too much fuel)
- Or too lean (not enough fuel)
Both conditions can cause drivability problems and trigger fault codes.
Difference Between MAF and Fuel Trim Data
MAF and fuel trims work together but measure different things:
MAF Data
- Direct airflow measurement
- Real-time engine intake air reading
Fuel Trim Data (STFT & LTFT)
- ECU correction based on MAF accuracy
- Shows whether engine is adding or reducing fuel
If MAF readings are wrong, fuel trims will compensate to balance the mixture.
Why OBD2 Is Better Than Basic Testing
Unlike visual inspection or unplug tests, OBD2 live data shows how the sensor behaves in real driving conditions. This makes it possible to:
- Detect early sensor degradation
- Identify airflow inconsistencies
- Confirm whether fuel corrections are normal or excessive
Key Insight Before Testing
A healthy MAF sensor should produce smooth, predictable changes in g/s values as engine load increases. Any irregular pattern—such as spikes, drops, or frozen readings—indicates a potential problem that needs deeper diagnosis in the next steps.
Method 1: Checking MAF Sensor Live Data (Idle Test)
The first and most important step in OBD2-based diagnosis is observing MAF sensor behavior at idle. This gives a baseline reading that helps you understand whether the sensor is reporting normal airflow when the engine is under minimal load.
Step 1: Connect the OBD2 Scanner
Plug the scanner into the vehicle’s OBD2 port and turn the ignition to the ON position. Start the engine and allow it to reach normal operating temperature before taking any readings. Cold engine data can be misleading due to temporary fuel and air adjustments.
Step 2: Locate MAF Live Data
Navigate to the live data or “real-time data” section on your scanner. Look for the parameter labeled:
- MAF (g/s)
- Air Flow Rate
- Mass Air Flow Sensor
Select it so you can monitor the reading continuously.
Step 3: Observe Idle Reading
With the engine idling steadily, check the MAF value.
A healthy system should show:
- Stable and consistent reading
- Low airflow value appropriate for idle conditions
- No sudden spikes or drops
The exact number varies depending on engine size, but the key factor is stability, not just the value itself.
Interpretation of Idle Results
Normal Condition
- Smooth, steady MAF reading
- No fluctuation at idle
- Engine runs evenly
👉 Indicates the sensor is likely functioning correctly at low load.
Abnormal Condition
- Fluctuating or unstable readings
- Reading too high or too low for idle
- Random spikes or drops
👉 May indicate:
- Dirty or failing MAF sensor
- Air intake leaks
- Wiring or connector issues
Frozen or No Reading
- MAF value stays at 0 or constant number
- No response to engine changes
👉 Strong sign of:
- Sensor failure
- Electrical issue
- Communication problem with ECU
Key Insight
Idle testing is not about comparing exact numbers alone—it’s about observing behavior consistency. A healthy MAF sensor should behave calmly and predictably when the engine is not under load.
Method 2: RPM Increase Test (Airflow Response Check)
After confirming idle behavior, the next step is to test how the MAF sensor reacts when engine load increases. This helps identify issues that may not appear at idle but become visible during acceleration.
Step 1: Monitor Live Data Continuously
Keep your OBD2 scanner connected and stay in the MAF live data screen (g/s). Make sure the reading is updating in real time before proceeding.
Step 2: Gradually Increase Engine RPM
With the vehicle in neutral or park:
- Slowly press the accelerator pedal
- Increase RPM from idle to around 2,000–3,000 RPM
- Release the throttle and return to idle
Observe how the MAF reading changes during this process.
Step 3: Expected MAF Behavior
A healthy MAF sensor should show:
- Smooth, gradual increase in g/s as RPM rises
- Stable and proportional airflow response
- Quick return to lower values when RPM drops
- No sudden jumps or delayed reactions
The key factor is consistent correlation between RPM and airflow.
Interpretation of Results
Normal Response
- MAF value increases steadily with RPM
- No lag between throttle input and sensor response
- Clean return to idle values
👉 Indicates proper airflow measurement under load.
Slow or Delayed Response
- MAF reading takes time to react
- Airflow increases late compared to RPM change
👉 Possible causes:
- Dirty sensing element
- Aging or weak sensor
- Restricted airflow in intake system
Erratic or Unstable Response
- Sudden spikes or drops in readings
- Inconsistent airflow values during steady RPM
👉 Possible causes:
- Contaminated MAF sensor
- Wiring interference
- Internal sensor malfunction
No Clear Change in Reading
- MAF value stays nearly the same despite RPM increase
👉 Strong indication of:
- Faulty sensor
- Electrical communication issue
- ECU not receiving correct data
Key Insight
A good MAF sensor must react instantly and proportionally to changes in engine speed. If airflow data does not follow engine load properly, it is a strong sign that further investigation is needed.
Method 3: Test Under Load (Driving Condition)
Static tests like idle and RPM checks are useful, but real MAF sensor problems often show up only when the engine is under actual driving load. This method helps confirm how accurately the sensor responds in real-world conditions.
Step 1: Start Live Data Logging
Before driving, connect the OBD2 scanner and enable live data monitoring for:
- MAF (g/s)
- RPM
- Vehicle speed (if available)
- Fuel trims (STFT/LTFT optional but useful)
If your scanner supports graph mode, enable it for clearer pattern visibility.
Step 2: Perform a Controlled Test Drive
Drive the vehicle on a safe, open road and observe MAF behavior under different conditions:
- Light acceleration from a stop
- Steady cruising at moderate speed
- Stronger acceleration (safe conditions only)
- Deceleration and return to idle
Step 3: Expected MAF Behavior During Driving
A healthy sensor should show:
- Smooth increase in airflow during acceleration
- Stable readings during constant-speed cruising
- Gradual drop when throttle is released
- No sudden spikes or drops in values
The airflow data should consistently match engine load.
Interpretation of Results
Normal Behavior
- MAF readings rise and fall smoothly with driving conditions
- No lag between throttle input and sensor response
- Stable readings during cruising
👉 Indicates correct real-world airflow measurement.
Poor Acceleration Response
- Engine feels weak or delayed
- MAF reading increases slowly or inconsistently
👉 Possible causes:
- Dirty or aging MAF sensor
- Air restriction in intake system
- Early sensor degradation
Erratic Driving Data
- Unstable g/s values during steady driving
- Sudden spikes or drops without reason
👉 Possible causes:
- Faulty MAF sensor
- Electrical noise or wiring issue
- Loose connector or poor grounding
No Load Reaction
- MAF reading does not increase properly during acceleration
👉 Strong indication of:
- Failed sensor
- ECU not receiving correct airflow signal
- Serious electrical fault
Key Insight
Driving conditions reveal what static tests cannot. A properly working MAF sensor must respond smoothly and proportionally under real engine load, not just in idle or RPM checks.
Method 4: Fuel Trim Analysis (STFT & LTFT)
Fuel trim data is one of the most reliable ways to confirm whether the MAF sensor is working correctly. While MAF readings show how much air is entering the engine, fuel trims show how the ECU is correcting the air-fuel mixture based on that data.
Step 1: Access Fuel Trim Data
On your OBD2 scanner, locate the following parameters:
- STFT (Short-Term Fuel Trim)
- LTFT (Long-Term Fuel Trim)
Make sure the engine is fully warmed up and idling before observing readings.
Step 2: Understand Normal Fuel Trim Range
In most healthy engines:
- STFT: around -5% to +5%
- LTFT: around -5% to +5%
Small fluctuations are normal because the ECU constantly fine-tunes fuel delivery.
Step 3: Observe Fuel Trims at Idle
With the engine idling:
- Watch how STFT and LTFT behave
- Check if values stay stable or drift significantly
Then gently increase RPM and observe changes.
Interpretation of Results
Normal Condition
- Fuel trims stay close to zero
- Small, stable corrections only
- No extreme positive or negative values
👉 Indicates the MAF sensor is likely providing accurate airflow data.
Lean Condition (Possible Under-Reporting MAF)
- High positive fuel trims (e.g., +10% to +25% or more)
- ECU is adding extra fuel
👉 Possible causes:
- MAF sensor under-reporting airflow
- Vacuum leak after MAF
- Dirty or weak sensor signal
Rich Condition (Possible Over-Reporting MAF)
- High negative fuel trims (e.g., -10% to -25% or more)
- ECU is reducing fuel delivery
👉 Possible causes:
- MAF sensor over-reporting airflow
- Contaminated sensing element
- Faulty sensor calibration
Unstable or Fluctuating Trims
- Fuel trims constantly changing rapidly
- No stable correction pattern
👉 Possible causes:
- Inconsistent MAF readings
- Intermittent wiring issue
- Intake air leaks or fuel system imbalance
Key Insight
Fuel trims act as a “second opinion” for MAF testing. If MAF readings look normal but fuel trims are heavily corrected, it often means the airflow data is incorrect or there is unmetered air entering the engine.
Method 5: Combined Diagnosis (Best Practice)
At this stage, you already have multiple data points from idle testing, RPM response, driving conditions, and fuel trim analysis. The most accurate diagnosis comes from combining all these results instead of relying on a single reading.
Step 1: Compare All Test Results
Review your findings together:
- MAF idle reading (stable or unstable)
- RPM response (smooth or delayed)
- Driving behavior (consistent or erratic)
- Fuel trims (normal or heavily corrected)
A single abnormal result does not confirm failure. A pattern across multiple tests is what matters.
Step 2: Cross-Check MAF vs Fuel Trim Behavior
This is one of the most important diagnostic comparisons:
- If MAF looks normal but fuel trims are extreme, airflow data may still be incorrect
- If MAF is unstable and fuel trims are correcting heavily, sensor accuracy is likely compromised
- If both are stable, the MAF sensor is likely not the issue
Step 3: Eliminate Other Common Causes
Before concluding the sensor is faulty, rule out other systems:
- Intake air leaks after the MAF sensor
- Dirty throttle body
- Weak fuel pressure or clogged injectors
- Exhaust leaks affecting oxygen readings
Many MAF “failures” are actually caused by these supporting issues.
Step 4: Final Decision Logic
Use this simple breakdown:
Likely Healthy MAF Sensor
- Stable g/s readings
- Smooth RPM response
- Fuel trims within normal range
- No drivability issues
Dirty or Contaminated MAF Sensor
- Slight inconsistencies in airflow data
- Improves after cleaning
- Mild fuel trim correction
Failing MAF Sensor
- Unstable or incorrect airflow readings
- Strong fuel trim corrections (+/- 10–25% or more)
- Poor driving performance under load
- No improvement after cleaning
Key Insight
OBD2 diagnosis is not about one single number. A correct conclusion comes from matching airflow behavior with fuel correction behavior across multiple driving conditions.
Common Mistakes When Using OBD2
Even with accurate live data, incorrect interpretation can lead to wrong diagnosis. These are the most frequent mistakes that reduce testing accuracy:
Misreading Generic Data Values
Different scanners may label or scale MAF data differently. Some show g/s, others show calculated airflow or PID variants. Misinterpreting these values can lead to false conclusions.
Ignoring Engine Load Conditions
Checking data only at idle is not enough. MAF problems often appear during acceleration or cruising, not just when the engine is stationary.
Confusing Fuel Trim Causes
High or low fuel trims are not always caused by the MAF sensor. Vacuum leaks, fuel pressure issues, or exhaust leaks can produce similar patterns.
Not Checking Intake System First
A dirty air filter, cracked intake hose, or loose clamp can completely distort MAF readings. Skipping this step often leads to unnecessary sensor replacement.
Relying on a Single Test
Using only idle data or only fuel trims is not reliable. A proper diagnosis always requires multiple test conditions.
How to Confirm a Bad MAF Sensor with OBD2
To confidently identify a failing MAF sensor, look for a consistent pattern across multiple tests rather than a single symptom.
Strong Indicators of Failure:
- Unstable or erratic MAF readings in live data
- Fuel trims consistently high or low under all conditions
- Poor engine performance during acceleration
- No improvement after cleaning the sensor
- Same abnormal behavior in both idle and driving tests
Supporting Confirmation:
- Intake system is fully sealed and leak-free
- Fuel system is functioning correctly
- Electrical connections are stable
If all conditions point toward the sensor, replacement becomes the most reliable solution.
Frequently Asked Questions
What is a normal MAF reading at idle?
It varies by engine size, but most vehicles show a low, stable g/s value. The key factor is consistency, not exact number.
Can OBD2 detect a bad MAF sensor?
Yes, OBD2 live data and fuel trim analysis can strongly indicate MAF issues, but confirmation often requires multiple tests.
What is g/s in MAF sensor reading?
It stands for grams per second and represents the amount of air entering the engine.
Can fuel trim show MAF failure?
Yes, extreme positive or negative fuel trims often indicate incorrect airflow measurement from the MAF sensor.
Is OBD2 enough to replace multimeter testing?
In many cases yes, but combining both methods provides the most accurate diagnosis.
Read More: How to Test a MAF Sensor with a Multimeter
Conclusion
Testing a MAF sensor with an OBD2 scanner provides a powerful and practical way to understand real engine behavior without removing parts or guessing. By analyzing live airflow data, RPM response, driving conditions, and fuel trims together, you can identify whether the sensor is working correctly or contributing to performance issues.
A proper diagnosis is always based on patterns, not single readings. When all data points consistently point toward a fault, replacing or cleaning the MAF sensor becomes a confident and informed decision.