A mass air flow (MAF) sensor is one of the most important sensors in your vehicle’s air intake system. It measures the amount of air entering the engine and sends that information to the engine control module (ECM), which uses the data to calculate the correct air-fuel mixture. If the sensor becomes dirty, faulty, or needs replacement, you’ll first need to remove it carefully to avoid damaging its delicate sensing element.
Fortunately, removing a MAF sensor is a straightforward DIY task on most vehicles. In many cases, the job takes less than 20 minutes and requires only a few basic hand tools. However, using the wrong tools, pulling on the wiring harness, or touching the sensor’s internal components can permanently damage the sensor and lead to poor engine performance, reduced fuel economy, or a check engine light.
In this guide, you’ll learn how to remove a MAF sensor safely, what tools you’ll need, where to find the sensor, and the precautions to take before you begin. I’ll also cover common mistakes to avoid, how to deal with stuck connectors or screws, and what to do after the sensor has been removed, whether you plan to clean, test, or replace it.
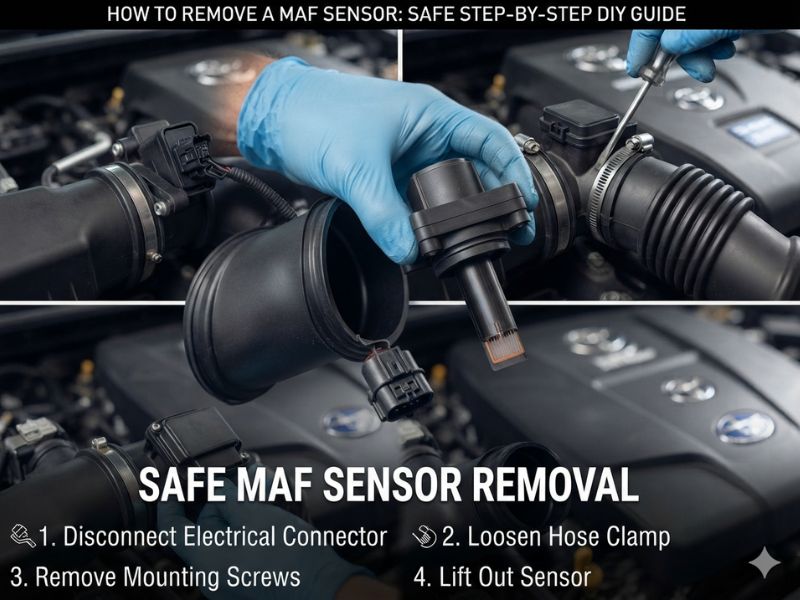
What You’ll Need Before Removing a MAF Sensor
Before opening the hood, gather the necessary tools and safety equipment. Having everything within reach will make the job quicker and reduce the risk of damaging the sensor or losing small parts during removal. While most MAF sensors can be removed with only a screwdriver or Torx bit, some vehicles may require additional tools depending on the sensor design and its location.
Basic Tools
The exact tools vary by vehicle, but you’ll typically need:
- Torx screwdriver or Torx bit set (T15, T20, or T25 are the most common)
- Security Torx bit (for tamper-resistant screws on some vehicles)
- Phillips or flat-head screwdriver
- Ratchet and socket set (if the intake duct needs to be removed)
- Needle-nose pliers (optional)
- Trim removal tool (optional for plastic clips)
- Flashlight or work light for better visibility
- Magnetic pickup tool (helpful if a screw is dropped into the engine bay)
Safety Equipment
Protect yourself and the sensor by using:
- Safety glasses
- Mechanic’s gloves or nitrile gloves
- Clean microfiber cloth or lint-free shop towel
Optional Supplies
Depending on what you plan to do after removal, you may also want to have:
- MAF sensor cleaner (if you’re cleaning the sensor)
- Replacement MAF sensor (if you’re installing a new one)
- Replacement O-ring or gasket (if applicable)
- Dielectric grease for the electrical connector (only if recommended by the vehicle manufacturer)
Tip: Check your vehicle’s owner’s manual or repair manual before starting. Some manufacturers use tamper-proof screws or have specific removal procedures that require a particular tool or sequence. Having the correct tools from the beginning will save time and help prevent stripped screws or broken connectors.
Understanding the Different Types of MAF Sensors
Although the basic removal process is similar across most vehicles, not all MAF sensors are designed the same way. Some sensors can be removed in minutes with two screws, while others are built into the air intake housing and require additional disassembly. Knowing which type of MAF sensor your vehicle uses will help you choose the right tools and avoid unnecessary force during removal.
Insert-Style MAF Sensor
The insert-style MAF sensor is the most common design found in modern passenger cars and light trucks. It is mounted directly into the air intake tube or air filter housing and is usually secured with two Torx or security Torx screws.
Once the electrical connector is unplugged and the screws are removed, the sensor can typically be pulled straight out. Since the sensing element is exposed, avoid touching the thin wire or film inside the sensor housing.
Common on: Ford, Toyota, Honda, Nissan, Hyundai, Kia, and many GM vehicles.
Cartridge-Style MAF Sensor
A cartridge-style MAF sensor is inserted deeper into the intake housing and sealed with an O-ring. It may fit tightly due to dirt buildup, heat, or the rubber seal.
After removing the retaining screws, gently wiggle the sensor while pulling it straight out. Avoid twisting it aggressively, as excessive force can crack the plastic housing or damage the sensing element.
Housing-Mounted MAF Sensor
Some vehicles use a complete MAF sensor housing rather than a removable sensor insert. In these systems, the sensing element is integrated into the housing that’s installed between the air filter box and the intake tube.
Removing this type of MAF sensor usually involves:
- Disconnecting the electrical connector
- Loosening the intake hose clamps
- Removing the entire housing from the air intake system
If only the sensing element has failed, check whether it can be replaced separately or if the entire housing must be replaced.
Integrated MAF and Intake Air Temperature (IAT) Sensor
Many newer vehicles combine the MAF sensor and the Intake Air Temperature (IAT) sensor into a single unit. While the removal procedure is nearly identical, you’ll be disconnecting one sensor that performs two functions.
Because this assembly contains additional electronics, handle it with extra care and avoid exposing the connector or sensing elements to moisture, dirt, or physical impact.
Why Identifying the Sensor Type Matters
Before you begin, take a moment to identify the type of MAF sensor installed in your vehicle. This simple step can help you:
- Choose the correct screwdriver or Torx bit
- Understand whether the intake duct needs to be removed
- Prevent damage to delicate sensing components
- Avoid breaking plastic tabs, clips, or housings
- Complete the job more efficiently with fewer surprises
If you’re unsure which design your vehicle uses, compare the sensor with your owner’s manual or a manufacturer parts diagram before attempting removal. A few minutes of preparation can prevent costly mistakes later.
Where Is the MAF Sensor Located?
Before you can remove a MAF sensor, you need to know where it’s located. On most vehicles, the sensor is easy to find because it’s installed in the air intake system, where it can measure the volume of air entering the engine. However, its exact position can vary depending on the engine layout, manufacturer, and whether the vehicle is naturally aspirated or turbocharged.
Most Common Location
In the majority of gasoline-powered vehicles, the MAF sensor is mounted between the air filter box and the throttle body. It’s typically attached to the air intake tube with two screws or integrated into a short section of the intake housing.
To locate it:
- Open the hood and find the air filter box.
- Follow the large plastic air intake tube toward the engine.
- Look for a small sensor with an electrical connector plugged into it.
This is where you’ll usually find the MAF sensor.
On Turbocharged Engines
Turbocharged engines may position the MAF sensor slightly differently. Depending on the vehicle’s design, it is commonly installed:
- Between the air filter box and the turbocharger inlet
- Just before the turbo intake pipe
- Inside a dedicated intake housing near the air box
Because turbo intake systems often include additional piping and components, accessing the sensor may require removing an engine cover or loosening an intake tube.
On Naturally Aspirated Engines
Naturally aspirated engines generally offer the easiest access. In many cases, the MAF sensor is clearly visible as soon as the hood is opened, allowing you to remove it without taking apart much of the intake system.
On Diesel Vehicles
Many diesel engines also use a MAF sensor in the intake system, although the surrounding components can make access more limited. Depending on the vehicle, you may need to remove an engine cover or disconnect part of the intake duct before reaching the sensor.
Vehicles That Don’t Have a MAF Sensor
Not every vehicle is equipped with a MAF sensor. Some manufacturers use a Manifold Absolute Pressure (MAP) sensor instead to calculate incoming air. If your vehicle relies solely on a MAP sensor, you won’t find a MAF sensor in the intake tube.
If you’re unsure whether your vehicle has one, check:
- The owner’s manual
- A factory service manual
- An OEM parts diagram
- A reputable online parts catalog using your vehicle’s year, make, model, and engine
How to Confirm You’ve Found the Correct Sensor
Before removing anything, verify that you’ve identified the correct component. A MAF sensor usually has these characteristics:
- Mounted directly in the air intake tube or air intake housing
- Connected by a multi-pin electrical connector
- Secured with screws, bolts, or retaining clips
- Positioned downstream of the air filter and upstream of the throttle body
Taking a few extra moments to confirm the sensor’s location can prevent you from disconnecting the wrong component and make the removal process much smoother.
Before You Start: Important Safety Precautions
Removing a MAF sensor is a simple job, but it requires careful handling. The sensing element inside the sensor is extremely delicate, and a small mistake—such as pulling on the wiring, dropping the sensor, or touching the sensing wire—can permanently damage it. Spending a few minutes on basic safety precautions can help you avoid costly repairs and ensure the job goes smoothly.
Turn Off the Engine and Let It Cool
Always remove the MAF sensor with the engine turned off. If you’ve recently driven the vehicle, allow the engine to cool for at least 15–30 minutes.
Working around a hot engine increases the risk of burns, and heat can make plastic connectors and intake components more difficult to handle.
Park the Vehicle Safely
Before opening the hood:
- Park on a flat, level surface.
- Shift the transmission into Park (automatic) or First Gear/Reverse (manual).
- Apply the parking brake.
- Remove the ignition key or keep the key fob away from the vehicle if it uses a push-button start.
This prevents accidental engine startup while you’re working.
Should You Disconnect the Battery?
For many vehicles, disconnecting the battery isn’t strictly required just to remove the MAF sensor. However, it’s often recommended if you’ll be replacing the sensor, working near exposed electrical connections, or removing additional intake components.
Disconnecting the negative (-) battery terminal can help:
- Prevent accidental short circuits
- Reduce the chance of triggering electrical faults
- Eliminate the risk of the engine being started accidentally
If you choose to disconnect the battery, use the correct socket or wrench and isolate the negative cable so it can’t accidentally touch the terminal.
Handle the Electrical Connector Carefully
The MAF sensor connector is held in place by a locking tab or safety clip. Never pull on the wires to disconnect it.
Instead:
- Press or lift the locking tab as designed.
- Hold the connector body—not the wiring harness.
- Pull it straight back with steady pressure.
If the connector feels stuck, inspect it for dirt or a secondary locking clip instead of forcing it.
Never Touch the Sensing Element
Inside the MAF sensor is a thin wire or heated film that measures incoming airflow. This component is extremely fragile.
Avoid:
- Touching it with your fingers
- Using screwdrivers or picks inside the sensor
- Wiping it with a cloth
- Blowing compressed air directly onto it
Even slight contact can damage the sensing element or affect its accuracy.
Keep Dirt and Debris Out of the Intake
Once the sensor is removed, the intake opening is exposed. Dirt, sand, leaves, or loose hardware that falls into the intake system can eventually reach the engine.
To prevent contamination:
- Place removed screws in a small container.
- Keep the work area clean.
- Cover the intake opening with a clean lint-free cloth if the sensor will remain out for an extended period.
Wear Basic Safety Gear
Although this is a low-risk DIY task, it’s still good practice to wear:
- Safety glasses to protect your eyes from dust and debris
- Mechanic’s or nitrile gloves for a better grip and cleaner hands
Loose clothing and jewelry should also be avoided, especially if you’re working in a crowded engine bay.
Read the Vehicle-Specific Procedure First
While the overall removal process is similar across most vehicles, some manufacturers use security Torx screws, hidden fasteners, or unique connector locks. Taking a quick look at your owner’s manual or repair manual beforehand can help you avoid stripped screws, broken clips, and unnecessary disassembly.
With these precautions in mind, you’re ready to begin removing the MAF sensor safely and without damaging the sensor or surrounding intake components.
Step-by-Step: How to Remove a MAF Sensor
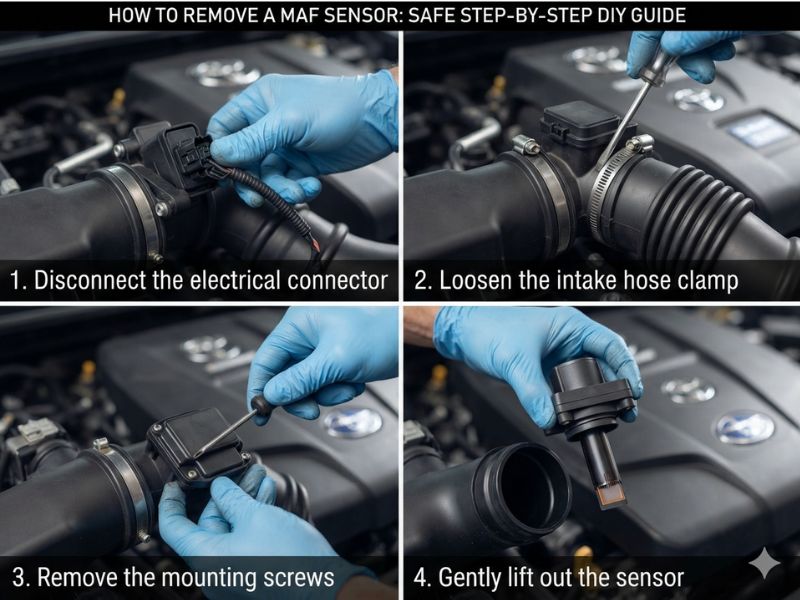
Once you’ve gathered the necessary tools and taken the proper safety precautions, you’re ready to remove the MAF sensor. Although the exact procedure varies slightly between vehicles, the following steps apply to most cars, SUVs, and light trucks equipped with a removable MAF sensor.
Step 1: Open the Hood and Locate the MAF Sensor
Start by opening the hood and securing it with the prop rod or hood struts. Locate the air filter box, then follow the large air intake tube toward the engine.
The MAF sensor is typically installed along this intake path, just after the air filter and before the throttle body. It will have an electrical connector attached and is usually secured with two screws or integrated into the intake housing.
Before proceeding, verify that you’ve identified the correct sensor. If necessary, compare it with your owner’s manual or a parts diagram for your specific vehicle.
Tip: Taking a quick photo of the sensor and connector before removal can make reinstallation easier later.
Step 2: Disconnect the Electrical Connector
The electrical connector must be removed before you can take out the sensor.
To disconnect it safely:
- Locate the locking tab or safety clip.
- Press, slide, or lift the locking mechanism, depending on the connector design.
- Hold the connector body—not the wires.
- Pull the connector straight away from the sensor.
Some vehicles use additional locking clips that must be released before the connector can be removed.
If the connector doesn’t come off easily:
- Check for a hidden locking tab.
- Wiggle the connector gently while pulling.
- Avoid using excessive force or metal tools that could crack the plastic.
Never pull directly on the wiring harness, as this can damage the wires or loosen the connector pins.
Step 3: Remove the Intake Duct (If Necessary)
On many vehicles, the MAF sensor is fully accessible without removing the air intake tube. However, on others, the intake duct may block access to the mounting screws.
If additional space is needed:
- Loosen the hose clamp using a screwdriver or socket.
- Release any retaining clips securing the intake duct.
- Carefully move the duct aside without stretching attached hoses or wiring.
There’s usually no need to remove the entire air intake assembly—only enough to gain clear access to the sensor.
Tip: If your vehicle has an engine cover blocking access, remove it first according to the manufacturer’s instructions.
Step 4: Remove the Retaining Screws or Fasteners
Most MAF sensors are secured with two retaining screws, though some use bolts or clips.
Choose the correct tool for your vehicle, such as:
- Torx bit (most common)
- Security Torx bit
- Phillips screwdriver
- Allen key
- Small socket
Turn each fastener counterclockwise while applying steady pressure.
As you remove the screws:
- Place them in a magnetic tray or small container.
- Avoid dropping them into the engine bay.
- Inspect the screw heads for signs of corrosion or damage.
If a screw feels unusually tight, don’t force it. Applying excessive torque can strip the head and make removal much more difficult.
Step 5: Carefully Remove the MAF Sensor
With the connector unplugged and the mounting screws removed, it’s time to take out the sensor.
Grip the plastic body of the sensor and pull it straight out of the housing. If the sensor is sealed with an O-ring, you may need to wiggle it gently to break the seal.
Avoid:
- Twisting the sensor aggressively
- Using a screwdriver to pry against the plastic housing
- Pulling on the sensing element
If the sensor feels stuck, stop and inspect it to make sure all fasteners have been removed before applying additional force.
Once the sensor is free, place it on a clean, dry, lint-free surface away from dirt, dust, and moisture.
Step 6: Inspect the Sensor and Mounting Area
Before cleaning, testing, or replacing the sensor, take a few minutes to inspect both the sensor and the mounting location.
Check the sensor for:
- Dirt or dust buildup
- Oil contamination
- Cracked plastic housing
- Bent or damaged connector pins
- Broken or flattened O-ring
- Damage to the sensing wire or sensing film
Also inspect the mounting area for:
- Dirt inside the intake tube
- Damaged sealing surfaces
- Loose debris
- Cracks in the intake housing
If the sensor appears physically damaged, cleaning it is unlikely to solve the problem, and replacement is usually the better option.
At this stage, the MAF sensor has been safely removed and is ready for its next step—whether that’s cleaning, testing, or installing a new unit.
How to Remove a Stuck MAF Sensor
In most cases, a MAF sensor slides out easily after the electrical connector and retaining screws are removed. However, years of heat, dirt, oil residue, or a hardened O-ring can cause the sensor to become stuck. The key is to remove it patiently without damaging the delicate sensing element or the plastic intake housing.
If the Electrical Connector Won’t Unplug
A stubborn connector is one of the most common issues during MAF sensor removal. Before applying more force, make sure you’ve fully released the locking mechanism.
Try these steps:
- Double-check for a hidden locking tab or secondary safety clip.
- Press the connector inward slightly before pulling it out.
- Wiggle the connector gently from side to side while holding the release tab.
- Remove dirt around the connector with a soft brush or compressed air if necessary.
Avoid pulling on the wiring harness or using excessive force, as this can damage the connector or pull the wires out of their terminals.
If the Retaining Screws Are Rusted or Seized
Corrosion can make retaining screws difficult to remove, especially on older vehicles or those driven in wet or salty climates.
If a screw won’t turn:
- Ensure you’re using the correct Torx or screwdriver size.
- Apply firm, even pressure to prevent the tool from slipping.
- Use a small amount of penetrating oil around the screw threads if they’re visibly corroded.
- Allow the oil to soak in for several minutes before trying again.
Never force a damaged screw. Stripping the head can make removal much more difficult.
If the Screw Head Is Stripped
A stripped Torx or Phillips screw requires extra care.
Depending on the damage, you may be able to:
- Try a new, correctly sized bit for a tighter fit.
- Use a manual impact driver to improve grip.
- Remove the screw with a screw extractor if the head is severely stripped.
If you’re uncomfortable using extraction tools, it’s often safer to seek professional assistance rather than risk damaging the intake housing.
If the Sensor Won’t Pull Out
Even after the screws are removed, the sensor may remain stuck because the rubber O-ring has bonded to the housing over time.
Instead of forcing it:
- Grip the sensor by its plastic body.
- Wiggle it gently from side to side.
- Pull straight outward with steady pressure.
Do not pry against the sensor with a screwdriver, as this can crack the housing or break the mounting flange.
If the O-Ring Is Stuck
Some MAF sensors use a rubber O-ring to create an airtight seal. Over time, heat and age can cause the rubber to harden and stick inside the intake housing.
If this happens:
- Continue applying gentle rocking motions.
- Pull evenly without twisting excessively.
- Inspect the O-ring once the sensor is removed.
If the O-ring is cracked, flattened, or damaged, replace it before reinstalling the sensor to prevent unmetered air from entering the intake system.
When to Stop and Recheck
If the sensor still won’t come out after reasonable effort, stop and inspect the assembly carefully. Look for:
- A hidden retaining screw or clip
- An intake tube that still needs to be loosened
- A bracket securing the wiring harness
- Vehicle-specific fasteners not immediately visible
Forcing the sensor can result in a broken housing, damaged connector, or a ruined sensing element—all of which are far more expensive than taking a few extra minutes to identify what’s preventing removal.
With patience and the correct technique, even a stubborn MAF sensor can usually be removed without causing damage to the sensor or the surrounding intake components.
Common Mistakes to Avoid When Removing a MAF Sensor
Removing a MAF sensor is relatively simple, but even small mistakes can lead to expensive repairs or poor engine performance. Since the sensor is responsible for measuring incoming airflow with extreme precision, it should always be handled with care. Avoiding the following mistakes will help ensure a safe removal process and prevent unnecessary damage.
Touching the Sensing Element
The sensing wire or sensing film inside the MAF sensor is extremely fragile. Even light contact from your fingers, a cloth, or a tool can damage it or leave contaminants behind that affect its readings.
Always hold the sensor by its plastic housing and keep your hands away from the sensing element.
Pulling on the Wiring Harness
When disconnecting the electrical connector, never pull on the wires. Doing so can loosen terminals, break internal wiring, or damage the connector itself.
Instead, press the locking tab and pull the connector by its plastic body.
Using the Wrong Tool
Many MAF sensors are secured with Torx or security Torx screws. Using the wrong screwdriver or an incorrectly sized bit can strip the screw heads, making removal much more difficult.
Before starting, verify which fastener your vehicle uses and choose the correct tool.
Forcing a Stuck Sensor
If the sensor doesn’t come out after the screws are removed, don’t pry it with a screwdriver or apply excessive force.
A stuck sensor is often caused by a tight O-ring or hidden fastener. Gentle rocking motions and careful inspection are much safer than forcing the sensor out.
Dropping the Sensor
Although the plastic housing may look durable, dropping a MAF sensor can crack the housing or damage the delicate electronics inside.
As soon as the sensor is removed, place it on a clean, stable, lint-free surface where it won’t be knocked off the workbench.
Letting Dirt Enter the Intake System
Once the sensor is removed, the intake opening is exposed. Dirt, dust, leaves, screws, or other debris that fall inside can eventually reach the engine.
Keep the work area clean and cover the opening with a clean cloth if the sensor will remain out for more than a few minutes.
Ignoring the O-Ring or Seal
If your MAF sensor uses an O-ring, inspect it before reinstalling the sensor. A cracked, flattened, or damaged seal can allow unmetered air to enter the intake system, leading to rough idling, poor fuel economy, and check engine lights.
Replace the O-ring if it shows signs of wear.
Cleaning the Sensor Incorrectly
Many people remove the sensor for cleaning, but using the wrong cleaner can permanently damage it.
Avoid using:
- Brake cleaner
- Carburetor cleaner
- Throttle body cleaner
- Compressed air
- Brushes or cotton swabs
Only use a cleaner specifically designed for MAF sensors, and allow the sensor to dry completely before reinstalling it.
Reinstalling the Sensor in the Wrong Direction
If you’re planning to reinstall the same sensor after cleaning or inspection, pay attention to its orientation during removal.
Most MAF sensors have an airflow arrow that must point toward the engine. Installing it backward can result in incorrect airflow readings and drivability issues.
Forgetting to Secure the Electrical Connector
After the sensor is reinstalled, make sure the electrical connector clicks securely into place. A loose connection can trigger diagnostic trouble codes, illuminate the check engine light, or cause symptoms that mimic a failed MAF sensor.
Taking a few extra minutes to avoid these common mistakes can save hours of troubleshooting later. Careful handling not only protects the sensor but also helps ensure your engine continues to receive accurate airflow readings after the job is complete.
Frequently Asked Questions
Can I remove a MAF sensor without disconnecting the battery?
Yes, on many vehicles you can remove the MAF sensor without disconnecting the battery. However, disconnecting the negative battery terminal is recommended if you’re replacing the sensor or working around exposed electrical components. It also reduces the risk of accidental short circuits.
What tools do I need to remove a MAF sensor?
Most MAF sensors can be removed with a Torx screwdriver or Torx bit set. Depending on your vehicle, you may also need a security Torx bit, Phillips screwdriver, socket wrench, or flat-head screwdriver to remove the intake duct or mounting hardware.
How long does it take to remove a MAF sensor?
For most vehicles, removing a MAF sensor takes 10 to 20 minutes. If the sensor is difficult to access or the intake system needs to be partially removed, the job may take longer.
Why won’t my MAF sensor come out?
A MAF sensor may be stuck because of a hardened O-ring, dirt buildup, corrosion, or a hidden retaining screw or clip. Before applying more force, make sure all fasteners have been removed and gently rock the sensor while pulling it straight out.
Can I remove a MAF sensor without removing the intake tube?
Sometimes. On many vehicles, the sensor is easy to access without removing the intake tube. On others, loosening or removing part of the intake duct provides the clearance needed to remove the sensor safely.
Is it safe to touch the inside of a MAF sensor?
No. Never touch the sensing wire or sensing film inside the sensor. These components are extremely delicate and can be damaged by even light contact, affecting the sensor’s accuracy and engine performance.
Can I drive my car with the MAF sensor removed?
No. Driving with the MAF sensor removed is not recommended. The engine may run poorly, stall, lose power, or illuminate the Check Engine Light because the engine control module is no longer receiving accurate airflow data.
Will removing the MAF sensor reset the ECU?
No. Simply removing the MAF sensor does not reset the engine control module (ECU). Some vehicles may temporarily adapt after the sensor is reinstalled, but a proper ECU reset usually requires disconnecting the battery for a period of time or using an OBD-II scan tool, depending on the vehicle.
Should I replace the O-ring when removing the MAF sensor?
Inspect the O-ring whenever the sensor is removed. If it is cracked, flattened, brittle, or damaged, replacing it is a good idea to ensure a proper seal and prevent unmetered air from entering the intake system.
Can removing a MAF sensor damage it?
Not if it’s removed correctly. Using the proper tools, handling the sensor by its plastic housing, and avoiding contact with the sensing element greatly reduce the risk of damage.
Conclusion
Removing a MAF sensor is one of the easier DIY maintenance tasks, but it requires patience and careful handling. By using the correct tools, disconnecting the electrical connector properly, and avoiding contact with the delicate sensing element, you can remove the sensor safely without causing damage.
Whether your goal is to clean, test, or replace the MAF sensor, taking the time to inspect the sensor and surrounding intake components can help prevent future engine performance issues. Once the work is complete, always verify that the sensor is securely reinstalled, the electrical connector is fully locked, and the intake system is sealed before starting the engine.
Following the steps in this guide will help you complete the job confidently while reducing the risk of costly mistakes and ensuring your engine continues to receive accurate airflow readings.