To attach safety chains to a trailer tongue, secure two properly rated chains to approved structural mounting points on the tongue, typically one on each side, using suitable bolted or welded-on anchors. Cross the chains underneath the coupler and connect their free ends to the tow vehicle’s designated safety-chain attachment points.
Safety chains provide a secondary connection if the trailer separates from its primary hitch. However, their effectiveness depends on more than chain strength. Poorly positioned anchors, weak bolts, unsuitable welds, or excessive slack can prevent the chains from functioning properly during an emergency.
The installation method depends on whether the trailer has an A-frame or straight tongue, whether existing attachment points are available, and whether the frame is made from steel or aluminum. The trailer’s gross vehicle weight rating also determines the required capacity of the complete chain assembly.
In this article, I cover how to select attachment points, install bolted or welded safety-chain anchors, choose properly rated hardware, connect the chains to a tow vehicle, adjust their length, and inspect the installation before towing.
Where Should Safety Chains Attach to a Trailer Tongue?
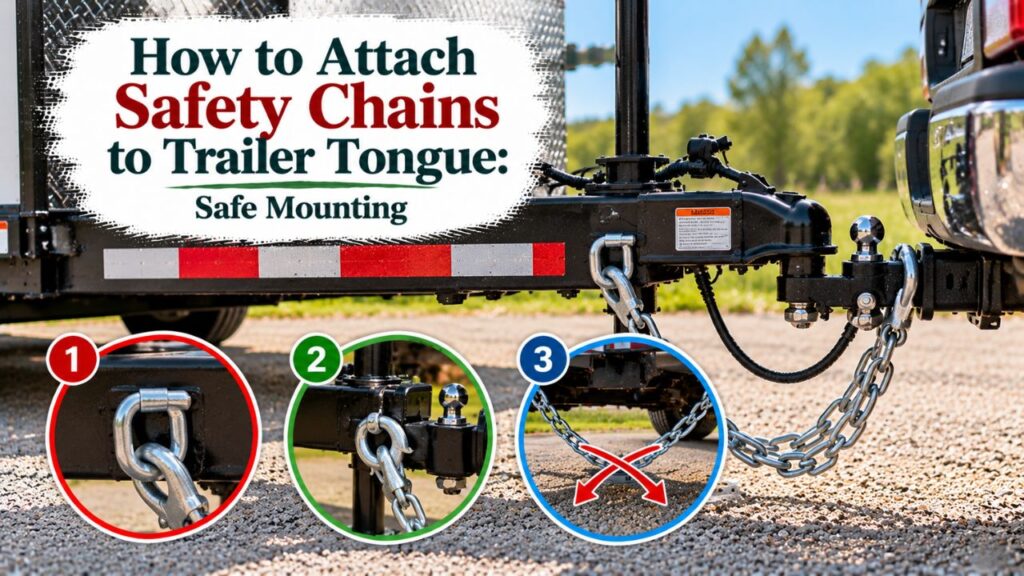
Safety chains should attach to a structurally suitable part of the trailer tongue, independently of the primary hitch coupling.
For many conventional trailers, the mounting points are located near the front of the tongue, behind the coupler.
The goal is to create a backup connection that can help keep the trailer attached to the tow vehicle if the primary coupling fails.
Safety Chain Attachment Points on an A-Frame Tongue
An A-frame trailer tongue has two structural members extending forward from the trailer frame toward the coupler.
This design is common on travel trailers, cargo trailers, and utility trailers.
For a typical two-chain installation:
- Attach one chain to an approved anchor on the left tongue member.
- Attach the second chain to an approved anchor on the right tongue member.
- Position both anchors according to the trailer manufacturer’s specifications.
- Keep the chain attachments independent of the coupler’s primary fastening system.
- Ensure the chains can move freely toward the tow vehicle without rubbing against sharp edges.
Some trailers already have factory-installed chain tabs, loops, or mounting brackets.
If those components are undamaged and properly rated, they are generally preferable to creating new mounting points.
Safety Chain Attachment Points on a Straight Tongue
A straight-tongue trailer has a single central drawbar rather than two angled frame members.
This arrangement is common on smaller utility trailers and some boat trailers.
Safety chains may be attached through manufacturer-approved mounting brackets or other rated anchor arrangements.
Because the available structural space is different from an A-frame tongue, the mounting layout may also differ.
Avoid drilling holes into the drawbar or installing random eye bolts without confirming that the frame and attachment method can support the required loads.
A thin-walled or aluminum tongue may require additional reinforcement or a specifically engineered connection.
Why Chains Should Not Depend on the Coupler
Safety chains must remain effective if the primary hitch connection fails.
That means attaching them to the same bolts that secure the coupler can defeat the purpose of having an independent backup system.
For example, if coupler mounting hardware fails and the chains depend on those same bolts, both connections could be lost.
Use separate, approved structural anchor points rather than relying on the hitch ball, coupler latch, or common coupler fasteners.
What Hardware Do You Need to Attach Safety Chains?
The correct hardware depends on the trailer’s rated weight and the type of mounting system.
A typical installation may require:
- Two properly rated trailer safety chains.
- Two approved trailer tongue mounting brackets or anchor points.
- Rated clevis fittings, shackles, or other compatible connectors.
- Appropriate mounting bolts and locking nuts if using a bolted system.
- Reinforcement plates or sleeves if specified by the mounting design.
- Suitable safety hooks with functional retainers.
- Wrenches and torque tools appropriate for the hardware.
- Wheel chocks and other equipment needed to stabilize the trailer.
Weld-on mounting systems also require appropriate welding equipment and a qualified installer.
Important: Hardware size alone doesn’t establish its strength. The chain, hook, connector, mounting bracket, fasteners, and attachment to the trailer must all be suitable for the trailer’s rated loading.
Choose Safety Chains With the Correct Weight Rating
Start by checking the trailer’s Gross Vehicle Weight Rating (GVWR).
GVWR is the maximum permitted weight of the trailer and its cargo.
For example, a trailer with a 7,000-pound GVWR requires safety-chain equipment suitable for that rated loading.
Don’t select chains based only on the empty trailer weight or the weight normally carried on short trips.
Safety-chain ratings may be expressed as minimum breaking strength or working load limit (WLL). These are different measurements and should not be treated as interchangeable.
A conservative selection is to use a rated chain assembly capable of meeting or exceeding the trailer’s GVWR for each chain, while following the applicable equipment standard and state requirements.
The Purdue University Extension guide to trailer hitch safety explains that chains, hooks, bolts, and other connectors must be strong enough to withstand the sudden loads associated with trailer separation.
The publication also emphasizes that the complete connection is only as strong as its weakest component.
Key Takeaway: A heavy-duty chain cannot compensate for an undersized hook, weak mounting bracket, or improperly installed bolt.
Select Suitable Safety Chain Connectors
Safety chains may connect to the trailer through:
- Manufacturer-approved clevis fittings.
- Rated shackles.
- Properly designed chain-retaining brackets.
- Approved bolted anchor assemblies.
- Factory-installed welded attachment loops.
Choose connectors specifically suitable for the intended trailer application.
If a clevis or shackle uses a removable pin, secure it using the manufacturer’s specified retaining method.
Avoid ordinary hardware-store quick links or open hooks without verified ratings.
Don’t modify, bend, or weld chain links to make them fit an unsuitable mounting point.
How to Attach Safety Chains to Trailer Tongue Step by Step
The installation process begins with securing the trailer and identifying suitable attachment points.
The following procedure applies to conventional ball-coupled trailers with two safety chains.
Step 1: Secure the Trailer Before Installation
Park the trailer on firm, level ground.
Disconnect it from the tow vehicle if necessary and support the tongue using its properly rated jack.
Chock the trailer wheels securely.
Make sure the trailer cannot move or fall while the mounting hardware is being inspected or installed.
Never work beneath an unsupported trailer tongue.
If existing chains are damaged or incorrectly attached, remove them only after the trailer is safely supported.
Step 2: Inspect the Tongue and Existing Chain Mounts
Examine the trailer tongue near the coupler.
Look for factory-installed attachment loops, welded tabs, or bolted brackets.
Check for:
- Cracked welds.
- Corrosion around attachment points.
- Deformed mounting tabs.
- Loose hardware.
- Elongated or damaged mounting holes.
- Structural cracks in the tongue.
- Previous unauthorized modifications.
If suitable factory attachment points are available, use them according to the trailer manufacturer’s instructions.
Don’t install additional hardware unnecessarily.
If a structural member is cracked or severely corroded, repair or replacement must be addressed before towing.
Step 3: Identify Approved Chain Mounting Locations
For an A-frame tongue, look for manufacturer-approved positions on the two structural tongue members.
For a straight tongue, identify the approved anchor arrangement for that specific frame.
The mounting points should provide a direct and reliable load path into the trailer structure.
They must also allow the chains to extend forward without rubbing against sharp corners, the jack, or other equipment.
Avoid positioning the mounts so far back that the chains become unnecessarily long.
However, don’t choose a location merely because it is close to the coupler.
The correct mounting position must be structurally suitable, not just convenient.
If the trailer doesn’t have identified attachment points, obtain installation specifications from the trailer or anchor manufacturer before drilling or welding.
Step 4: Install the Approved Mounting Brackets
The attachment method depends on the mounting system.
For a manufacturer-approved bolt-on assembly:
- Confirm that the specified mounting location is suitable for drilling or existing holes.
- Position the mounting bracket according to its instructions.
- Install the required bolts, washers, spacers, and reinforcement components.
- Fit the specified locking nuts or retaining hardware.
- Tighten the fasteners to the manufacturer’s required torque.
- Confirm that the bracket is secure and correctly aligned.
Don’t select bolt diameter, hole placement, or torque values by guessing.
For a weld-on anchor, have a qualified trailer fabrication professional install the approved bracket using the specified welding procedure.
The chain itself should not be welded directly to the trailer.
Step 5: Connect Each Chain to Its Anchor
Once the brackets are installed and approved for use, attach the chains using compatible rated connectors.
For a two-chain arrangement, secure one chain to each intended tongue anchor.
Make sure the chain links aren’t pinched or forced against sharp edges.
If using a removable clevis pin or shackle, install the required retaining device.
Check that the connector cannot disengage accidentally.
When finished, both chains should remain securely connected to the trailer even when the tow vehicle is disconnected.
Step 6: Cross the Chains Under the Trailer Coupler
Connect the trailer coupler to the tow vehicle’s hitch ball and secure it using the appropriate latch and retaining device.
Then route the chains beneath the coupler.
For a typical crossed arrangement:
- Take the chain attached to the left side of the trailer tongue.
- Route it underneath the coupler toward the right-side receiver attachment loop.
- Attach the hook to the approved right-side loop.
- Take the right trailer chain and route it underneath the coupler toward the left-side loop.
- Secure the second hook.
- Verify that both retainers are fully engaged.
The two chains should form an X-shaped arrangement beneath the trailer tongue.
This helps create a cradle that can reduce the likelihood of the coupler striking the road if the primary hitch separates.
Step 7: Adjust the Safety Chain Slack
Safety chains must be long enough for normal turns but short enough to avoid dragging or hanging excessively low.
With the tow vehicle and trailer aligned, inspect the amount of slack in each chain.
Both sides should have approximately equal usable slack.
Check that the chains don’t contact the ground, trailer jack, electrical wiring, or moving hitch components.
If the chains are too long, use the manufacturer’s approved shortening arrangement or replace them with properly sized chains.
Don’t assume that twisting the chains repeatedly is a safe adjustment method.
Step 8: Check the Completed Installation
Before towing, verify:
- Both chains are securely attached to the trailer structure.
- All mounting hardware is correctly installed.
- Chain hooks are connected to approved vehicle attachment points.
- Both chains cross beneath the coupler.
- The chains allow adequate turning movement.
- No chains drag on the ground.
- The trailer’s breakaway cable remains separate and properly connected.
- The coupler and hitch are correctly secured.
If the attachment system has been newly installed or repaired, have it inspected by a qualified trailer technician before road use.
How to Bolt Safety Chains to a Trailer Tongue
Bolted attachment systems can be suitable when the trailer and hardware manufacturers permit them.
However, drilling a structural tongue member without an approved design can weaken the frame.
Use Properly Rated Mounting Bolts
Trailer safety-chain connections may use high-strength bolts such as SAE Grade 5 or Grade 8 hardware when specified by the mounting design.
The correct grade, diameter, thread engagement, washer arrangement, and tightening torque depend on the particular installation.
A higher bolt grade doesn’t automatically make a poorly designed connection safe.
The surrounding frame material must also be capable of resisting the forces transferred through the fastener.
A bolt can remain intact while thin trailer tubing tears or deforms around its mounting hole.
Reinforce Thin-Walled Tongue Sections When Required
Some trailer tongues use rectangular or square steel tubing.
When bolts pass through hollow tubing, tightening the fasteners can deform the walls unless the connection is properly designed.
An approved installation may require:
- Internal compression sleeves.
- Reinforcement plates.
- Properly sized washers.
- Suitable brackets that distribute the load.
These components must be part of an appropriate mounting design.
Avoid installing an ordinary bolt through thin tubing simply because it fits.
Can You Drill Through an Aluminum Trailer Tongue?
Not without confirming that the trailer manufacturer permits the modification.
Aluminum structural members can be sensitive to hole placement, local stress concentrations, and inappropriate fastening arrangements.
Galvanic corrosion between dissimilar metals can also become a concern.
Use a manufacturer-approved mounting method for aluminum trailers.
If no approved arrangement is available, have a qualified trailer fabricator or engineer determine the appropriate connection.
Can You Weld Safety Chains Directly to a Trailer Tongue?
Welding a safety-chain link directly to a trailer tongue is not recommended and is prohibited under some state regulations.
Heat from welding can alter a chain’s mechanical properties and weaken the connection.
A safer approach, when permitted, is to weld a suitable chain-mounting bracket to the trailer structure and then mechanically attach the rated chain to that bracket.
Weld-On Safety Chain Brackets
Purpose-made weld-on anchors are available for certain steel trailer frames.
The bracket must be:
- Suitable for the trailer’s structural material.
- Rated for the required load.
- Compatible with the proposed chain connector.
- Positioned according to the approved mounting design.
- Installed using an appropriate welding procedure.
Don’t substitute a random piece of steel or an ordinary hardware-store ring for a rated attachment component.
Welding on a trailer tongue can also affect existing protective coatings and structural properties.
Have this work performed by a qualified professional.
What State Regulations Say About Welding Chains
The Washington Administrative Code, WAC 204-70-070, requires qualifying safety-chain attachments to be independent of the primary coupling fasteners.
It also prohibits welding or repairing the safety-chain links themselves, including welding a chain link directly to the towing or towed vehicle.
The rule requires chains to be crossed beneath the tongue and prohibits attaching them to the hitch ball or a readily removable ball mount.
These are Washington-specific requirements, not a statement that identical wording applies in every state.
Check the regulations applicable to the trailer’s registration and operating location, along with the relevant manufacturer instructions.
How to Connect Trailer Safety Chains to the Tow Vehicle
A properly anchored chain is useful only when its free end is connected to a suitable part of the tow vehicle.
Most frame-mounted receiver hitches have dedicated safety-chain attachment loops.
These are normally located on the fixed receiver assembly.
Use the Receiver’s Designated Safety Chain Loops
Attach each chain hook to a properly rated safety-chain loop provided by the hitch manufacturer.
Do not attach safety chains directly to:
- The hitch ball.
- The removable ball mount.
- The coupler latch.
- Unrated bumper trim or sheet metal.
- An ordinary cargo tie-down point.
- An unidentified hole in the vehicle structure.
A hitch manufacturer’s designated loops provide the intended attachment locations.
If the hooks don’t fit, don’t force them into the openings or use an unrated connector.
Select compatible, properly rated hardware.
Check the Safety Hook Retainers
Safety-chain hooks commonly use spring-loaded latches or other retainers.
Their purpose is to reduce the possibility of accidental disengagement.
Check that each hook:
- Fits the attachment loop correctly.
- Has no visible cracks or severe deformation.
- Has a functional retaining latch.
- Is not excessively worn.
- Cannot slip out under normal movement.
- Is rated for the required application.
A bent or broken hook should be replaced with an appropriate rated component.
Avoid using ordinary open hooks unless they meet the applicable equipment requirements and installation instructions.
How Much Slack Should Trailer Safety Chains Have?
There is no single chain length that fits every trailer and tow vehicle.
The correct length depends on the distance between the trailer anchors and vehicle connection points, the hitch arrangement, and the turning clearance.
The chains should have only enough slack to permit the required turning and articulation without binding.
Check Safety Chain Length While Turning
After connecting the trailer, inspect how the chains move through the expected turning range.
In a safe, open area, a trained driver and observer can check the arrangement according to the trailer and hitch manufacturers’ procedures.
The observer must remain clear of the vehicle-trailer combination and never stand between them while the vehicle is moving.
Check that:
- Neither chain becomes tight during normal turns.
- The chains don’t bind against the coupler.
- Hooks remain properly seated.
- Chains don’t interfere with hitch components.
- The chains remain clear of the road.
- The left and right sides have suitable slack.
If the chains become tight, they may place damaging forces on the anchors or restrict articulation.
If they hang too low, they can scrape the road.
Should You Twist Safety Chains to Shorten Them?
Twisting chains is sometimes used informally to remove excess slack, but it can change how chain links carry force.
Repeated twisting may create uneven loading or reduce the predictability of the assembly’s strength.
Use the chain or hitch manufacturer’s approved length-adjustment method instead.
When no suitable adjustment is available, properly sized replacement chains are preferable to an improvised connection.
Never shorten safety chains by cutting and rewelding ordinary links.
Safety Chains vs. Trailer Breakaway Cable
Safety chains and the trailer’s emergency breakaway system serve different functions.
Safety chains provide a secondary mechanical connection between the trailer and tow vehicle.
A breakaway cable activates the trailer’s emergency braking system when the breakaway switch is pulled.
Many trailers with electric brakes have a breakaway switch connected to a dedicated battery.
Why the Breakaway Cable Must Stay Separate
Don’t attach the trailer’s breakaway cable to a safety-chain link.
If the chain or its attachment fails, the cable may not activate the emergency brakes as intended.
Instead, connect the cable to the tow vehicle using the breakaway-system manufacturer’s specified attachment point and routing.
Keep the cable clear of chain links and moving hitch components.
The correct cable length and routing depend on the brake system and hitch design.
Follow the manufacturer’s instructions rather than using an arbitrary length.
Does Every Trailer Need a Breakaway Cable?
Breakaway brake requirements vary according to trailer weight, brake equipment, vehicle type, and jurisdiction.
Lightweight utility trailers without electric brakes may not have a breakaway brake system.
Larger trailers with electric brakes commonly use one.
The absence of a breakaway cable doesn’t eliminate the need for correctly rated safety chains where required.
Common Safety Chain Mounting Mistakes to Avoid
Several installation mistakes can make a strong chain assembly unreliable.
Using the Coupler Mounting Bolts
Sharing the primary coupler’s mounting bolts can remove the independence needed from the backup system.
Use approved separate structural attachment points.
Welding Chain Links Directly to the Frame
Welding can change the strength and properties of chain links.
Use properly designed mounting hardware, and avoid modifying rated chains.
Installing Unrated Eye Bolts
Ordinary eye bolts aren’t automatically suitable for trailer safety chains.
Their strength can depend on load direction, mounting method, and material.
Use rated equipment approved for the trailer application.
Drilling Random Holes in the Tongue
Improperly positioned holes can weaken structural members or create stress concentrations.
Never drill into the tongue without confirming the manufacturer-approved location and reinforcement requirements.
Connecting Both Chains to a Weak Attachment
Two strong chains cannot provide reliable protection if their shared mounting point fails.
Use the approved connection arrangement and verify that every component is rated.
Leaving Chains Dragging on the Ground
Dragging causes wear and can weaken chain links.
Road contact may also create sparks and damage protective coatings.
Correct the length or mounting arrangement before towing.
Using Damaged Chains or Hooks
Chains with cracked, stretched, severely worn, or damaged links should be replaced.
The same applies to distorted hooks, defective latches, and damaged mounting connectors.
Don’t attempt to restore chain strength through unauthorized welding or bending.
How to Inspect Trailer Safety Chains Before Towing
A quick safety-chain inspection should be part of every trailer hookup.
Pay particular attention after the trailer has been stored outdoors, repaired, or modified.
Check the Trailer Tongue Anchors
Inspect the mounting brackets and adjacent trailer frame.
Look for cracks, corrosion, loose fasteners, and deformation.
Make sure the chains remain firmly attached.
If a bolt-on mount has become loose, don’t simply tighten it without checking for damaged holes, failed hardware, or frame deformation.
Inspect Every Chain Link
Run a visual inspection along both chains.
Check for:
- Deep rust or severe corrosion.
- Flattened areas from road dragging.
- Cracked or stretched links.
- Bent connectors.
- Missing retaining pins.
- Excessive link wear.
Replace damaged components with appropriately rated parts.
Verify the Complete Hitch Connection
Before departure, confirm that:
- The hitch ball and coupler sizes match.
- The coupler is fully engaged and locked.
- The ball mount is securely retained in the receiver.
- Both safety chains are attached correctly.
- The chains are crossed and have suitable slack.
- Both hook retainers are secured.
- The trailer jack is fully raised or properly stowed.
- The breakaway cable is connected independently where fitted.
- Trailer lights and brakes function correctly.
- No wiring or chains can contact the road.
Recheck the connections after major adjustments or unusual towing conditions.
When Should You Replace Trailer Safety Chains?
Replace safety chains when their condition, ratings, or compatibility no longer meet the trailer’s requirements.
Replacement may be necessary after:
- Severe corrosion.
- Road dragging that has worn down links.
- A trailer separation incident that heavily loaded the chains.
- Visible chain stretching or deformation.
- Damage to hooks or connection hardware.
- Changes in trailer GVWR or towing configuration.
- An installation that uses unidentified or unrated chains.
Don’t assume chains are safe simply because they haven’t broken.
If a trailer has experienced a hitch separation, inspect the frame-mounted anchors as well as the chains.
Even when the chains remain intact, their mounting hardware may have been damaged.
Conclusion
Understanding how to attach safety chains to trailer tongue correctly means choosing a structurally sound, independently mounted connection that can function if the primary hitch fails.
For most conventional trailers, two properly rated chains are attached to approved tongue anchors, crossed beneath the coupler, and connected to the tow vehicle’s designated safety-chain loops.
Bolted and welded-on mounting systems can both be suitable when properly designed and installed. However, drilling structural members without approval or welding directly to safety-chain links can compromise the installation.
Check chain ratings, connector strength, mounting hardware, and turning clearance before towing.
If the trailer lacks factory attachment points or has damaged structural components, have a qualified trailer technician determine the appropriate mounting method.
A properly installed safety-chain system provides a dependable backup connection without relying on the same components as the primary hitch.
FAQs About How to Attach Safety Chains to Trailer Tongue
Should Safety Chains Be Welded or Bolted to a Trailer Tongue?
Both approved bolted and welded-on mounting systems can be suitable.
A bolted system needs correctly rated hardware and a structurally approved mounting location. A welded system should use an appropriate anchor installed by a qualified professional rather than welding directly to a chain link.
Can You Attach Safety Chains to the Bottom of a Trailer Tongue?
Only if the trailer manufacturer’s approved attachment design permits that location.
The attachment must remain structurally secure and provide appropriate clearance. A poorly positioned low anchor can increase the risk of chain or coupler contact with the road.
Do Trailer Safety Chains Have to Be Crossed?
For conventional ball-coupled trailers, crossing the chains beneath the coupler is the standard recommended arrangement and is required by some state regulations.
The crossed chains help form a cradle beneath the tongue if the primary hitch disconnects.
Can Both Safety Chains Use the Same Bolt?
Don’t assume a single common bolt provides an acceptable connection.
Many installations and regulations require independently attached chains or a specifically approved arrangement. Use the trailer manufacturer’s mounting design and comply with local requirements.
How Strong Should Trailer Safety Chains Be?
The chain assembly must meet the applicable strength requirements for the trailer’s rated weight.
A conservative approach is to select each complete chain assembly with a rating suitable for the trailer’s GVWR. Check the actual rating system, because minimum breaking strength and working load limit are different.
Can I Attach Trailer Safety Chains to a Hitch Ball?
No. Safety chains shouldn’t be connected directly to the hitch ball or a readily removable ball mount.
Connect them to the designated, properly rated safety-chain loops or other approved structural attachment points.
How Do You Shorten Safety Chains That Are Too Long?
Use a manufacturer-approved chain adjustment arrangement or replace the chains with appropriately sized components.
Avoid improvised connections, repeated twisting, cutting, or welding that could weaken the chain system.