To make a removable trailer tongue, use a properly engineered receiver-style sleeve or bolted connection that allows the front tongue section to detach from the trailer frame. The removable section must lock securely into place, support the trailer’s rated loads, and maintain safe connections for the coupler, safety chains, lights, and brakes.
A removable tongue is especially useful for utility trailers, small boat trailers, and equipment trailers that need to fit inside garages or other limited storage spaces. Removing the front section can shorten the trailer without requiring the entire frame to fold.
However, converting a fixed tongue into a detachable design requires careful structural planning. The tongue carries forces from towing, braking, cornering, and road impacts. An undersized receiver, poorly positioned holes, or incorrect locking hardware can cause the connection to fail.
Some lightweight trailers accept manufacturer-designed conversion kits. Others require a custom connection designed and installed by a qualified trailer fabricator.
In this article, I cover removable tongue designs, the required materials and tools, installation steps, locking mechanisms, safety-chain attachment, and wiring considerations. You’ll also learn how to measure the tongue, compare removable and folding designs, and inspect the finished assembly before towing.
What Is a Removable Trailer Tongue and How Does It Work?
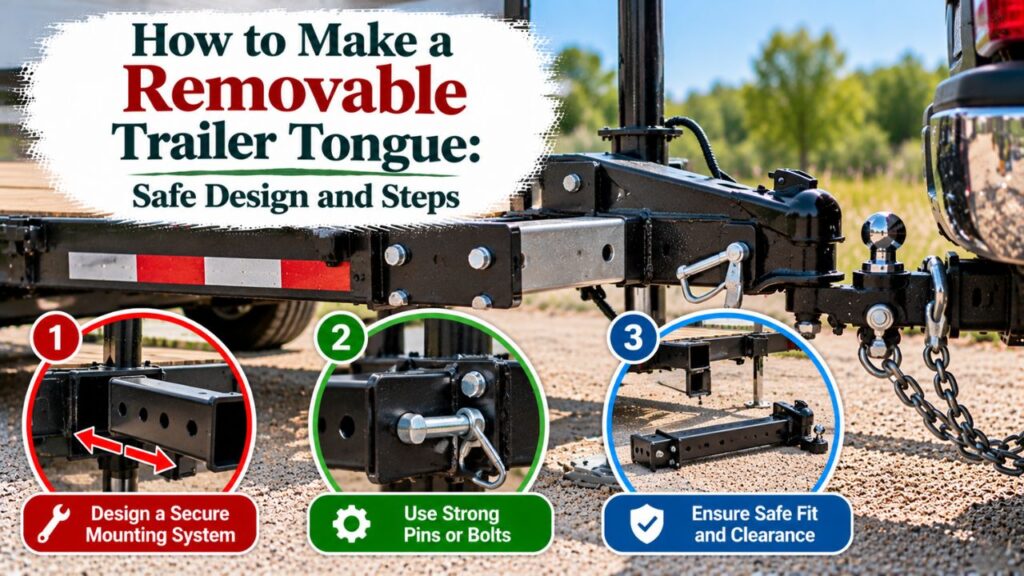
A removable trailer tongue is a detachable structural section connecting the trailer frame to the hitch coupler.
Unlike a permanently welded tongue, a removable design allows the forward section to be separated from the main frame when the trailer is parked.
The system typically consists of two connected structural components:
- Fixed receiver section: A reinforced mounting structure permanently attached to the trailer frame.
- Removable tongue section: A steel member carrying the hitch coupler and fitting into the receiver or another engineered connection.
The removable section is secured using manufacturer-specified structural pins, bolts, or another positive locking arrangement.
When correctly assembled, the joint must transfer towing forces into the main trailer frame without excessive movement.
When disconnected, the forward tongue can be removed or stored separately.
How a Receiver-Style Removable Tongue Works
A receiver-style connection commonly uses one structural steel tube fitting inside another appropriately sized section.
The outer tube remains attached to the trailer.
The inner tube carries the removable tongue and hitch coupler.
During assembly, the tongue slides into the receiver until the connection reaches its designed position. The locking hardware then secures the two components.
The receiver’s engagement length, wall thickness, material properties, and locking arrangement determine whether the joint can safely handle the intended loads.
A loose-fitting tube and ordinary hitch pin are not automatically suitable for this application.
Removable vs. Folding vs. Retractable Trailer Tongues
| Tongue design | How it works | Main advantage |
| Removable tongue | Forward section detaches completely | Maximum flexibility for storage and replacement |
| Folding tongue | Forward section pivots sideways | Quick storage without lifting the tongue away |
| Retractable tongue | Tongue slides backward into the frame | Shorter storage length without complete removal |
| Fixed tongue | Permanent structural connection | Fewer movable connections to maintain |
A removable design makes sense when the front tongue can be safely disconnected and stored elsewhere.
A folding tongue is often more convenient when frequent storage is necessary because the forward section remains attached to the trailer.
A retractable tongue can be another useful alternative when the trailer was designed to accept a sliding assembly.
What Materials Do You Need for a Removable Trailer Tongue?
The required materials depend on the trailer frame, gross vehicle weight rating (GVWR), tongue load, and selected connection design.
A removable tongue should be constructed with components selected for the entire towing assembly rather than simply choosing materials that appear heavy enough.
Removable Trailer Tongue Parts List
| Component | Purpose |
| Structural steel tongue tube | Forms the detachable forward section |
| Compatible receiver or mounting bracket | Connects the tongue to the trailer frame |
| Reinforcement components | Transfer loads into the existing structure |
| Rated structural locking pins or bolts | Secure the removable joint |
| Positive locking retainers | Prevent unintended fastener release |
| Properly rated trailer coupler | Connects the tongue to the tow vehicle |
| Rated safety chains and attachment hardware | Provide a secondary connection |
| Wiring harness connector | Allows electrical disconnection |
| Approved brake-line arrangement, if equipped | Maintains trailer brake operation |
| Suitable corrosion protection | Protects exposed steel and connections |
The exact tube dimensions, material grade, pin diameter, fastener class, and reinforcement arrangement must come from a compatible manufacturer’s instructions or a qualified engineering design.
Important: A receiver tube designed for an accessory rack or removable ball mount should not automatically be used as a trailer tongue receiver. Its intended loading conditions may be different.
Tools Needed for Installation
For a compatible bolt-on conversion kit, common tools may include:
- Measuring tape and straightedge.
- Wrenches and socket set.
- Torque wrench.
- Drill and manufacturer-specified bits.
- Clamps.
- Steel marking tools.
- Suitable jack stands and wheel chocks.
- Eye and hand protection.
Custom fabrication may additionally require professional cutting, welding, drilling, and alignment equipment.
Structural welding should be performed by someone qualified to work on load-bearing trailer frames.
How to Make a Removable Trailer Tongue Step by Step
The safest construction approach is to begin with a manufacturer-approved conversion kit or a connection designed specifically for the trailer.
The following procedure describes the installation stages and the checks required at each stage. It is not a substitute for an engineered fabrication drawing or the kit manufacturer’s fastening specifications.
Step 1: Inspect the Existing Trailer Tongue
Start by examining the trailer’s original frame construction.
Common tongue arrangements include:
- Straight center-tube tongues.
- A-frame tongues.
- Tongues integrated into the main frame rails.
- Boxed or reinforced tongue structures.
- Tongues supporting surge-brake actuators.
A straight center-tube tongue may be more suitable for a receiver-style removable arrangement than an A-frame structure.
However, the actual design determines whether conversion is possible.
Inspect for rust, cracks, previous weld repairs, bent members, and unusual modifications.
If the existing frame is damaged, repair or replace it according to an approved design before considering a removable connection.
Step 2: Determine the Trailer’s Weight Ratings
Check the trailer’s identification plate or manufacturer documentation.
Record:
- Gross Vehicle Weight Rating (GVWR).
- Gross Axle Weight Rating (GAWR).
- Actual loaded trailer weight.
- Actual tongue weight.
- Hitch coupler rating.
- Trailer brake configuration.
The removable assembly must be designed for the trailer’s applicable loads, including forces that occur during normal road use.
For many conventional ball-hitch trailers, tongue weight is commonly around 10–15% of loaded trailer weight, subject to manufacturer requirements.
For example, a loaded 3,000-pound trailer might place approximately 300–450 pounds of static downward force on its hitch.
However, static tongue weight is only one design consideration.
The connection also experiences longitudinal pulling and braking forces, lateral loads during turning, and repeated bending from road impacts.
Never size a removable tongue joint using static tongue weight alone.
Step 3: Measure the Existing Tongue and Storage Space
Measure the trailer before selecting a detachable connection.
Important dimensions include:
- Distance from the trailer frame to the hitch coupler.
- Tongue tube width and height.
- Tongue wall thickness.
- Coupler mounting position.
- Jack and safety-chain attachment locations.
- Distance from the planned connection to nearby frame crossmembers.
- Available space for the receiver assembly.
Determine how much overall trailer length must be removed to meet your storage requirements.
For example, a trailer measuring 14 feet overall might need to be reduced to 12 feet to fit a particular garage.
That would require eliminating approximately 2 feet of forward projection while stored.
This is a storage calculation only. It does not establish where the tongue can safely be separated.
The actual joint location must be chosen according to the structural design, not merely the desired removable length.
Step 4: Select an Engineered Receiver or Mounting Connection
There are two common approaches.
Receiver-style connection: A removable tongue fits into a fixed structural sleeve and is secured using an engineered pin or bolt arrangement.
Bolted mounting connection: The tongue attaches to a dedicated structural bracket or mounting assembly using specified bolts.
The receiver-style method is attractive when the tongue needs to be removed regularly.
A bolted connection may be more appropriate for occasional removal, such as during seasonal storage or transport.
Both arrangements require enough connection strength to withstand the intended loads.
The design should specify:
- Suitable structural materials.
- Required receiver engagement.
- Pin or bolt arrangement.
- Reinforcement details.
- Permitted tongue load.
- Permitted trailer weight.
- Appropriate attachment to the main frame.
- Inspection and maintenance requirements.
A manufacturer-designed example is the Malone MicroSport Retractable Tongue Kit.
Malone uses a dedicated receiver assembly with a locking-pin arrangement to shorten compatible MicroSport trailers for storage. Its published specifications also identify trailer models that are not compatible with the kit.
Although this product retracts rather than completely removes the tongue, it demonstrates why connection geometry, locking hardware, and trailer compatibility must be treated as a complete system.
Step 5: Support the Trailer Before Disassembly
Before loosening or removing any structural tongue components, secure the trailer.
Follow these precautions:
- Park on firm, level ground.
- Remove cargo if required by the conversion procedure.
- Chock the wheels securely.
- Disconnect the trailer from the tow vehicle.
- Support the main trailer frame with appropriately rated equipment.
- Confirm that the trailer will remain stable if the forward tongue is removed.
Do not assume the existing tongue jack will continue supporting the trailer after the tongue section is disconnected.
If the jack is mounted on the removable portion, the trailer may lose its front support when that section is detached.
The main frame must remain independently supported throughout the work.
Never work beneath an unsupported trailer.
Step 6: Prepare the Frame Connection
For a compatible conversion kit, follow the manufacturer’s instructions for preparing the mounting area.
Depending on the system, installation may involve removing an existing bolted tongue or attaching a purpose-designed receiver bracket to the frame.
A custom conversion requires professional assessment before cutting or drilling.
The person responsible for the structural design must verify that the connection will not weaken the trailer frame.
Particular attention is necessary around:
- Existing welds.
- Crossmember connections.
- Frame transitions.
- Previous mounting holes.
- Areas containing corrosion.
- Points carrying concentrated bending loads.
Do not cut a welded trailer tongue or drill cross-holes through a primary frame member based only on a generic tutorial.
Those operations can create stress concentrations or reduce the member’s effective strength.
A qualified trailer fabricator should carry out structural alterations according to the approved connection design.
Step 7: Install the Fixed Receiver Assembly
The fixed receiver is the section that remains permanently attached to the trailer after the tongue is removed.
Its installation depends on the engineered connection system.
For a compatible bolt-on assembly, the general process is:
- Position the receiver according to the manufacturer’s layout.
- Align it with the trailer’s longitudinal centerline.
- Check the specified mounting points.
- Install the supplied structural hardware.
- Tighten fasteners to the manufacturer’s specified torque.
- Verify that the receiver sits squarely and securely.
Custom welded assemblies require an approved welding procedure and suitable structural inspection.
Alignment matters because an incorrectly positioned receiver can place the coupler off-center.
The installation must not rely on unsupported assumptions about tubing strength or fastener capacity.
Step 8: Prepare the Removable Tongue Section
The detachable section normally carries the trailer coupler and may also support a tongue jack or other equipment.
For a properly designed assembly, confirm that the removable member has:
- The specified structural tube or fabricated shape.
- Correct attachment points.
- An appropriate coupler mounting arrangement.
- Suitable corrosion protection.
- Required locking hardware.
- Adequate clearance around the trailer frame.
The coupler must match the tow vehicle’s hitch ball and have sufficient rated capacity.
Do not assume that a coupler suitable for the original tongue can be transferred to a different member without checking its mounting requirements.
If the tongue contains electrical wiring, protect the harness from sharp tube edges and abrasion.
Step 9: Fit and Lock the Removable Tongue
Once the fixed receiver and detachable section are installed according to the approved design, check their fit.
For a receiver-style arrangement:
- Confirm the trailer is supported and cannot move.
- Inspect the receiver for debris or damage.
- Position the removable tongue in line with the receiver.
- Slide the tongue into the receiver to its designed engagement position.
- Align the locking points without forcing the connection.
- Install every specified structural pin or bolt.
- Fit the required retaining clips, locks, or other positive locking devices.
- Verify that the joint is fully secured.
The tongue should fit as intended without excessive movement or binding.
Do not replace manufacturer-specified locking components with ordinary hardware-store pins simply because they fit the holes.
Pin diameter alone does not establish load capacity.
Safety Note: Never tow with a removable tongue that has missing locking hardware, partially engaged pins, damaged holes, or unexplained movement at the connection.
Step 10: Install Safety Chains Correctly
Safety chains are particularly important on a trailer with a removable tongue.
The chains must provide a secondary connection if the primary hitch or detachable joint fails.
If both safety chains are attached only to the removable forward section, they may not prevent separation of the trailer’s main frame if the detachable joint itself fails.
The chain system must therefore be designed to account for the removable connection.
Depending on the approved arrangement, the safety chains may need independent attachment points on the main trailer frame or another engineered secondary connection spanning the removable joint.
The Washington State safety-chain regulation, WAC 204-70-070, requires two safety chains, cables, or wire ropes in addition to the primary towing connection. It also requires appropriate attachment, crossed positioning, and enough slack for turning without allowing the chains to drag.
This is a Washington-specific regulation. Requirements differ by jurisdiction and trailer classification, so verify the rules applicable to your trailer.
For a removable tongue, have a qualified installer confirm that the chains remain effective if either the coupler or detachable joint fails.
Step 11: Arrange the Trailer Wiring Connection
A detachable tongue often needs an electrical connection that can be disconnected without damaging the trailer’s wiring.
A practical system may use a suitable weather-resistant connector near the frame connection.
The wiring arrangement should allow:
- Safe removal of the tongue.
- Proper operation of trailer lights.
- Protection against moisture.
- Adequate strain relief.
- Clearance from moving parts.
- Secure grounding.
If the original harness runs through the tongue, the conversion may require rerouting it.
Use connectors and wiring materials appropriate for automotive trailer applications.
Avoid leaving exposed wiring ends or allowing cables to become pinched between receiver components.
When the tongue is reinstalled, connect the harness and verify that the turn signals, brake lights, running lights, and any required auxiliary electrical circuits function correctly.
Step 12: Address Trailer Brakes and Breakaway Equipment
Braked trailers require additional planning.
A removable tongue may carry a surge-brake actuator, hydraulic brake line, electrical connector, or breakaway equipment.
These systems cannot be treated like ordinary accessories.
For trailers with electric brakes, maintain the required brake wiring and breakaway system connections.
For hydraulic surge brakes, the actuator and hydraulic lines must remain functional and properly secured.
Do not simply cut a hydraulic brake line and add an ordinary quick-disconnect fitting.
Any required changes must use components and methods approved for that brake system, with appropriate testing afterward.
The breakaway cable must remain correctly connected to the tow vehicle according to the equipment manufacturer’s instructions.
If the brake arrangement cannot accommodate a removable tongue safely, a different tongue design may be necessary.
Step 13: Inspect the Completed Connection Before Towing
After installation, inspect the entire assembly.
Check that:
- The removable tongue is fully engaged.
- Structural pins or bolts are correctly installed.
- Locking retainers are secured.
- Receiver alignment is correct.
- The coupler is properly mounted.
- Safety chains provide the required independent connection.
- Electrical wiring is protected and connected.
- Trailer lights operate correctly.
- Trailer brakes and breakaway equipment function as intended.
- The tongue jack and other accessories have sufficient clearance.
A custom structural modification should receive a professional inspection and any required approval before road use.
A stationary fit check alone cannot establish that the assembly is structurally adequate for highway towing.
How Do You Make a Removable Trailer Tongue Connection Secure?
The joint is the most important structural feature of the conversion.
A poorly designed detachable connection can fail even when the steel tubing appears strong.
Several factors affect its reliability.
Use the Correct Receiver Engagement
A removable tongue needs sufficient engagement inside its receiver to transfer the intended forces.
An insertion depth that is too short may concentrate bending loads near the end of the receiver.
However, there is no universal insertion length suitable for every trailer.
The required engagement depends on the receiver geometry, steel properties, wall thickness, locking arrangement, and trailer loading.
Use the connection manufacturer’s specifications or an engineered design.
Prevent Excessive Movement
A removable tongue should not rattle or shift excessively under normal towing loads.
Movement can accelerate wear around the connection and locking hardware.
Inspect for:
- Unusual side-to-side play.
- Vertical movement at the receiver.
- Enlarging pin holes.
- Loose mounting bolts.
- Cracks near the joint.
- Deformation of the tongue or sleeve.
Do not use improvised shims or random additional bolts to correct an unsuitable structural fit.
Repair or replace components according to the approved design.
Use Positive Locking Hardware
The structural locking arrangement must resist accidental disengagement.
Depending on the design, this may involve specified bolts with locking nuts, retained pins, or another approved mechanism.
A retaining clip prevents a pin from sliding out but does not automatically increase the pin’s structural load capacity.
All locking components should be inspected for damage, corrosion, and wear.
If the design calls for multiple pins or bolts, every required component must be installed before towing.
Protect the Steel Against Corrosion
Removable connections can accumulate moisture, road salt, and debris.
Corrosion may reduce the effective steel thickness and make removal difficult.
Use a suitable protective coating and inspect areas where sliding contact has worn the finish.
Follow the manufacturer’s guidance about lubrication.
Avoid applying excessive grease if it could attract grit or interfere with a specified friction-based connection.
Can You Make a Removable Tongue on an A-Frame Trailer?
An A-frame trailer tongue requires more careful planning than a simple straight-tube arrangement.
An A-frame typically uses two angled structural members connecting the hitch area to the trailer frame.
These members distribute forces through multiple connections.
Cutting them to create a removable front section changes that load path.
A custom detachable A-frame design may require:
- Reinforced frame connection points.
- A purpose-designed removable front assembly.
- Appropriate crossmembers.
- Engineered mounting plates.
- Structural fasteners or locking hardware.
- Verification of the combined frame strength.
Simply joining two cut A-frame members with small sleeves and hitch pins is not an acceptable general design method.
The entire connection must be evaluated under the intended loads.
For an existing welded A-frame trailer, a compatible engineered folding-tongue assembly may be easier to obtain than a fully removable arrangement.
If no manufacturer-approved kit is available, consult a qualified trailer engineer or fabricator before modifying the frame.
Removable Trailer Tongue vs. Folding Tongue: Which Is Better?
Both designs reduce the space occupied by the trailer, but they operate differently.
Advantages of a Removable Trailer Tongue
A removable tongue can provide several practical benefits:
- The forward section can be stored separately.
- The parked trailer may occupy less space.
- A detachable front section can be replaced when the design allows.
- Removing the tongue may discourage casual trailer theft.
- The design may simplify shipping or transporting certain trailers.
However, the tongue must be handled and stored safely.
A heavy removable assembly may require two people or suitable lifting equipment.
Advantages of a Folding Trailer Tongue
A folding tongue stays attached to the trailer through a hinge mechanism.
This can make it more convenient for frequent storage.
Common advantages include:
- No need to carry the tongue away.
- Faster transition between storage and towing positions.
- Reduced risk of misplacing the entire tongue section.
- Compatibility with certain manufacturer-approved folding kits.
However, the hinge and locking system must be properly rated and installed.
Folding arrangements may also be unsuitable for certain trailer weights or frame configurations.
Which Design Should You Choose?
| Situation | More practical choice |
| Frequent garage storage | Folding or retractable tongue |
| Need to remove the front section completely | Removable tongue |
| Existing compatible conversion kit | Manufacturer-approved kit |
| Heavy trailer with no approved conversion | Professional engineering assessment |
| Trailer with complicated hydraulic brake routing | Design that preserves approved brake connections |
| Occasional compact storage | Bolted removable assembly, if approved |
For most trailer owners who only need to shorten the trailer for garage parking, a compatible folding or retractable system is often simpler than creating a custom removable connection.
How Much Does It Cost to Make a Removable Trailer Tongue?
The total cost depends on whether the trailer accepts an existing conversion kit or requires custom structural fabrication.
The main expenses may include:
- Structural steel and receiver components.
- Rated locking hardware.
- Professional cutting and welding.
- Reinforcement materials.
- Coupler relocation or replacement.
- Electrical connector changes.
- Brake-system modifications.
- Engineering review and inspection.
- Corrosion protection.
A compatible bolt-on kit can reduce fabrication work because the connection has already been designed for specified trailer models.
A custom conversion usually requires more labor and evaluation.
Do not compare prices based only on the cost of steel tubing and hitch pins.
The connection’s engineering, installation quality, and verification are central to the finished trailer’s safety.
If converting the existing trailer costs more than purchasing a compatible trailer with a factory removable or folding tongue, replacement may be the more practical option.
How to Remove and Reinstall a Trailer Tongue for Storage
Once a properly designed removable tongue has been installed and approved for use, the removal procedure should be straightforward.
Follow the specific manufacturer’s instructions rather than assuming every detachable system works the same way.
Removing the Tongue
A typical approved procedure involves:
- Park the trailer on stable, level ground.
- Chock the wheels.
- Support the main trailer frame independently of the removable tongue.
- Confirm that no unsafe load remains on the detachable connection.
- Disconnect the appropriate electrical connector.
- Disconnect other components only if the design specifically permits it.
- Remove the designated locking pins or bolts.
- Support and withdraw the tongue without allowing it to fall.
- Store the tongue and hardware in a dry, secure location.
Never disconnect the tongue while it is carrying an unsupported portion of the trailer’s weight.
If resistance occurs, don’t strike the assembly or force it apart without identifying the cause.
Reinstalling the Tongue
Before towing:
- Inspect the receiver and tongue for damage.
- Remove debris from the connection.
- Insert the tongue to the required position.
- Install all specified structural fasteners.
- Secure every retaining device.
- Reconnect wiring and any approved brake connections.
- Connect the trailer to the tow vehicle.
- Attach safety chains and the breakaway cable correctly.
- Confirm lights and brakes function.
- Complete the required towing inspection.
Do not tow if the tongue cannot be fully secured or if the connection shows unexplained movement.
Removable Trailer Tongue Problems and How to Fix Them
A detachable connection requires periodic inspection because its moving and fastening components may wear over time.
| Problem | Possible cause | Corrective action |
| Tongue won’t slide into receiver | Debris, corrosion, or misalignment | Clean and inspect the connection |
| Locking holes won’t align | Incomplete engagement or damaged parts | Stop and identify the cause |
| Tongue rattles excessively | Worn or improperly fitted components | Inspect against design tolerances |
| Pin holes become elongated | Excessive movement or loading | Have the structural connection assessed |
| Rust develops inside receiver | Moisture and damaged coating | Clean and apply approved protection |
| Trailer lights stop working | Loose or corroded connector | Inspect and repair the electrical connection |
| Brake system doesn’t function | Disconnected or damaged components | Repair before towing |
| Tongue becomes difficult to remove | Corrosion or deformation | Inspect rather than forcing removal |
When Should You Replace the Removable Tongue Components?
Replace or professionally assess parts showing:
- Cracked steel.
- Bent receiver walls.
- Enlarged or distorted pin holes.
- Damaged structural bolts.
- Excessively worn locking pins.
- Missing retainers.
- Severe corrosion.
- Deformation around welds or reinforcement plates.
Do not weld over a structural crack or enlarge a damaged pin hole without an approved repair procedure.
The problem may extend beyond the visibly damaged area.
Safety Checks Before Towing With a Removable Trailer Tongue
A removable tongue adds a structural connection that must be inspected before every trip.
A useful pre-towing checklist includes:
- Receiver: No visible cracks, deformation, or excessive corrosion.
- Tongue section: Fully inserted and correctly aligned.
- Locking hardware: Every required pin, bolt, and retainer secured.
- Coupler: Correct hitch ball size and properly latched.
- Safety chains: Properly rated and attached through a system that remains effective if the removable joint fails.
- Wiring: Connectors secure, with no damaged or pinched wires.
- Brakes: Operational and correctly connected.
- Breakaway system: Attached and functioning as required.
- Tongue jack: Raised or stowed according to its instructions.
- Cargo: Secure and within trailer weight limits.
- Tongue weight: Within manufacturer requirements.
- Frame: No new cracks, distortion, or loose mounting components.
Inspect the detachable connection again after any event that may have damaged it, such as an impact, overloading, or a severe road shock.
A trailer with a questionable tongue connection should remain out of service until the problem is resolved.
Conclusion
Understanding how to make a removable trailer tongue begins with selecting a connection designed to safely transfer towing forces into the trailer frame.
A properly engineered receiver-style or bolted assembly can allow the forward tongue section to be removed for garage storage, transportation, or maintenance.
The essential components include a suitable structural connection, rated locking hardware, a compatible coupler, correctly arranged safety chains, and protected electrical and brake connections.
For trailers that accept a manufacturer-approved conversion kit, installation may be relatively straightforward. Custom modifications to welded straight tongues or A-frame structures require professional design and fabrication to avoid weakening the trailer.
The best removable tongue is one that saves storage space without compromising the trailer’s structural integrity or towing safety. Always verify compatibility, inspect the complete assembly, and confirm that all required connections are secure before taking the trailer onto the road.
FAQs About How to Make a Removable Trailer Tongue
Can You Make Any Trailer Tongue Removable?
Not every trailer tongue can be safely converted using a simple removable connection.
Suitability depends on frame construction, trailer weight, tongue load, brake system, and available engineered components.
Some trailers accept manufacturer-approved conversion kits, while others require extensive structural modifications or may not be practical candidates.
Can You Make a Removable Trailer Tongue Without Welding?
Yes, a compatible bolt-on conversion kit may allow installation without welding.
However, the mounting system must be specifically designed for the trailer and its structural loads.
Simply drilling holes through the existing tongue and installing bolts does not guarantee a safe connection.
Can You Use a Hitch Receiver Tube for a Removable Trailer Tongue?
A properly engineered receiver-style assembly can be used for a removable tongue.
However, an ordinary hitch receiver tube is not automatically suitable for serving as the trailer’s primary structural tongue connection.
The complete assembly must be designed for the trailer’s loaded weight, tongue load, dynamic forces, and mounting arrangement.
How Long Should a Removable Trailer Tongue Be?
There is no universal removable tongue length.
The required dimensions depend on frame geometry, coupler position, towing clearance, and the engineered connection.
The tongue must provide adequate turning clearance while maintaining the intended trailer geometry and load distribution.
Can a Removable Trailer Tongue Be Used on a Boat Trailer?
Yes. Certain boat trailers use removable, folding, or retractable tongue designs for storage.
However, boat trailers with hydraulic surge brakes require special attention to the actuator and brake lines.
Use a compatible manufacturer-approved system or obtain a professionally designed conversion that preserves proper brake operation.
Are Hitch Pins Strong Enough to Hold a Removable Trailer Tongue?
Properly specified structural pins can be part of a removable tongue connection, but not every hitch pin is suitable.
The required strength depends on the loading arrangement, joint design, material properties, and number of load-bearing connections.
A retaining clip alone does not make an undersized pin safe.
Use the exact locking components specified by the connection manufacturer or engineer.
Where Should Safety Chains Attach on a Removable Trailer Tongue?
Safety chains should be arranged so the towing combination retains an effective secondary connection if the coupler or removable tongue joint fails.
Attaching both chains only to a detachable front section may leave the main trailer unrestrained if that joint separates.
Use an approved chain and attachment arrangement that accounts for the detachable connection and complies with applicable state requirements.
Is a Removable Trailer Tongue Safe for Highway Driving?
Yes, a properly engineered, rated, installed, and maintained removable tongue can be suitable for highway use.
Safety depends on the entire assembly, including structural connections, locking hardware, safety chains, brakes, and compatibility with the trailer.
An improvised removable joint that has not been verified for towing loads should not be used on public roads.