To jump a car battery with a jump starter, turn off both vehicles, connect the pack’s red clamp to the dead battery’s positive terminal and the black clamp to a suitable negative ground, switch on the pack, and start the car. Once the engine runs, turn off the jump starter before removing the clamps in reverse order.
The sequence matters because a jump starter is more than a portable battery: it is a high-current electrical device connected directly to a vehicle’s starting system. Correct clamp placement, adequate charge, battery compatibility, and a short cranking attempt all affect whether the car starts safely. A battery that is merely discharged can often be revived, but a damaged battery, corroded connection, blown fuse, or failed starter may require a different solution.
This guide explains how to inspect the vehicle, choose a compatible jump starter, connect and disconnect it, handle smart safety features, and troubleshoot a failed attempt. You will also learn when a jump pack is unsuitable, how lithium and lead-acid packs differ, what warning signs indicate a larger problem, and how to decide whether another attempt or professional help is the sensible next step.
What a Jump Starter Does and When It
A jump starter supplies temporary electrical current to a vehicle’s starting circuit so the starter motor can turn the engine. Unlike traditional jumper cables, it does not need a second running vehicle; the energy comes from the jump pack’s internal battery.
The device is designed to overcome a weak or discharged 12-volt automotive battery long enough for the engine to start. Afterward, the vehicle’s alternator may recharge the battery, although driving does not guarantee that a severely depleted or aging battery will recover fully.
A jump starter is most useful when the car’s lights were left on, the vehicle has sat for an extended period, cold weather reduced battery performance, or an accessory drained the battery. It may also help when the battery has enough capacity to operate some electronics but not enough power to crank the engine.
It cannot reliably fix a battery with a cracked case, frozen electrolyte, internal short, severely corroded terminals, or no usable connection to the vehicle. It also will not solve a failed starter motor, immobilizer fault, empty fuel tank, serious engine problem, or charging-system failure.
Check the Vehicle Before Connecting the Jump Pack
Inspect the vehicle and battery before attaching any clamps. Do not connect a jump starter simply because the engine will not turn over; first make sure the electrical system is safe to energize.
Confirm that the battery is suitable for a jump start
Most passenger cars and light trucks use a 12-volt starting system, and a 12-volt jump starter is normally the correct choice. Do not assume the same procedure applies to a 6-volt classic vehicle, a 24-volt commercial truck, or a hybrid system that uses a separate high-voltage battery.
Look at the battery for obvious damage. Stop if you see a cracked, swollen, leaking, or badly deformed battery, or if there is a strong sulfur or rotten-egg smell. A damaged battery can release corrosive material or flammable gas, and applying high current may increase the danger.
A battery that has frozen may also be unsafe to jump. Freezing is more likely when a lead-acid battery is deeply discharged in very cold weather; allow it to thaw in a safe location and have it inspected rather than applying a jump immediately.
Identify the positive and negative connection points
The positive terminal is usually marked with a plus sign, “POS,” or a red cover. The negative terminal is marked with a minus sign and is commonly connected to the vehicle body or engine by a black cable.
Some vehicles place the battery in the trunk, under a seat, or in another enclosed area. They may provide designated remote jump points under the hood. Use the manufacturer-provided points when available, particularly if the battery is difficult to access or the vehicle has a battery monitoring sensor.
Never identify polarity by cable color alone. Verify the markings on the battery or the vehicle’s instructions, because incorrect polarity can damage electronic modules, blow fuses, create sparks, or damage the jump starter.
Switch off electrical loads and secure the vehicle
Turn off the ignition, headlights, climate control, radio, heated seats, and other accessories. Place an automatic transmission in Park or a manual transmission in Neutral, apply the parking brake, and keep the keys or start control in the correct off position until the jump starter is connected.
Keep the jump pack away from moving belts, cooling fans, hot exhaust components, and wet surfaces. Remove loose jewelry and avoid leaning over the battery while making the connection.
Choose a Compatible Jump Starter
The jump starter must match the vehicle’s electrical system and provide enough starting current for the engine. A small pack may be adequate for a compact four-cylinder car but struggle with a large gasoline engine, diesel engine, truck, or vehicle in freezing conditions.
Match the voltage before considering current ratings
For most modern cars, the essential match is a 12-volt jump starter. Some packs include a selectable 12-volt and 24-volt mode for heavy equipment, but selecting the wrong mode can cause serious damage.
Do not connect a 24-volt output to a normal 12-volt passenger vehicle. If the voltage is unclear, stop and check the vehicle manual, battery label, or jump starter instructions.
Understand peak amps and starting amps
Manufacturers may advertise peak amperage, starting amperage, or a recommended engine size. Peak amperage describes a brief maximum under particular conditions; it is not always a reliable prediction of how well the pack will crank a cold engine.
A pack with an appropriate starting-current rating and a good operating-temperature range is generally more useful than one chosen only for the largest headline number. Diesel engines often need more cranking power than similarly sized gasoline engines because of higher compression and glow-plug demands.
Use the manufacturer’s vehicle-size guidance as a starting point, and allow extra capacity for very cold weather, an older battery, or repeated emergency use. A jump pack should not be treated as a permanent substitute for maintaining the vehicle’s battery.
Inspect the jump starter before use
Do not use a pack with a damaged case, frayed cables, bent clamps, melted insulation, corrosion, or a swollen internal battery. Check its charge indicator and recharge it if the level is low.
Many modern packs include reverse-polarity protection, short-circuit protection, over-temperature protection, and a manual override or “boost” mode. These features reduce risk but do not make incorrect connections harmless. Protection circuits can also prevent the pack from activating when the vehicle battery voltage is extremely low.
How to Jump a Car Battery with a Jump Starter
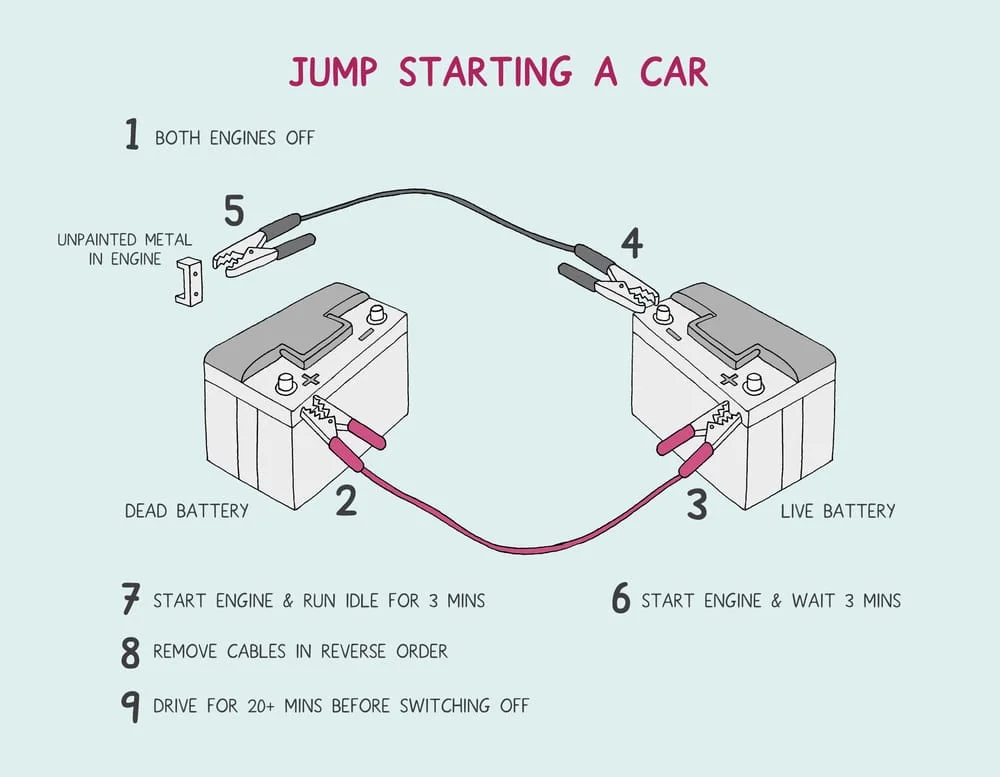
The basic procedure is to connect positive first, connect negative to a safe ground, activate the pack, start the vehicle briefly, and disconnect only after the engine is running. Follow the instructions supplied with your particular jump starter if they differ from this general sequence.
Position the jump starter and prepare the cables
Park the jump starter on a stable surface where its cables can reach the battery without being stretched across a fan, belt, pulley, or hot component. Keep the pack upright if its instructions require that position, and leave the vehicle’s ignition off.
Separate the clamps so they cannot touch each other. Confirm that the jump starter is off unless its manual specifically instructs you to connect while it is powered on.
Connect the red clamp to positive
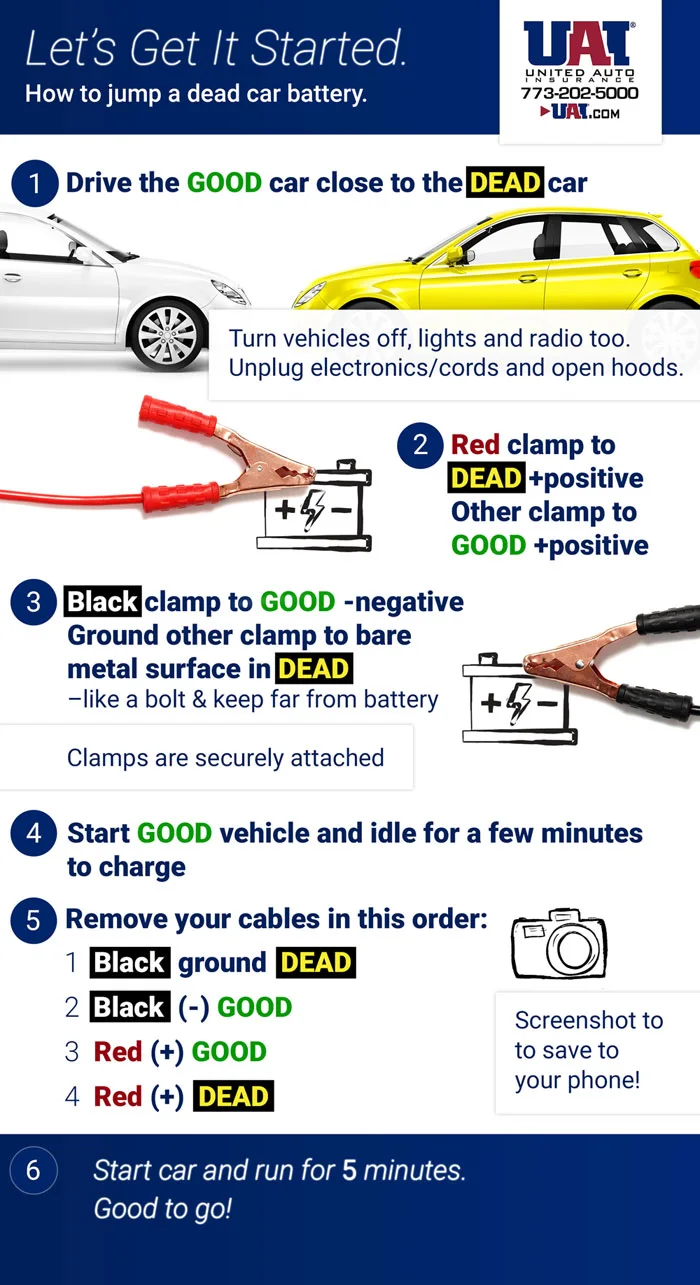
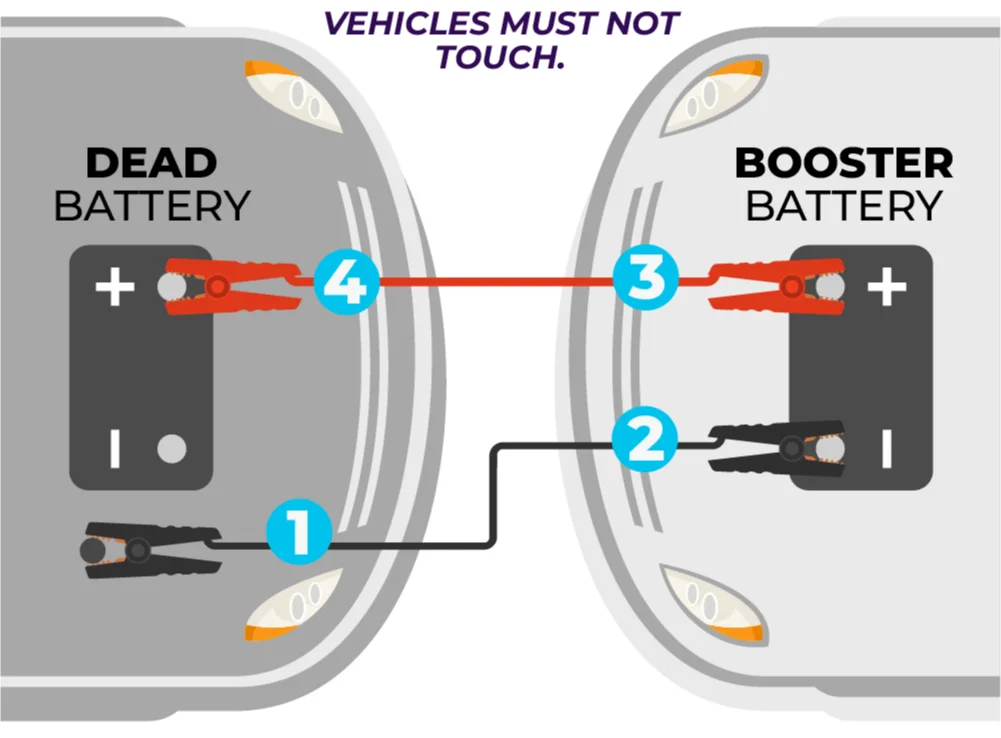
Attach the red clamp to the battery’s positive terminal or the vehicle’s marked positive jump point. Make sure the jaws grip clean metal and cannot slip off.
Do not attach the red clamp to a random bolt, painted bracket, or nearby metal part. The positive connection must be electrically connected to the positive starting circuit.
Connect the black clamp to a suitable ground
Attach the black clamp to a clean, unpainted metal point on the engine block or vehicle chassis, away from the battery and moving components. A solid grounding point allows current to return through the vehicle’s structure or engine ground path.
Some vehicle manufacturers specify the negative battery terminal instead, while others specifically require a remote ground point. Follow the vehicle instructions when available. If the battery is outside the engine compartment, use the designated negative connection rather than guessing.
Connecting negative away from the battery can reduce the chance of a spark occurring directly beside battery gases. The grounding point still needs to be secure; a thin, painted, rusty, or flexible part may not carry enough current.
Activate the jump starter
Turn on the jump starter or press its activation button after both clamps are firmly attached. If the pack displays a warning, does not arm, or reports reversed polarity, switch it off and recheck both connections.
Do not continue if the cables become hot, the clamps spark repeatedly, the battery bulges, or you smell burning insulation. Disconnect the pack only after switching it off, unless an immediate hazard requires moving away and calling for assistance.
Crank the engine in short attempts
Try to start the vehicle for no more than several seconds at a time. A typical attempt should be brief; pause for at least 30 seconds before trying again so the starter motor, cables, and jump pack can cool.
Do not hold the key or start button continuously while the engine fails to turn. Extended cranking can overheat the starter motor and may drain the jump pack quickly without addressing the underlying problem.
If the engine turns slowly, stop and check the clamp contact and ground point. If it turns at normal speed but does not start, the battery may not be the main problem.
Allow the engine to stabilize
When the engine starts, leave it running at normal idle for a short period. Do not immediately accelerate aggressively, and keep the jump pack and cables clear of belts and fans.
Some vehicles may run unevenly for a moment after a low-voltage event. If the engine stalls, wait before making another attempt and inspect the connections again. A repeated stall can indicate a charging, fuel, ignition, or electronic-control problem rather than a simple flat battery.
Disconnect in the reverse order
Turn off the jump starter before removing the clamps if the instructions call for that sequence. Remove the black clamp from the ground point first, then remove the red clamp from the positive terminal.
Keep the clamps separated while they are connected to the pack, and do not allow either clamp to touch the other clamp or an unintended metal part. After removing the cables, close the vehicle’s hood carefully and move the jump pack away from engine heat.
Why the Connection Order Matters
The order is intended to control where sparks may occur and reduce the chance of a short circuit. Connecting positive first and negative second gives the negative clamp a final connection at a grounded metal point rather than directly beside the battery.
Removing the negative connection first breaks the return path before the positive clamp is handled. This does not eliminate all electrical risk, but it makes accidental contact between a live positive clamp and the vehicle body less likely while the circuit is complete.
A jump starter’s clamps can deliver very high current. If the red and black clamps touch, or if a connected positive clamp contacts grounded metal, the result can include a large spark, melted metal, damaged cables, or a fire.
What to Do When the Jump Starter Will Not Work
If the car does not start, do not assume the jump pack is defective. Start with the simplest causes: low pack charge, poor clamp contact, incorrect polarity, an unsuitable ground point, or a vehicle battery that is too damaged to accept assistance.
Recheck polarity and clamp contact
Turn off the jump starter before adjusting the cables. Confirm that red is on positive and black is on the approved ground or negative point.
Move each clamp slightly to ensure the jaws are biting clean metal. Corrosion can form a poor electrical connection even when a terminal looks connected. If safe and practical, clean light corrosion with a suitable battery-terminal brush, but do not scrape aggressively on a damaged or leaking battery.
Check whether the pack has enough charge
A jump starter that shows a charge percentage may still lack sufficient output if it has been stored for a long time, exposed to extreme temperatures, or used for several attempts. Recharge it according to its instructions before relying on it again.
Some lithium packs lose performance in very cold conditions. Warming the pack indoors before use may help, but never heat it with a flame, heater, or other direct high-temperature source.
Use boost mode only when appropriate
Automatic packs may refuse to activate when they cannot detect enough voltage from the vehicle battery. A manual boost mode can sometimes supply current in that situation, but it may disable reverse-polarity protection or other safeguards.
Use boost mode only when the positive and negative connections have been positively identified and the jump starter’s instructions authorize it. Never use it as a shortcut for uncertainty.
Interpret the sound of the starter
A rapid clicking sound often indicates low voltage or inadequate current reaching the starter. Check the clamps, ground, and battery terminals first.
A single heavy click may point to a weak battery, a poor connection, or a starter-solenoid issue. If the engine cranks normally but does not start, investigate fuel, ignition, immobilizer, and engine-management causes instead of repeatedly using the jump pack.
No sound at all can result from a fully disconnected battery, an ignition or neutral-safety issue, a blown fuse, or a failed starter circuit. A jump starter cannot bypass every electrical fault.
Safety Risks to Avoid During a Jump Start
Jump-starting is usually straightforward, but the battery and cables can release high current, sparks, corrosive material, and flammable gas. Safe technique is more important than speed.
- Do not reverse the polarity. Positive must connect to positive, and negative must connect to an approved ground or negative point.
- Do not let the clamps touch. Keep the handles insulated and the metal jaws separated.
- Do not smoke or create open flames near the battery. Charging and discharging can produce hydrogen gas.
- Do not jump a visibly damaged or frozen battery. Replace or professionally inspect it instead.
- Do not place the pack near moving or hot engine parts. Belts, fans, manifolds, and exhaust components can damage it.
- Do not use a wet or damaged jump starter. Moisture and damaged insulation increase electrical risk.
- Do not keep cranking repeatedly. Pause between attempts and stop if cables or components heat up.
Wear eye protection if available, especially when inspecting a conventional flooded lead-acid battery. Keep children and bystanders away from the engine compartment while the cables are connected.
Special Vehicle Situations That Need Extra Care
Hybrid and electric vehicles
Many hybrids and electric vehicles still have a small 12-volt battery that powers computers, locks, relays, and other systems. A jump pack may be used on that low-voltage system in some vehicles, but it does not charge or jump the high-voltage traction battery.
Use only the procedure and connection points specified for the vehicle. Do not touch orange high-voltage cables or attempt to access high-voltage components. If the vehicle manual does not clearly describe the procedure, request roadside assistance.
Vehicles with battery monitoring sensors
Some vehicles use a sensor on the negative battery terminal to monitor current. Connecting to a specified chassis ground rather than directly to the negative post may help the vehicle’s system measure the event correctly.
The vehicle manual takes priority because battery layouts and monitoring systems vary. Avoid forcing a clamp onto a sensor housing or delicate wiring.
Vehicles with multiple batteries
Some trucks, diesel vehicles, recreational vehicles, and specialty vehicles use dual batteries or multiple electrical systems. They may require a particular battery or jump point, and a small passenger-car jump pack may not be adequate.
Do not connect batteries in an improvised series or parallel arrangement. Confirm the system voltage and prescribed connection method before applying power.
Vehicles with inaccessible or remote batteries
If the battery is in the trunk, beneath a seat, or inside a sealed compartment, use the remote terminals if the manufacturer provides them. Opening panels unnecessarily can damage trim, expose sensitive electronics, or create a poor connection.
Some vehicles also have special procedures for opening the trunk or hood when the battery is flat. Check the mechanical key and emergency access instructions rather than forcing a powered latch.
What to Do After the Engine Starts
Starting the engine does not prove that the battery is healthy. The battery may have been discharged, sulfated, weakened by age, or drained by a continuing electrical load.
Keep the engine running or drive according to the vehicle manufacturer’s guidance, but avoid treating a long drive as a guaranteed battery recharge. Modern vehicles may control alternator output, and a severely discharged battery can require a proper external charger.
Check for warning lights and abnormal behavior
Watch for a battery-shaped warning light, dimming lights, fluctuating electrical functions, a burning smell, or repeated stalling. These symptoms can indicate an alternator or charging-system fault.
If the battery warning light remains on while the engine runs, limit driving and arrange service promptly. The vehicle may stop again once the jump pack’s temporary help is gone.
Have the battery and charging system tested
A battery test can estimate starting capacity, while a charging-system test checks whether the alternator is supplying appropriate voltage and current. Testing is especially worthwhile if the battery is several years old, the car needed more than one jump, or the problem returned after driving.
Replace a battery only after confirming the correct physical size, terminal arrangement, technology, and required registration or reset procedure. Some vehicles need battery-management programming after replacement.
How to Maintain a Portable Jump Starter
A jump pack is useful only if it has stored energy when an emergency occurs. Store it in a dry, moderate-temperature location and inspect it periodically rather than leaving it forgotten in a hot trunk for years.
Recharge the unit at the interval stated by its manufacturer. Lithium jump starters often use a USB-C or similar charger, while larger lead-acid units may require a dedicated charger or wall adapter.
Keep the clamps clean and dry, and coil the cables without sharp bends. Check the case, cable insulation, and clamp springs for damage before each important trip.
Do not use the pack as a general-purpose battery bank while ignoring its starting charge. If it includes a flashlight, USB ports, or an air compressor, those features can consume energy needed for an emergency start.
Jump Starter Versus Jumper Cables
A portable jump starter is convenient because it does not require another vehicle or a second driver. It is particularly useful for a car parked at home, in a parking lot, or in an isolated location.
Jumper cables can provide a strong source of current when connected correctly to a suitable donor vehicle, but they require two vehicles to be positioned safely and introduce risks if the donor vehicle or connection sequence is unsuitable. The cables also need enough length and adequate gauge for the task.
Neither method repairs a failed battery or charging system. A jump starter is an emergency starting aid, while a battery charger is better for gradually restoring a discharged battery and a battery maintainer is intended for long-term storage.
Common Misconceptions About Jump Starters
A jump starter does not charge the battery like a wall charger
A jump pack supplies a short burst of starting power. It may help the engine run so the alternator can recharge the battery, but that process is not equivalent to a controlled battery charge.
A larger advertised amp number is not the only important factor
Output capability, cable quality, clamp design, battery condition, temperature, voltage compatibility, and the pack’s charge level all affect performance. Peak amps alone do not guarantee that the pack will start every vehicle.
Starting after a jump does not prove the battery is good
The vehicle may start once and fail again after being parked. A battery that repeatedly needs a jump should be tested rather than treated with repeated emergency starts.
Protection features are not permission to guess
Reverse-polarity and short-circuit protection can prevent some mistakes, but not every pack detects every hazardous condition. Correct identification of the terminals remains essential.
When Professional Roadside Help Is the Better Choice
Request professional assistance when the battery is leaking, cracked, swollen, frozen, or producing unusual heat. Also stop if the vehicle has high-voltage components, an unfamiliar multi-battery setup, or connection points you cannot identify confidently.
Professional help is also appropriate after repeated failed attempts, persistent clicking, smoke, burning smells, a battery warning light, or an engine that cranks normally but will not start. Continuing to apply high current can make an electrical fault more expensive or dangerous.
A roadside technician can test the battery, alternator, starter circuit, and cables rather than simply supplying another jump. Towing may be necessary if the vehicle cannot be safely started where it is parked.
FAQ About Jumping a Car Battery with a Jump Starter
Can I use a jump starter on any car battery?
No, the jump starter must match the vehicle’s voltage and starting requirements. Most cars use a 12-volt system, but some vehicles and equipment use different voltages or special procedures. Check the vehicle manual and avoid damaged, leaking, frozen, or swollen batteries.
How long should I leave a jump starter connected?
Use it only long enough to make a brief starting attempt, unless the manufacturer gives different instructions. After the engine starts, disconnect the pack in the specified reverse order. Leaving it connected unnecessarily can expose the cables and electronics to heat and vibration.
Should the black clamp go on the negative battery terminal?
Usually, the black clamp goes on an approved unpainted engine or chassis ground. Some vehicles specify the negative post or a remote negative terminal, so follow the vehicle instructions. The chosen point must be secure, clean, and away from moving parts.
How many times can I try to start a car with a jump pack?
Make only a few brief attempts with cooling pauses between them. Repeated long cranking can overheat the starter and drain the pack. If the engine does not respond after checking the connections, investigate the vehicle rather than continuing to crank.
Can I jump a car if the battery is completely dead?
Sometimes, but not if the battery is physically damaged or shorted internally. A very low battery may prevent an automatic jump pack from activating, in which case the manufacturer’s manual boost mode may help. Use that mode only after confirming polarity and connection points.
Why does my car still not start after I connect the jump starter?
The cause may be poor clamp contact, insufficient jump-pack charge, an undersized pack, or a fault unrelated to the battery. Check polarity, ground, and cable contact first. Normal cranking without ignition suggests that another system may be responsible.
Can I jump a hybrid or electric vehicle with a portable jump starter?
Some hybrids and electric vehicles can receive a jump on their separate 12-volt system, but the procedure is model-specific. A portable pack does not jump the high-voltage traction battery. Use only the designated low-voltage terminals and never touch orange high-voltage wiring.
Do I need to drive after using a jump starter?
Often, the vehicle should be driven or charged afterward, but driving is not a guaranteed battery repair. A proper battery and charging-system test is wise if the battery was deeply discharged, the vehicle is older, or the problem repeats. A battery charger may be more appropriate than relying on the alternator.
Conclusion: Use the Jump Pack as a Controlled Emergency Start
Using a jump starter safely means confirming a compatible 12-volt system, inspecting the battery, connecting red to positive and black to an approved ground, making brief starting attempts, and disconnecting in reverse order. Stop for any sign of leakage, swelling, heat, smoke, incorrect polarity, or unfamiliar high-voltage equipment.
After the car starts, have the battery and charging system tested if the failure was unexpected or happens again. Recharge and inspect the jump pack before storing it, so it is ready for the next legitimate starting emergency rather than being treated as a substitute for vehicle maintenance.