To test a portable jump starter, fully charge it, inspect the case and clamps, verify its charge indicators and accessory outputs, then perform a controlled jump-start test on a compatible vehicle. A multimeter can provide useful information on some models, but many smart lithium jump starters do not energize their clamps until they detect a battery, so a zero-voltage reading does not automatically mean the unit has failed.
A portable jump starter can look fully charged and still fail when asked to crank an engine. Internal battery aging, damaged cables, weak clamps, a faulty battery management system (BMS), extreme temperature, or poor charging can all reduce real starting performance.
The most useful test therefore goes beyond pressing the power button. You want to verify three things separately: the jump starter can store energy, its clamps and electronics work correctly, and it can deliver high current under an actual starting load.
What Does a Good Jump Starter Test Actually Tell You?
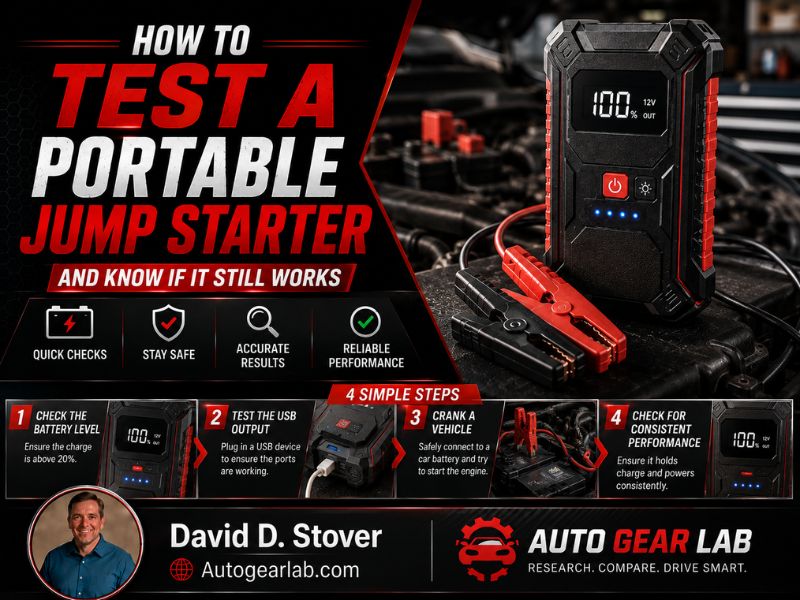
Testing a portable booster pack should answer several different questions.
A complete check should determine whether:
- The internal battery accepts a full charge
- The charge level remains stable during storage
- The housing and battery show no physical damage
- The jumper clamps and cables are intact
- Smart-clamp protection circuits operate normally
- USB or 12V accessory outputs work, if equipped
- The unit can recognize a vehicle battery
- It can provide enough current to crank a compatible engine
- It does not immediately overheat or shut down
- It recovers normally after use
A jump starter that passes only the flashlight or USB test has not necessarily proven that it can start a vehicle. Those functions draw far less current than a starter motor.
Similarly, seeing four charge LEDs does not guarantee that an aging internal battery can maintain voltage under a heavy load.
That is why the final load test is the most meaningful part of the process.
Before Testing: Identify What Type of Jump Starter You Have
The correct testing approach depends partly on the jump starter’s battery technology.
Lithium-Ion Jump Starters
Most modern compact portable boosters use some form of lithium battery and electronic smart clamps.
Typical features may include:
- Battery-level LEDs
- Reverse-polarity protection
- Short-circuit protection
- Temperature protection
- Automatic battery detection
- USB power-bank output
- Manual override on some models
These units often keep the high-current clamp output electronically disconnected until a compatible battery is detected.
For example, NOCO’s Boost system automatically detects an attached battery before entering boost mode, while its manual override deliberately bypasses some normal safety logic.
That design changes how you test the clamps with a multimeter.
AGM or Sealed Lead-Acid Jump Starters
Larger professional jump boxes may use an internal AGM or sealed lead-acid battery.
These units are typically heavier and may have:
- Direct high-current cables
- Built-in voltmeter or digital charge display
- AC charging system
- 12V accessory outlet
- Longer, heavier cables
- Published cranking amp (CA) or cold cranking amp (CCA) ratings
Schumacher, for example, sells professional booster packs using internal sealed lead-acid or AGM batteries and provides charge/status displays on various models.
Traditional lead-acid jump packs can sometimes be assessed more directly with voltage measurements, but manufacturer instructions should still control the test procedure.
Test 1: Start With a Physical Inspection
Do not connect a questionable jump starter to a vehicle until you inspect it.
Look at the entire unit under good lighting.
Check the Battery Housing
Stop using the jump starter if you notice:
- Battery swelling
- Bulging plastic
- Cracks in the housing
- Melted areas
- Burn marks
- Chemical odor
- Leaking material
- Severe impact damage
- Exposed internal wiring
- Corrosion around electrical connections
A swollen lithium battery is not something to “test and see if it still works.”
Physical deformation can indicate internal battery damage, and continuing to charge or heavily discharge a damaged lithium pack can create a thermal runaway hazard.
Inspect the Cables
Run your eyes and hands along the jumper cables.
Look for:
- Cuts
- Split insulation
- Flattened areas
- Burned sections
- Exposed copper
- Loose cable connections
- Extreme stiffness
- Damage near strain-relief points
High-current starting cables must carry substantial current for a short period. A weak or partially broken connection can cause excessive resistance, heat, and poor cranking performance.
Inspect the Clamps
Open and close both clamps several times.
They should move freely and apply firm pressure.
Check for:
- Corrosion
- Burned contact surfaces
- Loose jaws
- Broken springs
- Damaged insulation
- Bent clamp halves
- Loose cable-to-clamp connections
A powerful jump starter can perform poorly simply because the clamps are not making solid electrical contact with the battery terminals.
Test 2: Fully Charge the Jump Starter
Testing a partially discharged jump starter can produce misleading results.
Charge the device according to its manufacturer’s instructions until it indicates a full state of charge.
On the NOCO GB40, for example, the manufacturer’s charge indicators progress through 25%, 50%, 75%, and 100%, with the 100% indicator becoming solid when fully charged.
Do not assume that every model uses the same LED behavior.
Watch for Abnormal Charging Behavior
While charging, pay attention to how the unit behaves.
Possible warning signs include:
- It never reaches full charge
- Charging stops immediately
- The charge level jumps unpredictably
- The charger repeatedly disconnects
- The case becomes unusually hot
- An error LED appears
- The unit loses most of its indicated charge soon after being unplugged
A modest temperature increase during charging can be normal depending on the device. Excessive heat, swelling, odor, or rapid temperature rise is not.
If those symptoms appear, discontinue testing.
Test 3: Check Whether It Holds a Charge
A portable jump starter is an emergency device, so self-discharge and charge retention matter almost as much as immediate performance.
After fully charging it, disconnect the charger and leave the unit unused for a reasonable period.
Then turn it on and check the charge indication again.
You do not need to deliberately leave it untouched for months just to perform a test. The purpose is to identify obvious problems such as a pack that reports 100% when plugged in and then quickly falls to 50% or shuts off.
An aging internal battery may accept charge but have poor energy retention.
What Is a Bad Sign?
Be suspicious if a fully charged jump starter:
- Drops dramatically overnight
- Turns off soon after being unplugged
- Cannot power even low-draw accessories
- Requires constant charging to stay ready
- Shows inconsistent charge percentages
Battery indicators are estimates rather than laboratory measurements, but major unexplained changes can indicate internal battery deterioration.
Test 4: Test the Built-In Functions
Many portable jump starters include additional outputs.
These are not substitutes for a cranking test, but they can help confirm that the internal electronics are functioning.
Test any equipped:
- LED flashlight
- USB-A output
- USB-C output
- 12V DC outlet
- Battery percentage display
- Air compressor, if integrated
Connect a normal compatible device to the USB output and verify that charging begins.
If none of the low-current features work despite the jump starter indicating a full battery, there may be a problem with the internal battery or power-control electronics.
However, the opposite does not prove the booster is healthy.
A jump starter may successfully charge a phone while no longer having enough high-current discharge capability to crank an engine.
Test 5: Understand the Multimeter Test Before Trying It
A digital multimeter can be useful, but this is also where many jump-starter tests become misleading.
Can You Measure Voltage Across the Jump Starter Clamps?
Sometimes.
On a traditional lead-acid booster with directly connected clamps, measuring DC voltage across the clamps can provide information about the internal battery’s resting voltage.
On many modern lithium jump starters, however, the smart-clamp circuitry keeps the output disconnected until a vehicle battery is detected.
As a result, you may place a multimeter across the red and black clamps and see:
- 0 volts
- A very small voltage
- An unstable reading
while the jump starter is actually operating normally.
NOCO’s smart boost logic, for example, requires proper battery detection before normal boost output is enabled.
Therefore:
Do not declare a smart lithium jump starter defective solely because its disconnected clamps show zero volts.
Never Test Current by Putting a Multimeter Across the Clamps
This is especially important.
Do not switch your multimeter to the amperage setting and connect it directly between the positive and negative jump-starter clamps.
An ammeter presents a very low-resistance path. Connecting it directly across a high-current jump source can effectively create a short circuit and may:
- Blow the meter fuse
- Damage the multimeter
- Damage the jump starter
- Cause arcing
- Overheat test leads
- Create a fire or injury hazard
A normal handheld multimeter is not designed to directly measure the hundreds of amps a starter circuit may demand through its standard probe inputs.
If professional current measurement is required, technicians use appropriately rated DC current clamps, shunts, load-testing equipment, or vehicle diagnostic equipment.
Test 6: Verify Smart-Clamp Operation
For lithium jump starters with smart cables, the clamp module provides valuable diagnostic information.
Connect the unit to a healthy, compatible vehicle battery according to the manufacturer’s procedure:
Red clamp: positive (+) terminal
Black clamp: manufacturer-specified negative terminal or ground location
Do not guess if the vehicle has unusual battery access or manufacturer-designated jump points.
What Should Happen?
Depending on the model, you may see:
- A green ready light
- A boost indicator
- Battery-detected message
- Connection confirmation
- No error warning
Stanley’s smart cable system, for example, uses specific green and red indicator patterns for conditions including jump-start ready, reverse polarity, short circuit, low input voltage, high temperature, and other protection states.
If your unit repeatedly reports an error on a properly connected, healthy battery, inspect:
- Clamp contact
- Terminal corrosion
- Cable damage
- Jump starter charge level
- Battery voltage
- Temperature
Then consult the model-specific troubleshooting information.
Test Reverse-Polarity Protection?
Do not intentionally reverse the clamps just to see whether the protection works.
Reverse-polarity protection is a safety feature, not something that needs to be deliberately challenged during routine maintenance.
A wiring fault, defective unit, or incorrect procedure could still result in damage.
Test 7: Perform the Most Important Test—A Real Starting Test
The most practical way to determine whether a portable jump starter still works is to see whether it can provide useful current under a starter-motor load.
But perform this test intelligently.
Use a Compatible Vehicle
Confirm that the jump starter is designed for:
- The vehicle’s battery voltage
- The engine displacement
- Gasoline or diesel application
- The battery chemistry specified by the jump-starter manufacturer
A small jump starter failing to crank an engine beyond its rated capacity does not mean the unit is defective.
Do Not Disconnect the Vehicle Battery
Some people attempt to test a jump starter by disconnecting the car battery and trying to start the engine entirely from the portable booster.
That is not a good general-purpose DIY test.
The vehicle battery is part of the electrical system, and disconnecting it may affect:
- Electronic modules
- Voltage stability
- Memory settings
- Security systems
- Charging-system behavior
Use the jump starter as designed: in parallel with the installed vehicle battery, following the manufacturer’s instructions.
A Controlled Test Procedure
A practical test looks like this:
1. Fully charge the portable jump starter.
Starting with a known full charge removes one major variable.
2. Use a vehicle with a genuinely low battery only when needed.
Do not intentionally destroy or deeply discharge a healthy car battery just to test your booster.
If the vehicle already has a weak battery or is struggling to crank, that can provide an appropriate real-world test.
3. Turn off unnecessary electrical loads.
Turn off:
- Headlights
- HVAC blower
- Heated seats
- Audio system
- Other high-draw accessories
4. Connect the clamps correctly.
Follow the vehicle and booster manufacturer’s connection sequence.
5. Confirm the ready indicator.
Do not crank if the jump starter reports reverse polarity, overheating, or another fault.
6. Attempt a normal start.
Crank only for the duration allowed by your jump starter’s instructions.
Avoid repeated long cranking attempts.
7. Observe the result.
A healthy, correctly sized booster should noticeably improve cranking when the vehicle battery is weak but the engine and starting system are otherwise functional.
How to Interpret the Starting Test
The engine’s behavior provides useful clues.
Pass: The Engine Cranks Strongly and Starts
This is the clearest practical evidence that the jump starter can still perform its primary function.
After the engine starts:
- Disconnect the booster according to its instructions
- Check the jump starter’s remaining charge
- Feel the cables for abnormal heat
- Recharge the unit before storing it
Some charge reduction after a difficult start is normal.
Partial Pass: It Improves Cranking but Does Not Start
The jump starter may be working while the vehicle has another problem.
Possible causes include:
- Vehicle battery extremely discharged
- Starter motor drawing excessive current
- Poor battery-terminal connection
- Fuel problem
- Ignition problem
- Engine mechanical issue
- Jump starter undersized for the engine
Do not assume every no-start is caused by the booster.
Fail: Clicking or Very Slow Cranking
If the vehicle normally starts and all connections are good, weak performance can indicate:
- Low jump-starter charge
- Aging internal battery
- Poor clamps
- Damaged cables
- Excessive internal resistance
- Cold-temperature limitations
- Booster undersized for the engine
Recharge the jump starter fully and test again only after checking connections.
If the same weakness repeats, the internal battery may have lost usable capacity.
Fail: Jump Starter Shuts Off Immediately
Possible causes include:
- Overcurrent protection
- Short-circuit protection
- Excessive temperature
- Low internal battery voltage
- Faulty clamp connection
- Internal BMS fault
Do not repeatedly override a protection shutdown without understanding why it occurred.
A Voltage-Drop Test Can Reveal Bad Connections
For experienced users with appropriate equipment, voltage-drop testing can help identify excessive resistance in cables and connections while the starter is cranking.
This is different from merely measuring open-circuit voltage.
A connection can look clean and still develop a large voltage drop when hundreds of amps are flowing.
Potential high-resistance points include:
- Battery terminals
- Booster clamps
- Cable-to-clamp joints
- Vehicle ground connection
- Starter cable connections
A professional technician can measure voltage drop across individual portions of the starting circuit during cranking.
This is particularly useful if the jump starter appears strong but the engine still cranks slowly.
Should You Load-Test a Portable Jump Starter?
It depends on the type of jump starter and the equipment being used.
Traditional carbon-pile load testing is well established for automotive lead-acid batteries. Clore’s battery tester guidance, for example, describes applying a controlled load for a defined time and evaluating voltage under load.
That does not mean you should automatically connect a carbon-pile tester to every portable lithium jump starter.
A lithium booster contains:
- Battery cells
- BMS circuitry
- Temperature protection
- Current limiting
- Smart switching electronics
Applying an uncontrolled external load can trigger protection circuitry or exceed the unit’s intended operating conditions.
Unless the manufacturer provides a specific load-test procedure, use a manufacturer-approved tester or controlled vehicle-start test rather than improvising with a carbon pile.
Manual Override Is Not a General Test Mode
Some jump starters include a manual override feature for batteries whose voltage is too low for automatic detection.
Do not use manual override merely to see whether voltage appears at the clamps.
On NOCO’s GB40, manual override manually forces boost output on and disables normal safety protection; the manufacturer reserves it for situations where the connected battery voltage is too low to be detected.
That means incorrect use can remove protections against connection mistakes.
Treat manual override as an advanced emergency function, not as a diagnostic button.
Temperature Can Change Your Test Results
Battery performance is temperature-dependent.
A jump starter tested indoors at moderate temperature may perform differently after sitting overnight in a very cold vehicle.
NOCO, for example, specifies an operating-temperature range for its GB40 and separately specifies a narrower charging-temperature range.
If your booster performs poorly only in severe cold:
- Check its specified operating range
- Allow it to reach an appropriate temperature
- Fully charge it
- Re-test under safe conditions
Do not charge a lithium battery outside the temperature range permitted by its manufacturer.
Heat can also trigger protection.
A smart jump starter may temporarily refuse output when its internal battery is too hot. NOCO and Stanley both document temperature-related protection behavior on applicable models.
How to Tell Whether the Jump Starter Battery Is Wearing Out
Rechargeable batteries lose performance as they age.
The most useful signs are not simply calendar age but behavior under load.
Watch for these symptoms:
| Symptom | What It May Mean |
| Charges to 100% but quickly drops | Reduced capacity or internal battery deterioration |
| USB works but engine will not crank | Battery may lack high-current capability |
| Cranks once, then immediately dies | Reduced capacity or high internal resistance |
| Requires frequent charging in storage | Excessive self-discharge |
| Gets unusually hot during normal use | Battery, cable, or connection problem |
| Smart clamps repeatedly reset | Low voltage, overload, temperature, or electronic fault |
| No charge indicators at all | Deep discharge, charger fault, or internal failure |
| Swollen case | Stop using; possible battery damage |
| Burned clamp or cable | High resistance or overcurrent damage |
A battery can have acceptable open-circuit voltage yet collapse when loaded. That is why a static voltage measurement cannot replace a real performance test.
Testing a Jump Starter That Has Been Stored for Months
If the unit has been sitting in a trunk, garage, or cabinet for a long period, do not wait for an emergency to find out whether it still works.
Use this sequence:
Charge → inspect → verify indicators → test accessories → connect to vehicle → perform a controlled starting test if appropriate → recharge.
Pay extra attention to the battery after prolonged storage in extreme heat.
High storage temperatures can accelerate battery aging, while long periods at a very low state of charge can also harm rechargeable battery performance.
Follow the manufacturer’s recommended maintenance-charging schedule rather than assuming the pack can be ignored indefinitely.
Common Testing Mistakes That Give Misleading Results
Assuming Four LEDs Means the Battery Is Healthy
Charge indicators estimate state of charge, not necessarily battery health or available cranking power.
Judging a Smart Lithium Unit From Clamp Voltage Alone
The output may be electronically isolated until a battery is detected.
Shorting the Clamps Together
Never touch the positive and negative clamps together as a “spark test.”
Modern jump starters may shut down, but intentionally creating a high-current short is unsafe.
Using Manual Override Without a Battery
Override modes can bypass protection systems.
Testing Only the USB Port
Charging a phone requires dramatically less current than cranking an engine.
Intentionally Flattening a Healthy Car Battery
There is no need to damage a good automotive battery to verify your emergency booster.
Ignoring the Vehicle Battery
Sometimes the portable jump starter is blamed when the actual problem is an internally failed vehicle battery, corroded connection, defective starter, or mechanical engine problem.
When Should You Replace the Portable Jump Starter?
Replacement becomes reasonable when the unit repeatedly fails after being fully charged and correctly connected to a compatible vehicle.
Consider replacement if:
- It cannot hold a useful charge
- Starting capability has noticeably deteriorated
- The battery is swollen
- The housing is heat damaged
- Clamps or cables cannot be safely repaired
- The charger no longer recognizes the battery
- It repeatedly triggers unexplained internal faults
- Replacement batteries are unavailable or not user-serviceable
- The unit has become unreliable enough that you would not trust it during an emergency
For some professional AGM jump packs, the internal battery may be replaceable.
Compact sealed lithium jump starters are often not intended for user battery replacement. Follow the manufacturer’s service guidance.
Frequently Asked Questions
How Do I Know If My Portable Jump Starter Is Working?
Fully charge it, verify normal status indicators, inspect its cables and clamps, and perform a controlled jump-start test on a compatible vehicle. Successfully powering USB devices alone does not prove it can deliver sufficient starter current.
Can I Test a Jump Starter With a Multimeter?
Yes, but the usefulness depends on the design. A traditional lead-acid booster may show its internal battery voltage across the clamps, while a smart lithium jump starter may show zero volts until it detects a connected battery.
What Voltage Should a Jump Starter Show?
There is no universal reading for every portable jump starter because battery chemistry, internal pack voltage, and smart-clamp circuitry differ. Use the manufacturer’s specifications rather than applying one voltage threshold to all models.
Why Does My Jump Starter Say 100% but Not Start the Car?
The internal battery may have lost high-current capacity, or the problem may involve poor clamp contact, undersized booster capacity, a failing starter motor, extreme temperature, or a defective vehicle battery.
How Can I Load-Test a Lithium Jump Starter?
The safest practical load test is generally a manufacturer-approved procedure or a controlled jump-start on a compatible vehicle. Do not automatically use a conventional carbon-pile tester on a lithium jump pack unless its manufacturer specifically permits that test.
Can I Test a Jump Starter by Touching the Clamps Together?
No. Intentionally shorting the clamps is unsafe and provides no useful measurement of battery health.
Should a Jump Starter Spark When Connected?
Modern smart jump starters may be designed to reduce or prevent connection sparks. Lack of a spark does not indicate failure.
Why Is There No Voltage at My Jump Starter Clamps?
Many smart lithium models keep their high-current output disconnected until they recognize a vehicle battery. A zero clamp reading while disconnected can therefore be normal.
Can a Jump Starter Be Fully Charged but Bad?
Yes. An aging battery can reach its indicated full-charge voltage yet suffer from high internal resistance or reduced capacity, causing its voltage to collapse when the starter motor demands high current.
How Often Should I Test My Portable Jump Starter?
There is no universal test interval. Check the charge periodically according to the manufacturer’s maintenance recommendations and perform a functional check before long trips, severe-weather seasons, or whenever the unit has been stored for an extended period.
How Do I Test the Jump Starter Without a Dead Car Battery?
Start by checking charge retention, accessory outputs, smart-clamp operation, and connection to a healthy battery. For a true high-current performance test, use an approved load-testing procedure or test it when an appropriate real starting situation occurs rather than deliberately draining a healthy vehicle battery.
Why Does My Jump Starter Keep Beeping?
A beep can indicate reverse polarity, low voltage, short circuit, excessive temperature, timeout, or another protection condition, depending on the model. Read the specific LED/buzzer code in the owner’s manual rather than assuming every warning means a bad battery. Stanley’s smart cables, for example, use different warning patterns for several separate fault conditions.
Can Cold Weather Make a Good Jump Starter Seem Bad?
Yes. Battery performance can decline at low temperatures, and both the vehicle and jump starter may have less available starting margin. Confirm the booster is being used within its specified operating-temperature range.
Is a Jump Starter Bad If It Gets Warm?
Some warming during a high-current start can occur, but rapid heating, excessive temperature, burning odor, melting insulation, or repeated thermal shutdowns require investigation. Stop using a unit that appears physically damaged or dangerously hot.
Can I Test the Jumper Cables Separately?
An experienced technician can evaluate cable continuity and voltage drop, but a simple continuity beep does not prove a cable can carry starter current. High resistance may appear only under load.
A Reliable Portable Jump Starter Test Comes Down to Load Performance
The most reliable way to test a portable jump starter is to combine a full-charge check, physical inspection, electronic-function test, correct clamp connection, and a controlled real-world starting test. A device that successfully holds charge and cranks a compatible engine strongly provides much better evidence of health than LEDs or an unloaded voltage reading alone.
Be especially careful when testing smart lithium jump starters. Their BMS and clamp electronics may intentionally block output until a battery is detected, which means traditional clamp-voltage tests can produce misleading results. Never short the clamps together, connect a multimeter directly across them in current mode, or activate manual override merely for testing.
If the jump starter repeatedly loses charge, shuts down under load, overheats, or cannot crank an engine it is properly rated to start, the internal battery may be reaching the end of its useful life.
The best time to discover that weakness is before your car battery dies—not while you are stranded and relying on the jump starter to work.